Grainy Renders and Plenty of Light
 gwennovynne
Posts: 40
gwennovynne
Posts: 40
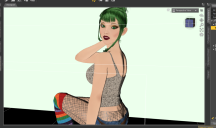
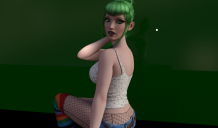
Hello all! I need some help when it comes to renders. I've looked this problem up several times before, and the answer I usually see is that the person didn't have enough light in the scene. However, my renders are coming out grainy even when my scene is completely flooded with light. In the studio picture, the "white" backdrop is actually a dark forest green that has so much light on it that it looks completely white. Strangely enough, when I don't apply any lights at all, the final rendered image actually comes out BRIGHTER than the one flooded by light. As you can see in the finished render, I'm still having big grainy spots on the final product no matter what I select. It's not going to a set time and then cutting off, either; pictures that take an hour to render are grainy, as are pictures that only take ten minutes. Can anyone point me in the direction of which setting would fix this? (the clearer of the two is how it looks with NO lights applied. It's brighter than the one with four lights on her)

Daz 3D is part of 
Connect
DAZ Productions, Inc.
7533 S Center View Ct #4664
West Jordan, UT 84084
Licensing Agreement | Terms of Service | Privacy Policy | EULA
© 2025 Daz Productions Inc. All Rights Reserved.
Comments
Is this Iray or 3Delight?
The "brighter with no lights" thing is probaby because you have the camera headlight set to "Auto when no scene lights" in your render settings, instead of "never."
This is Iray :) And I do have that setting turned on, but it seems like the copious amount of lights I had on her should be much brighter than they are, but I'm no expert in that area.
Just out of curiosity, what type of lights are you using (point, spotlight, linear, distant, mesh, etc)? Also, what type of material is the green background? The grain seems to mostly appear on the background which seems odd.
I have the same problem when I try to use more than one Distant Light in Iray. It seems like only one will show up, so I'm probably doing something wrong as well. I also get a little graininess in some areas where its shadowed.
The background is just a Primitive Plane with the reflection turned up, as is the floor. I was lucky with this one, usually the figures come out much more grainy. I usually use default lights that come with purchases from the store, but for this one I tried with one distant light, then two distant lights, and then two distant lights and two spotlights (shown in the preview pic) and it still wouldn't brighten up the scene or make it less grainy.
Iray is really picky about light. It doesn't just care about the number of lights, and their position, but the amount of light each light puts out. Iray is basically modeling real world photography. So do your best to do things the way real world photographers do things. For a portrait that generally means three, point, lights positioned around the subject. Then adjust the lumen output of each far higher than the default. The default is 1500. For a start try 10k. But that is almost always insufficient. You can add a fill light if you have any of the HDRI fill light packages the ones I have work very well. If not you can add a distant light shining above and behind the camera, again crank the lumen output way up, 125k roughly. If that doesn't get youa clear pic you can start messing with the render settings.
Yeah, when Iray starts getting fussy about using certain lights, you just have to experiment and try different things. Personally, I mostly use mesh lights and rarely a distant or spot light, but that's just the type of lighting I like in my pictures.
It might be easier if you make the model invisible, then you can get your lighting and background adjusted a lot faster. Then, once that's good, bring the model back in.
It's not just light, though, Gwen... I also had this problem a lot, but I did find a useful solution in the forums that had nothing to do with the amount of light. (Good thing too, because I use a lot of low-light scenes. Batman just doesn't look so scary in broad daylight lol... but I digress!)
The solution for me was in the Render Settings tab. Granted, the Max Time setting makes optimal rendering take hours on my computer, even for simple scenes. But I think it's so worth it.
I can't remember the name of the individual who posted this advice, or where the thread is. But I copied the Render Settings he recommended. They always help and almost always fix it. (I resequenced the advice because his instructions were scattered all over the map.) He said:
Under Progressive Rendering --
Minimum Update Samples: 5
Update Interval: 5
Min Samples: 20
Max Samples: 15000
Max Time: 7200000
Rendering Quality Enable: On
Rendering Quality: 1.0
Rendering Converged Ratio 95%
Under Optimization --
Max Path Length: 10
Architectural Sampling: Off
Caustic Sampling: Off
Instancing Optimization: Memory
Under Filtering --
Firefly Filter EnableL On
Nominal Luminance: 100
Noise Filter and Bloom Filter: both Off
Pixel Filter: Mitchell Radius 0.70.
Use Tone Mapping for the camera settings (if you're knowledgeable about photography - John A.). All the settings are there, Shutter Speed, F/stop and Film ISO. Smaller F/stop = bigger lens opening = more light.
He also had talked about "the Light settings under the light you are using" - but he wasn't using Iray light sources. The advice still applies, but if you're setting the Emission values in the Surfaces tab as I do, it's redundant. Still, just in case you're not, here's what he said: "set the Luminous Flux for the brightness, lower is less light 0.5 being a candle or there about and 1750 an ordinary 100 Watt bulb. Use the Temperature for the colour of the light, 1700 for a match, 6500 for daylight."
If you're confused about light settings, we can talk more about it. I ignore the last two paragraphs and it works just fine for me.
I hope that helps you!
Turning off architectural and caustic sampling is fine for outdoor renders. I would strongly discourage it for indoor renders.
He didn't explain what those settings do. Can you explain it, please? My indoor scenes look fine to me, but maybe I don't know what I'm looking for. Do you have renders showing the difference? Thanks, kenshaw --
Architectural sampling has to do with how interior lighting, and outside light coming in through windows etc. bounce off reflective surfaces.
Caustic sampling has to do with how light is cast onto a surface by specular reflection or transmission. Stuff like light through glass or water. This one is safer to turn off as it is less likely to occur but if you're trying for photorealism you should leave it on.
I'm at work right now. When I get home I'll set up a simple scene and render it with each on and with both on to see if I can show the differences.
Its not the render settings. It's the surface of the backdrop, and the shaprness of the light. The plane is at 100% Gloss value with 0 Gloss Roughness with no bump value. This makes light get trapped in single pixel pockets. Try using Matte, or increase the glossy roughness. It would also help if you made a spot light and chose Sphere or Cylinder with a width of about 15-30. Your light is too sharp, I can tell by the Box shes sitting on. It's casting a shadow on the backdrop. You see how crisp that shadow is? Thats very unnatrual. There is no such thing as a perfectly crisp shadow in the natural world. If you could touch shadows you could cut your finger on the edge of that puppy. Not only is it unappealing but super sharp shadows slow your render time and generate fireflys. The plane is too reflective The plane should have some kind of roughness. There is no such thing as a perfectly flat surface in the natural world. Light should always be able to be reflected and refracted. Otherwise, the light dont know what to do, so, it opts to stay put. Which will generate a firefly. You want light to be cast from its point of origin like a shotgun, rather than a laser. Direct hits, espeically direct hits on a 100% gloss surfaces, generates fireflys. Remember, the Larger your casting area is. (The bigger your mesh light is) The softer light becomes. Right now, you have it set to infinitely small, Which is phyisically impossible, hence your running into Anomalies.
Dont use Distant lights for the above reasons. You cannot make Distant light shadows soft. That is why they always look bad and that is why you get Rendering Anomalies.
Well, here's a problem I found when I adjusted the character's face to look downward with a spotlight angled upward. Look at the anomalies on the eyebrows(separate mesh, not layered image) in the first screenshot. No additional lights were used and the headlamp was off.
Settings:
Ray Length 8.01, Intensity 125%, Spread Angle 90, Light Geometry DISC, Height(Diameter) & Width 50, Luminous Flux 150,000, Temperature 7500, and the rest of the settings were on default. The second screenshot shows the orientation of the character in relation to the spotlight. The third screenshot with a spot render shows what happens to these anomalies when I lower the Height(Diameter) and Width setting back to their default of 10. Anyway, not sure why this happens. Just seems like dealing with the lighting is a huge pain in the arse.... heh. Any suggestions?
Those are reflections, or fireflies, caused by too much glossiness or to bright a light.
I've already tried knocking the Intensity back down to 100% and reducing the Luminous Flux to 100,000. Lowering the flux down any further will start making the character in the scene too dark, and adding additional lights would most likely increase the anomalies. Increasing Glossy Roughness of the surface just makes the anomalies larger and blurry. The only thing that seems to work is selecting the brow surface and reducing the Glossy Reflectivity from the default 0.50 down to 0.05 or zero.
For me, it raises the question of why this is an issue with the hair on the brows, but not the hair on the head, particularly in the front in areas where its thinner. Is it possible that some of the default settings are slightly off for the brow surface(doubtful)? I know, its probably a stupid question, but thought I would ask.
Note that Intensity is a 3Delight lighting parameter — if you've been juggling both that and the lumen values, it can cause unpredictable effects on the actual scene lighting as it's calculated at render time. When you do Iray renders, leave the Intensity setting at 100%.
I seldom use Lumen over 50.000, on any lights, and that is generally when using a Distant Light as the sun, even then I seldom go above 10,000 (that is at cd/cm^2). Set the Base Mixing to PBR Specular/Glossiness in the Surfaces tab for the surface causing the problem which opens up extra options.
I use different settings for every render so giving a set of settings wouldn't work. I keep this page open in a separate tab in my browser for reference as to what does what in the settings.
http://docs.daz3d.com/doku.php/public/software/dazstudio/4/referenceguide/interface/panes/surfaces/shaders/iray_uber_shader/shader_general_concepts/start#base_thin_film
Thank you, kenshaw. I'll pay attention to those details in future renders!
Thank you too, Angel - Wings - and to gwennovynne for posting this question. I'm learning a lot on this one --
Do you work with mostly dark or low-light scenes? Anything under 60,000 in Iray appears too dark, especially if I'm trying to mimmick mid-day sunlight or a well-lit interior, in which case I have to jack the lumins up to 90,000-120,000.
If I don't use at least 120k lumens for a distant light I cannot get a sunlight effect at all. I have no idea what other people are doing for sunlight in renders. I see people refering to simply setting sun & sky for their renders but that has never worked for me at all, are those people not rendering in HD maybe?
I do the full spectrum of outside, indoor, daylight, night and dark renders. I use distant, point and spot lights as well as sun and sky and emissive surfaces. Have a look at my render thread, the link is in my signature.
Actually architectural sampling has been marked as deprecated and will be removed in the next version of Iray. So don't get used to it, if it even works at all. The only thing that setting ever did was jack up render times. There is a reason it is marked for deletion.
The 4.11 beta denoiser will take care of grain. Its not perfect for skin, but for environments and distant people it works wonders. Give it a try, you may never go back. If your character is somewhat toonish you may be happier anyway. The denoiser is PERFECT for toonish renders. If you want a bit of a painted look, make a large render size (one that will take a while to render), and set the denoiser to start early. When the denoiser first kicks in you will get a funky watercolor looking image. This will continue to converge and clear up the longer you let the render go. Simply stop the render when you are happy. And there will be no grain. Grain is dead!
I see where the disconnect is coming from. If those are at the full resolution you rendered them at we're simply doing very different things with Daz.
I try to use lower energy settings on my lights as well. If the render is coming out too dark, I'll adjust the tone mapping in the Render Settings tab to get it to look better. Rendering engines historically have issues with the amount of light energy they are dealing with. Some will even reflect more than 100% of the light that's hitting the surface. So I've gotten used to using lower intensity lights and adjusting exposure in other ways rather than assuming that the exposure settings on the camera are correct and I need to change my lights.
@JonnyRay "Rendering engines historically have issues with the amount of light energy they are dealing with"
Iray renders faster and better (noise) with more light than less.
I fail to see how the resolution has anything to do with the lights and grainy renders.
HD renders are very different from other renders. I discovered this when I switched resolutions. This is pretty analogous to HD video which needs very different lighting as well.
This sounds interesting and I have no idea what you're talking about;) Care to elaborate on the matter?
My latest renders are 1920x1080 which is HDTV resolution and the reason for that is in case I use them in a video which is the resolution I normally use for videos. So what do you mean by HD renders? Unless you mean print resolution which means pixel size divided by DPI to get the printed image size i.e. 7200x5400 pixel render to get a 24x18 inch print at 300 DPI, which you could actually print at 150 DPI and get a 48x36 inch poster.