Question: render too dark
 Seeker Stock Art
Posts: 76
Seeker Stock Art
Posts: 76
QUESTION:
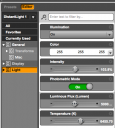
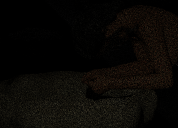
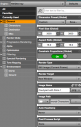
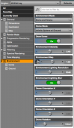
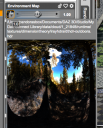
I'm baffled as to what settings I've got wrong in my lighting set ups and rendering. I'll attach screenshots in case it helps. My guess is my render settings are causing the problem, more specifically my dome settings. I chose an HDRI image, I believe for the environment map. My render engine is iray.
I just went through the entire Daz user guide plus a bunch of lighting/rendering tutorials on YouTube, but once again, it seems I'm stuck where I always get stuck: attempting to render a full scene with dome, ground, and architecture surrounding my figure. *deep sigh* I also tried searching the forum for answers but I'm clearly using the wrong search terms because nothing came up at all.
Help?
Daz 3D is part of 
Connect
DAZ Productions, Inc.
7533 S Center View Ct #4664
West Jordan, UT 84084
Licensing Agreement | Terms of Service | Privacy Policy | EULA
© 2025 Daz Productions Inc. All Rights Reserved.
Comments
Shutter speed is slower the lower the value (it's fractions of a second) - I think that is countracting the increase in ISO to make the scene dark. However, that won't account for (most of) the noise, is you scene enclosed? If so the HDRI isn't doing anything, or much, for the lighting and only any lights within the scene are contributing (note that a Distant Light is not inside -the gizmo shows only direction, the source is always external to the scene).
My recommendation on the Tone Mapping would be to ignore the ISO, Shutter Speed, etc. While they approximate actual camera settings, unless you're trying to match a photo where you have all that data it's more difficult than it needs to be.
Just focus on the Exposure Value. The default is 13. A lower value will result in a brighter scene. I tyipcally set mine to 12. There is a big difference by just moving it 1 or 2 points in either direction.
Because I almost always tweak my exposure and contrast post-render, I also tend to set Burn Highlights and Crush Blacks to zero and the Gamma to 1.0. This gives you the most range between the darkest and lightest parts of the image, but you almost certainly will want to use a photo editor afterwards to adjust the results to your liking.
When I do my lighting, I always set the aux viewport to Iray preview. That allows me to see what effect the changes I make to things like tone mapping, or adding/changing lights, will do. That could at least help you track down the problem.
One note: the ability to do this depends somewhat on your video card. When I had an older card that cound't handle the size of most scenes I would make, if I used Iray preview in the aux viewport and the system fell back to CPU, it made the system basically unusable.
Is the distant light the only light source in the render? If so what is the actual lumen value you have it set to? If its 5k that's far far far far too low. If you're aiming for a daylit scene increase it to 125k and see if that helps.
iRay likes a lot of light if you're using the built in lights. You'll a lot better results if you get or learn how to make mesh lights.
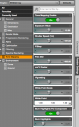
Thank you for all your excellent comments and suggestions. I reset all sliders to defaults and that seemed to do the trick. I must have fiddled with them and one of them was causing this issue. But I'm glad you mentioned the lumen value. I hadn't realized it was okay to go that high. I think I had it around 5K if I recall.
Out of curiosity, what is a usual/average lumen value for an indoor scene? You know, a ball park lumen to start with. I will do some research on mesh lights. This is the first I've heard of them.
I have no idea. I had no end of trouble with indoor scenes till i started using mesh lights. I bought a couple of sets and they really don't say there lumen values. They're clearly much brighter, or something, than the Daz built in lights can easily be made.
@kenshaw011267 "using mesh lights. I bought a couple of sets and they really don't say there lumen values. They're clearly much brighter, or something, than the Daz built in lights can easily be made."
Studio Photometric lights can take any lumen value you enter. Lumen values in the millions are possible. Lumen values >100,000 are commonly used. People get too hung up on using "realistic" lumen values.
Mesh lights may appear brighter because they using a luminosity value per unit area.
Spotlights can use geometry to have an equivalent lighting effect as a mesh light (area).
To be honest, one of the reasons such extreme values are often used for lighting is because the default exposure settings for rendering in Tone Mapping are set assuming you're doing an outdoor scene in full sunlight. Just like with a real camera, adjusting the exposure to account for the lower light levels will also help on interior light scenes.
That doesn't mean I don't still use lumen values that are higher than "real" lights at times. After all the end goal is the quality of the render, not proving how accurately you can simulate reality. But adjusting your exposure for interior verses exterior is a valid way to achieve your goals as well.
I tried approaching it as I would a standard camera but that really didn't work at all. for instance there's 2 seperate f/stops. One on the camera and one in the render settings. and the settings are different, its not like they match or anything. To this day I have no idea which one is the actual one used. I did have some luck with changing shutter speed and exposure but still it was just way easier to start using mesh lights, which pretty much everyone in the real world shooting in HD does as well, and stop pulling my hair out over all that stuff.
When I am lighting an indoor scene, I usually start at 100,000 lumens and then go up/down from there depending on how it looks in the Aux preview. The value changes on a per-render basis depending on the size of the area to be lit, tone mapping settings, effect I'm looking for, etc.
That said, I usually am between 100K and 1M lumens, lately trending toward the lower end of the scale as I learn other tricks.
Let me clear up the F-Stop question first.
The one that is on the Camera object controls your depth of field. Just like in a camera, higher f-stops allow more of the scene to be in focus while lower ones have a narrower range of what is and what is not in focus. However it has zero effect on the exposure of the image.
The F-stop in the Tone Mapping of render settings is used in concert with shutter speed and ISO film speed settings to change your exposure. TBH, I stopped trying to use those settings a long time ago. First, Studio seemed to want to "help" me by automatically adjusting one of the other parameters when I changed F-Stop. Probably trying to keep my exposure level the same, which defeated the purpose. Second, the tradeoffs aren't there like in a real camera. A 3 second shutter speed would be almost unusable in a camera without a really good tripod and even then you'd have all sorts of blurring. But it makes no difference in the rendering engine.
I've changed to just using the Exposure Value slider to get the rendering exposure that I want. I let it do all sorts of weird things to the "camera" values for exposure and don't worry about it since they are meaningless.
Second, I agree on the mesh or ghost lights. First, in photography they are similar to bounce lights or reflectors that people use in studio and artistic photography all the time. Second, they are great for adding some light on the main figures of my scene without coming up with all sorts of weird lighting configurations. Before mesh lights, we'd use a bunch of low intensity point lights to achieve something similar. Mesh lighting is just easier to shape and position in the say you need them.
Edit: Note to self, try to cut back on using the "First" and "Second" way to make your points.