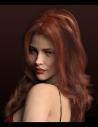
*Released dforce Sea Salt* Commercial
 chevybabe25
Posts: 1,278
chevybabe25
Posts: 1,278
https://www.daz3d.com/dforce-sea-salt-for-genesis-3--8-females
YAY for Strand Based Hair!!!
I'd like to include some general information and helpful tips for you to use my new sets in the store :)
What is the difference between strand based hair and fibermesh?
Strand Based Hair is generated inside Daz Studio. Fibermesh is actual mesh generated within Zbrush. Fibermesh can bring even the nicest computers to a painful crawl once it is imported into Daz Studio. Strand Based Hair is so much lighter!! There are a lot less hairs in your viewport, and the rest are generated during the render. I don't know all the magic behind that part, but its really awesome.
SBH ( Strand Based Hair ) is DYNAMIC! - Yes!!!!!!!!!!!!!. As an artist that has been working with Daz Studio and Poser for almost 20 years, this is what I always dreamed of!!!!!! Well I have also dreamed of being a millionaire too, but I'll settle for this  .
.
But what if I don't want to run a simulation? With the ones currently in the store, you do not need to run a simulation unless you want to. There are morphs that will move the hairs around like a traditional hair model too! The coolest part is that you can use the morphs before a simulation, without a simulation, and/ or after a simulation.
How do I use it? Select your figure and load the model like you normally would. Make sure that you do not have the geometry editor tool or the awesome Mesh Grabber Tool selected, pose your figure and render.
How do I use the morphs? These SBH hair models are currently in pieces to add more versatility. Selecting it in the scene tab will make the morphs appear in the parameters tab ( They are parented to the head) . Keep in mid that because these hairs are separate pieces they are grouped. So you will have to expand the options in the scene tab to find the individual pieces. Then just play with the sliders to your liking!
How do I simulate the hair? Welll there are several ways to do this, but the easiest way is to click on the simulate tab and click simulate. No extra settings needed. You can also use a timeline animation, or use the settings provided to use just gravity.
There will be so much versatility!! I have added a ton of separate surfaces so you will be able to easily kitbash these. Shut off certain surfaces to combine them with other SBH hairs orrrr maybe even combine them with some of the regular 3d hair models in the store and make a hybrid!
Technical Stuff:
Line Start With & Line End Width - This is how thick your hair is and how it tapers. I kept mine slightly thicker @ .09. and .03 to keep the amount of generated hairs to a minimum. If you want the hair to be thinner or taper more, you can turn this amount down, but oviously you will have to add more hairs.
Root Radius - This is the mode I have chosen to favor. It doesn't require painted maps or interpolation algorithms ( where hairs can go off in crazy directions for almost no good reason) and it is much more predictable for me when I import my hair from outside programs. With that said, there are no options for the cool stuff like frizz. Sorry guys :(
PS Points (per hair) - for those of you that model this is similar to CVS in a curve. It can control how smooth the hair will look. If you do a simulation and the hair just turns to a straight mess, try turning this down. The lower the setting, the more stiff the hair itself will behave and keep it's shape. Too low and you may end up with some jaggy edges. I feel like 20 to 30 is a good start for these stiffer styles.
PS Hairs (Per guide)- This is fairly self explanatory. If you want a fuller look, you can try adding more hairs. More hairs will probably require more computing power. But feel free to play with the setting.
PS Hair Tip Separation - This is a clumping option. Positive direction moves the hair away from the tip. Negative direction forms a clump at the tip.
Bias and Gain - This also has to do with clumping.
Bias is where along the hair shaft the clumping/non clumping starts. The lower the number the higher up the hair shaft the tip separation starts and vice versa.
Gain is how the bias transitions along the hair shaft.
I don't bother messing with these too much, but feel free to play with them.
PS Hairs and PR Hairs - PS hairs are supposed to be more accurate when simming than PR hairs. Also, I have found that PS hairs have a more delicate, natural look to them. PR hairs are great for adding a little extra bulk or frizz depending on how you use it. To get hair more dense looking, you can add PR hairs one or two at a time. I like to think of PR hairs as a multiplier, so you don't need to add a whole lot. If you want to make the hair appear a little more frizzy, you can play with the distribution radius and the tip separation for the PR hairs.
More Technical Questions * This will be added to as questions come up so all info can be placed in one convenient place
I want a certain section of my hair to drape more. Is there a way to do that? Yes! There are a few options you can use to adjust the draping so it suits your particular scene better. You can adjust the PS Points on the surface you select to something higher. The double dutch braids in particular are kept fairly low around 20. This keeps the whole hairstyle fairly stiff. I would start fairly high at maybe 60 and see what results you get and what you are exactly looking for. If it drapes better but its lost too much of your shape you can adjust other options as well.
You can also adjust the Local Shape Constraint Stiffness. Turning this down lower will also make the hair drape more while keeping the shape of the hair more in tact.
You can also adjust the tips of the hair with Local Shape Constraint Tip Stiffness. This will loosen up how the tips drape more. A lower number will spread those tips out more during a simulation.
All of this is a process of trial and error and what exactly you are looking for in an end result.
I want to simulate hair on a figure that is on a floor. When I sim the hair it makes an explosive mess. Help! This wasn't a question posed here yet but I know it's on the way :) You have a few options to handle this situation. If you are on an older computer that doesn't do so well with simulations, try keeping the model's head height as the same level the default figure loads in. I hope that makes sense. When a simulation is going it is essentially pulling those hairs to the end pose. Further away from default equals more pulling.
If you have a decent computer and you don't have an issue with simulations then you can simply change the simulation settings - Pose Transition Time to something higher than 1. The promos I did with Victoria on the floor all had a pose transition time of 3 - but I believe 2 probably would have done just fine.
Now go have some fun and be creative already!
I will be here checking this thread as often as I can to help, should you get stuck, have questions, or just wanna show off pretty pictures :
Daz 3D is part of 
Connect
DAZ Productions, Inc.
7533 S Center View Ct #4664
West Jordan, UT 84084
Licensing Agreement | Terms of Service | Privacy Policy | EULA
© 2025 Daz Productions Inc. All Rights Reserved.
Comments
I also want to take some time to offer some quick tips with this particular hair.
This is one of the hairs that I would not recommend changing dynamics settings on if you are animating a simulation. Leave them be for your own sanity :)
If you are just using gravity.. knock yourself out.. it should behave just fine.
If you find your hair is sticking to the body too much, use the "Head Bend Back Morph". before simulating. It also looks so much nicer after certain simulations.
Also.. I keep forgetting to add a special preset so that the hair is visible in the nvidia viewport. Sorry guys.. I honestly never use it. So fo those of you that are struggling to figure out why its rendering invisble in the nvidia viewport:
Click on the hair in your scene.
Click on the parameters tab.
Scroll down in the parameters tab and change the Viewport line tesselation sides and change it from 0 to 3.
Also Ill make sure I add the word hair to my products in the future. It's the small simple things i miss when I put these complicated things together.
Looks great.
I missed seeing this for some reason.
The hair looks great. I just wonder, if it can be exported as OBJ as well.
Thanks guys :)
Because this is Strand Based Hair it can not be exported into other applications, at least not to my knowledge.
Excellent! Looking forward to seeing lots of pretty pictures :)
Yeh, is a shame as i now render in blender.
I hear ya. I would love to see the dhair have some kind of converter; so you could get it in all the major softwares; like Blender Maya etc. Maybe someday. (bats lashes at the Daz Gods)
One thing I find the more I work with it about some dForce hair that's come out recently, is that it lacks glossy highlights. It kind of reminds me of the before images in hair conditioner commercials, whereas most of OOT's hairs look like the after. There are shader products available, and you can manually dial up gloss without them, but I'm usually disappointed at their appearance out of the box.
Well.. I think this depends on so many factors. The biggest of course being lighting. Some hdris are super reflective and some are super dull so building hair gloss just around that can be challenging.
I try to keep my glossy at middle of the road ( touchably soft, no extra silicone or blow out shine under most lighting)
Also, to be fair, Dforce Hair and more particularly the Strand Based Hair is fairly new tech..the vendors that are making these hairs are learning as they go. We are all rookies at this point in time. The traditional iray uber shader doesn't work the same on the strand based hair and the dual lobe shader made specifically for the dhair is also new and a bit difficult to understand too.
Im sure as time goes on, the shaders will improve, as will the styles and overall look of the hair. This has been a huge learning process.
It would be really of advantage if the product name would include the word "hair" at some point. I had to open the the promo to find out what this even is about. And I wonder if it comes up using the shop search function for hair.
Noted. I'll try to remember that in the future. There will probably be 3 or 4 more before you see a change though..
I have not had any luck with strand based hair. The Sea Salt hair looks fantastic and I decided to purchase and give it a go... Still no luck. Invisible in viewport and daz memory crash.
HOWEVER, thanks for posting the tips. Im certain that alot of the issues I have with strand based hair are simply because I dont know how to control it. Im going to play with it again later and see what happens using your tips (now I have to go build a fence for my chickens ).
).
Beautiful hair! I hope I get it working.
There are two reasons its invisible.
1: You are using the nvidia viewport ( which i apologized for not making a preset for that in the post above).. with directions on how to fix that
2: You have the geometry editor or ManFridays Mesh Grabber stuff on. Just select a different tool .. like the active pose tool and stuff should show up.
Crashing can occur if you have an older computer. If you do.. I would avoid the simulation part. You can just select the hair, select the parameters tab and select :Freeze Simulation: On
You can use all the morphs like a traditional hair even if if you can not simulate it.
nvidia viewport? Ill look into that. Im certain that the geometry tool isnt selected and I dont have Mesh Grabber. I can simulate the hair just fine. The memory crash happens at render.
I am attaching a picture of the nvidia option. If you don't use that and its still rendering invisible, Ill have to ask tech and see whats up with that. There is nothing worse than buying new toys and not being able to use them.
Thank you so much for this tutorial! The hair is in my cart and looks beautiful. I do agree that "hair" should be added to the name though. At first I thought this thread was about Himalayan Salt lamps lol!
You are so very welcome :) Enjoy!!
LOL! I will definitely start adding the word hair to the names.
This made me LOLAW (Laugh Out Loud At Work) - I read it with some slightly different emphasis and heard 'The Cart looks beautiful with this product in it". You KNOW you have reached 'A Level' when just having certain things in your cart make the cart look beautiful and you get to a point where you are 'designing' a cart by contents and making purchases based on what makes the cart look good. HA HA!
My name is Gogger, and I am a shopaholic. Today I struggled to find the right selections to make my cart look good. In the end I bought a lot of stuff I will never use, my cart looked FABULOUS!
P.S. I bought this hair this morning, and my cart looked amazing too!
LOL!
"Scroll down in the parameters tab and change the Viewport line tesselation sides and change it from 0 to 3."
OK, this fixed it. I shouldve read down further. The hair is now viewable in my viewport and renders without crashing. Its a bit heavy on the memory but thats just because of my out-dated video card. That nvidia preset would be nice.
How do you change parameters like Root Radius and such? I didnt see those items in the parameters tab and when I choose edit strand based hair daz tells me that there is no strand based hair node selected.
Yay! Glad we got that sorted!!!
Those settings listed above are on the surfaces tab. There are a lot of surfaces, so you will have to tweak each one individually ifyou are tempted to play with stuff.
I also can say.. this hair is really finicky with the combinaton of settings and simulation. So if you do or plan on doing an animated simulation, I heavliy advise against messing with the stiffness settings. It took me several 12 hour days to get a setting to work properly.
If you use the gravity option which just relaxes the hair into the current pose, (Start Bones From Memorized Pose.. OFF) you should be just fine.
And for best results lift the hair with the morphs provided before starting a simulation :)
That's one of the hurdles I've come across with longer hair that I've been working on. The shorter hair seems a LOT easier to set up dForce settings for. Longer hair is insanely difficult and time-consuming. Even just changing the length by a little bit usually means you have to go in and change several other settings to get the same movement as you had before the length change. You have to go in and do a ton of trial and error testing, like you said hours and hours of work, to find those "magical combinations" of settings that will allow for both proper gravity movement and keeping the hair's style intact at the same time. My hat is off to you and other PAs who have managed to create long hairstyles that do that. And each hairstyle created is different and seems to react completely differently to the same settings, so you really can't use the same settings from one hair style to another without a lot of tweaking and changing and a lot of trial and error testing. I've tried several times to create longer styles and it's crazy time consuming and difficult. So - you rock!
The Sea Salt hair promos look awesome and it's in my cart. I'm just working on some "Cart Janga" to see what all I want to add. Thank you for your amazing patience in creating these long strand based hairstyles! The results look fantastic and I can't wait to render some scenes with it. :)
Great! Thanks Chevybabe, I appreciate the help.
Thanks Diva!! This is exactly why I have vowed to alternate between long and short hairs after this one. The longer hairs are just so much more work.
You are so very welcome!! Enjoy !!
Thanks a lot for all that great information. Wish you published that earlier, took me a long time to figure out half of that. Please make sure your product includes a big howto, that really improves the experience a lot for newcomers, with such a complex piece of tech.
I don't really need another dForce hair right now, but your post made me want to buy it. Earmarked for the next shopping spree.
And yes, I too went into this expecting a fancy shader that can generate salt crusts, on ships and mermaids and whatnot :)
(btw. don't know your hair yet, but with others, hair hitting floor can get very very excited; turning up collision response damping ~.9 solves that)
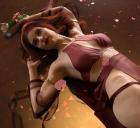
So I got my Sea Salt, and got a pretty girl in a bikini to try it on. Lighting is from the Altern8 render settings plus a spotlight overhead and another from the side. No scenery for reasons which will become apparent.
This is with the sim setting Most. First of all, this is not a hair for puny GPUs, especially with that sim setting, which increases vertices from the default 1,863k to 2,929k, which is a lot! What you see, with a non-HD character, the Classic Bikini for G8F from here, no shoes, and a few lights and a couple of Chrome windows took up 7,358 Mb on my 2080ti.
I did this two ways. The first is Blonde 1 out of the box. For the second I increased Glossy Layered Weight from 0.22 to 0.8 and reduced Base Roughness from 0.35 to 0.1. The first has that dry look, while the second is a bit too glossy, especially the flyaways and, uh, no longer blonde. I'm not sure why it's no longer blonde, because SBH is still a mystery to me, but it doesn't look blonde to me.
Anyway, if you're on a tight memory budget, don't mess with the simulation settings presets, or you'll be on your CPU in a hurry.
Oh, if anyone's curious, this is the lovely Deirdre by 3-DArena over at Rendo.
I'd been avoiding strand based hair because of the inability to see it in the viewport. I'll try your tip on another hair, and if it works for me, I'm grabbing this new one. It looks great!
I love this hair! Only one problem. I can't see it in Smart Content when I have a G8F character loaded with Filter by Context checked. I can find it in Content Library, but not in Smart Content. It does show up for G3F in Smart content, however.
The G8F one went into Lost & Found for me. Just need to update the category.