Volcanic Misery

vonHobovonHobo Posts: 1,706
edited December 2020 in The Commons

https://www.daz3d.com/naurfire-volcano

I really want this product to work for me, but when I load it into the default perspective scene, it appears to be so large that moving and panning do almost nothing. 

To even see the entire volcano, I had to modify Translate Y to -10000 and Translate Z to -90000.

I realize a mountain is big, I have several (for instance The Highlands) but they all load into the default perpective where you can start working with the landscape. This item is ridiculous in this way.

Now that I want to add fire and smoke, I am also forced to change the Y, Z to get these in the right placement with the volcano.

Is there any easier way to do this? Am I missing something obvious?


Untitled-1.jpg
1182 x 652 - 366K
Post edited by vonHobo on

Comments

  • watchdog79watchdog79 Posts: 1,026

    Would using the grey scale slider to set it to a much smaller sized object, then adding and posing everything, then scaling it up some to your liking, work, perhaps?

  • vonHobovonHobo Posts: 1,706

    watchdog79 said:

    Would using the grey scale slider to set it to a much smaller sized object, then adding and posing everything, then scaling it up some to your liking, work, perhaps?

    By gray scale slider do you mean the Scale parameter? 

    I would like to try that. 


  • vonHobovonHobo Posts: 1,706

    https://www.daz3d.com/planet-lava

    This might be better for me. But it does not say Iray anywhere on the product.

    And I wonder if it works in Iray because it does mention

    • UberEnvironment light set included in Scene

    .??

  • watchdog79watchdog79 Posts: 1,026

    von Hobo said:

    https://www.daz3d.com/planet-lava

    This might be better for me. But it does not say Iray anywhere on the product.

    And I wonder if it works in Iray because it does mention

    • UberEnvironment light set included in Scene

    .??

    Products with SKU below roughly 20000 can be safely expected to not have Iray. Maybe some received a recent update, but I think that would have been explicitely stated somewhere.

  • watchdog79watchdog79 Posts: 1,026

    von Hobo said:

    watchdog79 said:

    Would using the grey scale slider to set it to a much smaller sized object, then adding and posing everything, then scaling it up some to your liking, work, perhaps?

    By gray scale slider do you mean the Scale parameter? 

    I would like to try that. 


    Yes, that grey slider that says "Scale". Mind, that parented objects should be affected by adopting the same scale modifier as the parent too.

  • vonHobovonHobo Posts: 1,706

    watchdog79 said:

    von Hobo said:

    watchdog79 said:

    Would using the grey scale slider to set it to a much smaller sized object, then adding and posing everything, then scaling it up some to your liking, work, perhaps?

    By gray scale slider do you mean the Scale parameter? 

    I would like to try that. 


    Yes, that grey slider that says "Scale". Mind, that parented objects should be affected by adopting the same scale modifier as the parent too.

    Thank you! I'll give it a try. There isn't really another nice looking volcano on DAZ so I need this to work. smiley 

  • NorthOf45NorthOf45 Posts: 5,553

    You can frame the selected scene item with the targeting reticule in the View controls. You might end up quite a ways out, but you don't have to scroll and pan for 5 minutes to get there. You can point the camera straight down and frame the terrain, then you'll get something like a satellite's-eye view.

    Or you could try zooming back to mimic a wide-angle lens (right-click on the View controls-Magnifying glass and push the mouse forward, but don't click the left button at the same time, that's how you lose the cursor). The scene will be very distorted if you go really far, but at least you can see everything to get it all in place. You should be able to find a good compromise to work with. Drop a camera at locations you would like to re-use so that you don't have to move the perspective view around so much.

  • vonHobovonHobo Posts: 1,706

    watchdog79 said:

    von Hobo said:

    https://www.daz3d.com/planet-lava

    This might be better for me. But it does not say Iray anywhere on the product.

    And I wonder if it works in Iray because it does mention

    • UberEnvironment light set included in Scene

    .??

    Products with SKU below roughly 20000 can be safely expected to not have Iray. Maybe some received a recent update, but I think that would have been explicitely stated somewhere.

    Ah yes. This one says SKU:15082. So I'm sure it is 3Delight then.


  • vonHobovonHobo Posts: 1,706

    NorthOf45 said:

    You can frame the selected scene item with the targeting reticule in the View controls. You might end up quite a ways out, but you don't have to scroll and pan for 5 minutes to get there. You can point the camera straight down and frame the terrain, then you'll get something like a satellite's-eye view.

    Or you could try zooming back to mimic a wide-angle lens (right-click on the View controls-Magnifying glass and push the mouse forward, but don't click the left button at the same time, that's how you lose the cursor). The scene will be very distorted if you go really far, but at least you can see everything to get it all in place. You should be able to find a good compromise to work with. Drop a camera at locations you would like to re-use so that you don't have to move the perspective view around so much.

    I will try this first suggestion, including the camera. Thanks.

         "You can frame the selected scene item with the targeting reticule in the View controls."

    I will have to figure this one out to do it. LOL Not sure what the reticule is. Learning.


  • NorthOf45NorthOf45 Posts: 5,553

    The reticule is the stylized box with the little cross in the middle (the one under the magnifying glass). Hover your pointer over the View controls and there should be an infotip that appears give a brief description.

  • QuasarQuasar Posts: 651

    von Hobo said:

    NorthOf45 said:

    You can frame the selected scene item with the targeting reticule in the View controls. You might end up quite a ways out, but you don't have to scroll and pan for 5 minutes to get there. You can point the camera straight down and frame the terrain, then you'll get something like a satellite's-eye view.

    Or you could try zooming back to mimic a wide-angle lens (right-click on the View controls-Magnifying glass and push the mouse forward, but don't click the left button at the same time, that's how you lose the cursor). The scene will be very distorted if you go really far, but at least you can see everything to get it all in place. You should be able to find a good compromise to work with. Drop a camera at locations you would like to re-use so that you don't have to move the perspective view around so much.

    I will try this first suggestion, including the camera. Thanks.

         "You can frame the selected scene item with the targeting reticule in the View controls."

    I will have to figure this one out to do it. LOL Not sure what the reticule is. Learning.


    If they are turned on in your viewport, they are the camera buttons in the top right corner of the viewport window. The one with the + in a box will frame whatever item you have targeted. To bring the view back in close, select something small in the scene and target that. Sometimes it doesn't work right, but I can usually fix it by rotating the camera view I'm in to a different angle and then clicking the target button again. Also, those buttons can do different things depending on if you use the left mouse button or the right mouse button so try them out to see how they can help. I also tend to use the W or S keys to zoom in and out a little faster when the camera isn't too far from the center of the scene.

    Screenshot 2020-12-29 151247.png
    290 x 245 - 16K
  • vonHobovonHobo Posts: 1,706
    edited December 2020

    NorthOf45 said:

    The reticule is the stylized box with the little cross in the middle (the one under the magnifying glass). Hover your pointer over the View controls and there should be an infotip that appears give a brief description.

    Worked like a charm! Thank you.

    However I am still left with how to get in close now (the reverse problem as first metioned) because the mouse wheel almost has no effect. The volcano is of such immense proportion that zooming would take forever to get close in. Maybe play with Z translation at this point to get the frame I want so that when I add a figure later I'm adding it front and center? Otherwise, the figure could be who knows where. 

    v.png
    669 x 677 - 191K
    Post edited by vonHobo on
  • vonHobovonHobo Posts: 1,706
    edited December 2020

    Quasar said:

    von Hobo said:

    NorthOf45 said:

    You can frame the selected scene item with the targeting reticule in the View controls. You might end up quite a ways out, but you don't have to scroll and pan for 5 minutes to get there. You can point the camera straight down and frame the terrain, then you'll get something like a satellite's-eye view.

    Or you could try zooming back to mimic a wide-angle lens (right-click on the View controls-Magnifying glass and push the mouse forward, but don't click the left button at the same time, that's how you lose the cursor). The scene will be very distorted if you go really far, but at least you can see everything to get it all in place. You should be able to find a good compromise to work with. Drop a camera at locations you would like to re-use so that you don't have to move the perspective view around so much.

    I will try this first suggestion, including the camera. Thanks.

         "You can frame the selected scene item with the targeting reticule in the View controls."

    I will have to figure this one out to do it. LOL Not sure what the reticule is. Learning.


    If they are turned on in your viewport, they are the camera buttons in the top right corner of the viewport window. The one with the + in a box will frame whatever item you have targeted. To bring the view back in close, select something small in the scene and target that. Sometimes it doesn't work right, but I can usually fix it by rotating the camera view I'm in to a different angle and then clicking the target button again. Also, those buttons can do different things depending on if you use the left mouse button or the right mouse button so try them out to see how they can help. I also tend to use the W or S keys to zoom in and out a little faster when the camera isn't too far from the center of the scene.

    Thanks! Now that I've got it framed. I need to zoom in, but W and S don't seem to do anything on my workspace.

    Maybe because the scene is so immense? And scrolling with the wheel would take half a century to get in closer. I can barely see any changes as I scroll the wheel to zoom in.

    Too bad there is no way to crop/zoom in DAZ Studio in one step like in Photoshop. Just outline a box and click zoom. Did a quick google search and found nothing.


    v.png
    669 x 677 - 191K
    Post edited by vonHobo on
  • QuasarQuasar Posts: 651

    Try pressing shift+k to turn on keyboard navigation. At that far distance, even the keyboard navigation will be really slow. It would be nice if DAZ would update the zoon feature for these situations because it can be annoying with big scenes like this.

  • vonHobovonHobo Posts: 1,706
    edited December 2020

    Quasar said:

    Try pressing shift+k to turn on keyboard navigation. At that far distance, even the keyboard navigation will be really slow. It would be nice if DAZ would update the zoon feature for these situations because it can be annoying with big scenes like this.

    Thanks for the help ...

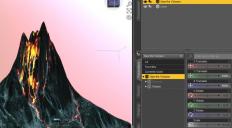
    Well, here is what I did to get the scene attached:

    1. Load the volcano, fire and smoke props, and textures.

    2. Group the above elements.

    3. Scale the Group to 5%. Yes 5%. LOL

    4. Load and pose the dragon, and move up into sky with Y translate.

    5. Add the dragon's breath from Muelsfell Fire Storm Iray FX.

    6. Select a skydome as background.

    I don't think there is any loss of detail in the volcano at 5% because as you can see in the second picture (which I did not scale) they have basically the same amount of detail.


    va.png
    669 x 677 - 751K
    va2.png
    669 x 677 - 647K
    Post edited by vonHobo on
  • RGcincyRGcincy Posts: 2,839

    I had this problem of slow panning in a large city scene. You can got to your translate parameter dials, select the wheel icon, select Parameter Settings and change nudge to something larger like 10, 50, 100. That will make much bigger changes when you drag the sliders. Alternatively, you can go to Tool Settings pane and pick Scene Navigator. Type a larger value of in the Move Control box and use the buttons in the navigator to move around.


  • vonHobovonHobo Posts: 1,706

    RGcincy said:

    I had this problem of slow panning in a large city scene. You can got to your translate parameter dials, select the wheel icon, select Parameter Settings and change nudge to something larger like 10, 50, 100. That will make much bigger changes when you drag the sliders. Alternatively, you can go to Tool Settings pane and pick Scene Navigator. Type a larger value of in the Move Control box and use the buttons in the navigator to move around.


    Thank you very much for the info.

    I will remember that next time I encounter this problem. 

    I think for this particular prop however, if I had been able to pan in larger increments would not have made a difference because the prop is just way bigger than it needs to be. I had to shrink it down to get it to look even halfway beleivable next to the dragon. I have not had this problem with any other environments so I'm a bit dissapointed that the artist made the default size so large, but it's the only volcano on DAZ so I will use my workaround. 

    There have been so many times I did want to pan in larger increments with other scenes. I will keep your instructions handy. 

  • Place helper nulls around the scene you can frame

  • vonHobovonHobo Posts: 1,706

    WendyLuvsCatz said:

    Place helper nulls around the scene you can frame

    Tried to look for info on helper nulls, but found nothing. Where is it explained?

    The only thing I found is something about Target Nulls for animation.


  • von Hobo said:

    WendyLuvsCatz said:

    Place helper nulls around the scene you can frame

    Tried to look for info on helper nulls, but found nothing. Where is it explained?

    The only thing I found is something about Target Nulls for animation.


    they are just nulls laugh 

    create null

    can place where you are looking in the viewport in options same as lights and cameras

    I called them helper nulls as you can frame them and they don't render

  • vonHobovonHobo Posts: 1,706

    WendyLuvsCatz said:

    von Hobo said:

    WendyLuvsCatz said:

    Place helper nulls around the scene you can frame

    Tried to look for info on helper nulls, but found nothing. Where is it explained?

    The only thing I found is something about Target Nulls for animation.


    they are just nulls laugh 

    create null

    can place where you are looking in the viewport in options same as lights and cameras

    I called them helper nulls as you can frame them and they don't render

    I will try that. Thanks Wendy. 

  • DiomedeDiomede Posts: 15,225

    WendyLuvsCatz said:

    Place helper nulls around the scene you can frame

    Thanks, good tip.  

  • BTW the thread title also describes the aftermath of a hot chilli dinner exiting one's body very aptlydevil

  • vonHobovonHobo Posts: 1,706

    WendyLuvsCatz said:

    BTW the thread title also describes the aftermath of a hot chilli dinner exiting one's body very aptlydevil


    LOL. So true!

Sign In or Register to comment.