Are my render settings too high?
 deleted user
Posts: 1,204
deleted user
Posts: 1,204
When is too much, too much? Am I going overkill here or undershooting?
I know what all the functions are and what they do but I'm curious what settings are recommended.
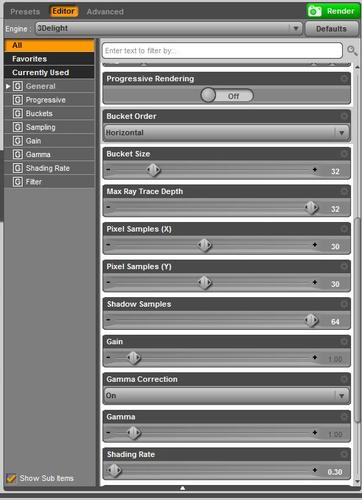
Capture2.JPG
530 x 732 - 79K
Daz 3D is part of 
Connect
DAZ Productions, Inc.
7533 S Center View Ct #4664
West Jordan, UT 84084
Licensing Agreement | Terms of Service | Privacy Policy | EULA
© 2025 Daz Productions Inc. All Rights Reserved.
Comments
The ray trace depth looks excessive unless you have lots of overlapping refractive glass, or a hall of mirrors. The samples look a touch high unless you are using a lot of soft shadows with a fairly high softness, or depth of field, especially as the shading rate isn't that low.
Greetings,
As Richard implied, it depends on what you're rendering, but for the 99% of images, oh my goodness yes.
Your Max Ray Trace Depth should generally be around 2-4, unless you've got reflective/refractive surfaces, and even then I'd render to see how it looks first.
The bucket size is more dependent on how many cores you have vs. the image resolution of your scene, IIRC, but there's not a huge amount of reason to bump it up like that.
Pixel Samples (X/Y) essentially determines how much oversampling it does at each point. I haven't found it to be very awful to have high numbers there, but I typically keep them around 12-16. This will matter a whole bunch more if you use Deep Shadow Maps, because (IIRC) the deep shadow maps use the pixel sample numbers to oversample the lights being cast, and that'll slow it down a whole bunch.
Shadow samples is excessive. I've found 12-16 works well for me for that, and the real place to tune is on the shadow samples for the actual lights being used.
Gamma on with a Gamma of 1.0 is not (if I recall properly) correct. Typically if you turn Gamma on, you'll want a Gamma of 2.2. I leave Gamma off, personally.
Shading rate of 0.3 is fine. You can drop that down to 0.5 or even 1.0 for test renders, and it makes a good bit of difference in speed, IIRC, but 0.3 is good for final quality. (I used to use 0.1, but I got my fingers slapped (virtually) by one of the devs on here who said it's unnecessary, super-slow, and actually harms the image in certain cases.)
There are a bunch of threads on here about render settings, especially ones comparing shadow samples in render settings vs. shadow samples in UE2 and AoA lighting, and which ones give the most bang for the buck.
-- Morgan
p.s. A lot of this is just my experience over time; definitely poke at some of the other threads if you can find them, as some folks have more hardcore knowledge than I.
Thanks for your input. :)
Your Bucket size is fine 32-64 is ok but your renders may get stuck on a particularly complex bucket. It's really only important for determining what gets rendered where and in what order in your scene.
Raytrace of 4 is usually enough for hair and glass. Higher levels are used for insane refractions and reflections on complex objects.
Pixel samples are way over what you should be using.
4-8 draft
12-16 final render
21-24 Final render with Depth of Field and | or Volumetric lighting.
Shadows samples are fine at 32 unless you are using occlusion or really soft shadows. Even then it's not very noticeable.
You can ignore the gamma and gain controls. You are better off popping the final render into photoshop and doing corrections there.
Shading rate...
If you are doing a high resolution image say 4k size you can actually get away with .5 - 1.0 shading rate.
Your setting is fine for like 1080p resolution. Smaller and you are going to have to use .2 or .1
I had meant to say that the gamma correction button isn't needed for gamma 1, it performs an anti-correction on textures if you adjust gamma so that they aren't over bright. I would, however, disagree that gamma correction is best done in an image editor - especially if you are likely to make other colour or tonal adjustments - as DS saves only 8 bit per channel images so you want as many calculations as possible done on the higher precision internal calculations before saving the render for further editing.
My problem always was that anytime I touched the gamma and gain settings, Daz Studio would re-optimize images. So It was a bit of a pain to play around with them.
But yes, modifying the pixels as they are being created is the far superior option. That goes for the sharpening filters as well.