Skin Rendering with LUX/ Realty 4 is Way too Shiny!! Also, Noise.
 DrowElfMorwen
Posts: 538
DrowElfMorwen
Posts: 538
I just upgraded from Reality 2.5 to 4 for DAZ Studio, and got the newest version of LUX render as well. I was hoping with the new set up it'd be easier to adjust settings and such, but I feel like I don't know what I'm doing. I have two main problems.
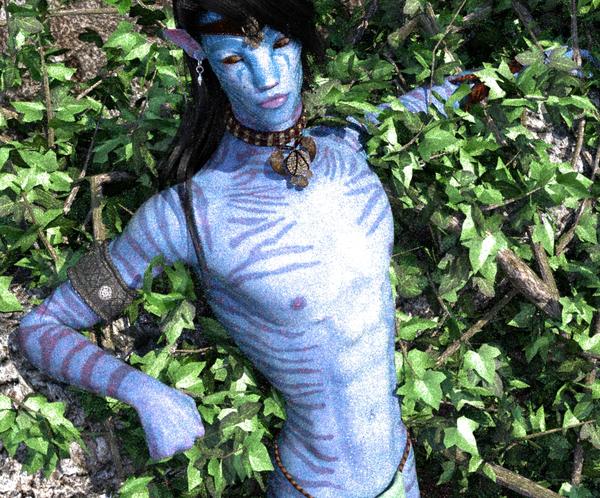
First, I am trying to render a Na'vi in the forest, but his skin won't stop being super shiny--even though he's on skin settings.
Second, I have 3 regular distant lights and a sun light to my scene, and a couple mesh lights--I figured the more lighting, the better for the render, but I still get a lot of noise, even after trying to follow a tutorial (here: http://preta3d.com/kill-the-render-noise-form-your-lux-scenes/) about adding mesh lights to down the amount of noise.
Mostly, I'm annoyed by the skin problem, and if anyone has a suggestion, it'd be great. I've seen another thread on here about skin in LUX, but I don't know how people are getting all those menus up. I can't locate them at all--and the screenshots look like they're from DAZ, which confuses me more >.> Anyway, I'm hoping a user of Reality 4 would have an answer... I would be most grateful.
Daz 3D is part of 
Connect
DAZ Productions, Inc.
7533 S Center View Ct #4664
West Jordan, UT 84084
Licensing Agreement | Terms of Service | Privacy Policy | EULA
© 2025 Daz Productions Inc. All Rights Reserved.
Comments
Oh, and the setting in Reality...
EDIT to add: I adjusted the sunlight, which has seemingly taken care of the skin problem, but I still do not understand why I have so much noise in the scene...
I don't use Sun much, but I've heard people say the sun light is more noisy than meshes. Many people avoid using it because it is also very harsh and can make skin look quite nasty. I would suggest replacing this with a mesh light. What I do is to position a mesh in the air (say about 6 metres) pointing down at the subject from the direction I want the sun to come from. There is a setting in the new R4 mesh lights in the Shadow Control area called "sharp" (I think). This scales the mesh right down so that it will give more sun-like shadows.
I would add no more than two soft (large mesh) mesh lights. For example one on each side of the camera, on approximately the same plane as the camera, or behind, and pointing in towards the subject (2-point lighting set up used in photography), but of course you can try various positions (including a top light which can be quite effective).
Although you do want light to reach the subject, adding too many lights will slow down the render because calculations are needed for every light source, and really, much of this extra lighting is unnecessary and will be wasted.
On the skin, because R4 uses "SSS" by default and this set up (which uses volumes) takes longer to render, you will find your skins initially more noisy than using simple gloss (as in R2.5). I'm afraid this means being even more patient. As long as you have good lighting the noise will clear up.
On this particular skin set up I see the specular colour is quite high. It looks equivalent to about 50% grey or more. Even with spec maps I wouldn't have the colour that high, unless it is a very dark map. This is likely to be contributing to the excess brightness of the skin, so try bringing this value down to 30% or 25% even, i.e. bring the slider in the colour picker down to a quarter to a third of the way up from 0 (pure black). I can't be sure what's likely to work without seeing the map itself.
Thank you for the advice! Currently I am still working on it as I set up before, but I changed around the light settings, playing with them, and also changed the kernel from "auto linear" to "contrast" and it cleared away all the brightness, but I'll keep in mind tro try your settings. Right now it has been rendering for two hours and most noise is gone, but I'm stuck with firelies around his face (the ear and eyes are especially bad) >.> I read that someone else changed some SSS sampling (low discrepancy sampler for SSS?), but I have no idea what the poster was talking about or how to change it.
Here is my render now. I'm going to leave it overnight, to see if the fireflies persist or disappear.
Oh, I also looked under the Lights tab in Reality, but I don't see anything about shadow settings. :(
if you use "sun" change your settings in LuxRender to Linear,
sensitivity to 100
exposure to 125
f-stop to 16
gama 2.2 - 2.4
Well that is looking very promising now.
I've never noticed the "contrast" kernel setting, but I'm glad it worked in this case. However, I'd suggest you always use Linear (other than for animation, I believe, but I never do animations). Linear is the tone mapping kernel that best models the way a real world camera responds and will give more predictable results. Adjust the camera exposure settings to get a good exposure before you fiddle with the light group intensities (e.g. if it is very dark, open f-stop, reduce shutter speed or increase film sensitivity rather than upping the light gain). Film sensitivity (ISO) steps give you finer adjustments than the others, I find those handy for tweaking.
The menus you can't find and settings you can't work out, I'm wondering if these are actually for Luxus and not Reality, in which case they won't be very helpful.
Those "hotspots" (bright specks) can be a curse. I think there are a number of causes, but I've never heard a satisfactory explanation that accounts for all of them. Some of them seem never to go in a reasonably time frame. If I have a few isolated ones I fix them with the heal tool or a hot pixel filter in Photoshop; groups of them though are hard to get rid of by postwork without ruining the surrounding area, so it is better to keep rendering to see if they clear up.
My experience, the less lights, the better for speed. If you are rendering an outdoor scene, is it sunny or overcast, under a roof or not, your shadows should reflect this no matter the light you use. I typically use the reality sunlight when doing outdoor scenes and maybe include an outdoor IBL or HDRI light also for ambiance (replace the sky setting for the sunlight) and/or reflection.
Speed, I typically let my renders run overnight, but being a long time 2.5 user, i find reality 4/latest Lux to be a bit faster.
The new reality syncs and translates what your DS settings are more than the older versions did, so i tend to edit materials much more in DS first before opening Reality since it is much faster and gives me less to do inside the reality UI. Then you can tweak the Lux specific settings more, which I always have to do no matter the object or skin.
Lux settings, unless you have tweaked your light settings perfectly BEFORE opening reality, I would stick with the linear setting and manually adjust the lights from there. Shadow settings are in DS under the light parameters. The bigger the mesh light size, the softer the shadows basically.
BTW cool render, where did you get the character
Oh yes, I meant to answer about the mesh light settings. As Michael says, click on the Reality 4 mesh light you have loaded (must be R4 mesh lights, not R2.5) and go to Parameters and you will see a Shadow Control section, which has dials with buttons to click the settings on and off (you can have multiple buttons selected to get a larger range of sizes). All shadow control does is change the size of the meshlight, as the larger the mesh, the more diffuse the light and therefore the softer the shadows.
DreamLight has a Lux/Reality for DS tutorial, can't find it in the DAZ store but you can get it from their own store:
http://basic3dtraining.com/shop/daz-studio-reality-lux-render-lighting-concepts-jolt-series/
Ah, I finally found that under the camera! Thank you both, I will play around with your advices.
Thank you all so much for your help!! I finally have a render from LUX I can proudly put up in my gallery!
Fantastic! I'm so glad we were able to NAVIgate you through these issues! :D
Ah, I finally found that under the camera! Thank you both, I will play around with your advices.
you can set it in either the Reality interface or the LuxRender interface, so you can always tweak it in LuxRender while it's rendering.
Thanks, but I sorta made him myself. Well, the Na'vi type morphs came in a morph pack by DarioFish, but for the rest, I did my own morphs/ used various character presents/settings, and also modified a skin to make it Na'vi. :)
Also, I have another question. I cannot seem to change mesh light settings in LUX. Am I supposed to set them in DS? Because they do not seem to change at all in the rendering in LUX.
Also, I have another question. I cannot seem to change mesh light settings in LUX. Am I supposed to set them in DS? Because they do not seem to change at all in the rendering in LUX.
The only thing you can change in DS is the size, either scaling yourself or using the shadow control buttons in the mesh's Parameters. Intensity (gain) can be set in Reality and adjusted in Luxrender.
What I'm guessing is happening is that you are not renaming the light groups in Reality. By default all mesh lights are in the same group, called "Mesh Lights". Luxrender works with lighting "groups"; however a group can have just one light and each light can have its own group. To set this up you need to change the name of the group against each additional light in Reality to something other than "Mesh Lights". You can call them anything and it's handy to call them by position, e.g. Left, Top, Back.
Once you have the lights in their own groups you will notice that each has a slider in Luxrender so that you can control them individually.
Having more light groups takes up more memory and apparently takes longer to render, but I've not tested this. I doubt if I would notice as I don't usually have massively long render times, where it would make a more noticeable difference.
Hm, my problem is I have changed the names so each light belongs to itself. But when I adjust it in LUX, I can never see a change in the render. This only happens with the Reality mesh lights. Not the other lights. And I'm setting them to extremes but there is no difference at all.
**EDIT** Nevermind! :D It seems that the mesh lights just take an extremely long time to change in the render >.> Everything is working. Thank you again!
Yes, sometimes changes to light gain can be very laggy and then suddenly become responsive. Perhaps this happens while Lux is writing the flm or the tonemapping. How many light groups do you have? I wonder if this is more noticeable if you have a lot of light groups. I don't usually have more than 3 or 4.
You can speed up your renders (somewhat) by consolidating your lighting into one group once you have balanced the individual lights in Lux and entered the resulting values back into Reality.