ot photoshop question? trying to clean up the grey
 Mistara
Posts: 38,675
Mistara
Posts: 38,675
this is a scanned packing slip.
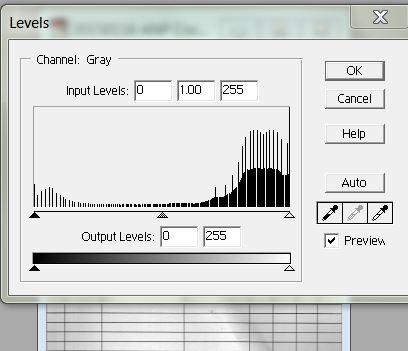
is there an easy way to filter out the gray and leave only the text and lines?
Thanks :)
greys.JPG
408 x 351 - 32K
Daz 3D is part of 
Connect
DAZ Productions, Inc.
7533 S Center View Ct #4664
West Jordan, UT 84084
Licensing Agreement | Terms of Service | Privacy Policy | EULA
© 2025 Daz Productions Inc. All Rights Reserved.
Comments
I would use the magic wand tool to select the grey and then press delete to delete the grey areas. Your background colour must be white before you delete (unless you change the background to a layer). Possibly some of the buttons will not select along with the main background so select these individually. Use a low tolerance—say 16.
Edit: just realised you are not talking about the Photoshop dialogue! I wondered why you would want to do that. This technique will probably not work well if there are lots of continuous variations in the grey, which there probably are. Beyond using levels and contrast etc., as you are doing I'm assuming, I can't think of an easy way.
Well, I do not have photoshop, no more ...
But here I used Gimp, in this example
in your case, as is text, it may be that the values are different from this obtained for my render, but all you have to do is slide the values in Table brightness and contrast
I would apply a level adjustment layer and pull the white point down (and the black point up) until the results looked OK. If there are odd marks left you may be able to use the clone or healing brushes to remove them. It's better, if you can, to do the equivalent of the levels adjustment in the scanner since that handles the raw data - especially if you scan to 8 bit formats.
The Levels dialog is the way I've always done it, but note that it only works if the scan is good enough — fuzzy thin lines, and stuff-that-should-be-black too close a shade of grey to stuff-that-should-be-white have a tendency to disappear if you're not careful.
Look at the levels graph in your screenshot. The "bump" on the left side is the nearly-black pixels, the "bump" on the right is the nearly-white pixels. All you need to do is drag the little triangles immediately below the graph until they're close to the plateau in the middle of the graph. You might also need to juggle the centre triangle, which sets the mid-grey point. Remember to tick the Preview box so you can see what you're doing before you commit yourself.
One word of caution if there's text in the scan — make sure it still reads the same after you've done the adjustment, letter shapes count as "fuzzy thin lines" as I noted above. If the original scan isn't quite good enough, some letters can come out badly distorted. I usually have to go over the scan with a small brush/eraser afterwards, cleaning up any remaining stray scruffy bits.
Another method that may work quite well is to use Custom Filter in Photoshop. This is one of the more mysterious filters in PS which can be found under Filter/Other. By default there is a 5 surrounded by -1 values. Change the 5 to a 6 or higher and see if that gives you the result you want. You can get a similar effect on a document like this with Image/Adjustments/Threshold.
Just to give you one more option :) - if your version of Photoshop supports it (not sure when it was added) you can go into the layer styles Blending Options and use the "Blend If" sliders too. I've used this technique many times to very quickly and neatly clean-up scans of line art and sketches.
Insert a pure white layer underneath the layer your scan is on, double click the layer with the scan to open the layer options and where it says "Blend If Grey" move the right hand slider for "This Layer" to the left until all the grey disappears.
Most efficient technique would be to use posterize or threshold function
Takeo.Kensei,
Neat - I had never played with the threshold adjustment layer before; I'll have to remember that. The problem with being self taught is gaps like this in my knowledge. :)
I don't understand how posterize would work for this though - I'm playing around with it and at higher settings it doesn't seem to do much and at lower settings it creates "cow" patterns from the grey parts that started out close to black. How would you use it here?
Thanks,
Mark
well remembered! I had forgotten this! This works !!! threshold
Just to remind you, my Gimp is in Portuguese of Brazil,
Then, Limiar =Threshold
I used to use Posterise (after all other tweaks have been done) way back in the Elder Days* — it did help, but IIRC its biggest effect was in allowing a reduced compressed file size without too much extra quality loss. Not really needed nowadays, but I agree, it's a handy technique to keep in mind.
Speaking of reduced file size, was the original scan in greyscale or full colour mode? Some of these techniques we've been discussing can sometimes introduce a little bit of colour cast unless the image is greyscale.
* I first learned to use Photoshop way back in version 4. Not CS4. Yes, that long ago...
Oops! Now I saw that you tried to posterize, and not the threshold
Just to add to the confusion, another option is to use Selective Color - Image> Adjustments> Selective Color.
Select Color> Whites, Neutrals or Blacks and play with the sliders. This dialog is also useful for targetted Hue adjustments.
In Photoshop, there are usually umpteen different ways to get a result, and it's instructive to play with them all.
mac
The slight drawback with threshold is that it's either/or - so you lose any anti-aliasing around the edges of curved or angled lines. That isn't always a bad thing, for example with lines at a very shallow angle, but it may make the result look unnecessarily jagged.
Well, I will also add to the confusion:
There is a filter in my gimp I did not know existed:
"Repair Scanned document"
Takeo.Kensei,
Neat - I had never played with the threshold adjustment layer before; I'll have to remember that. The problem with being self taught is gaps like this in my knowledge. :)
I don't understand how posterize would work for this though - I'm playing around with it and at higher settings it doesn't seem to do much and at lower settings it creates "cow" patterns from the grey parts that started out close to black. How would you use it here?
Thanks,
Mark
I may pass a Level filter before. However there is also a tool in Gimp Called Reinhardt that can do the job in that case. Screenshot below
@Jorge: The filters are in Tool->GEGL Operations in latest Gimp 2.8+
Hello, thanks for the tip
I ... I found the filter: "scanned document repair"
In the menu / filters / G'MIC
If no-one minds me slightly mangling Kipling:
"There are nine and sixty ways of constructing postwork lays, And every single one of them is right!"
;-)