Skullcaps showing in IRAY - Help Needed
 xjadexxx
Posts: 43
xjadexxx
Posts: 43
I have encountered a problem with IRAY that I cannot resolve. If I render in IRAY using point lights, hair renders fine. If I use a mesh light, or set a spotlight geometry to "disc", for example, the skullcap is not longer transparent, but instead shades the skin of the figure. See the example images: Point spotlight, mesh light, Disc Spotlight, and IRAY render settings.
Has anyone else encountered this, or found a solution?
THANK YOU!
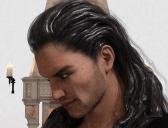
Hair Test - With Spotlight Point light.jpg
1876 x 1426 - 1M
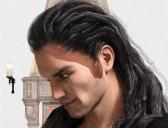
Hair Test - With Circular Mesh light.jpg
1876 x 1426 - 2M

Hair Test - With Spotlight Disk.jpg
1876 x 1426 - 1M

Hair Test Tone Mapping Settings.jpg
864 x 706 - 126K
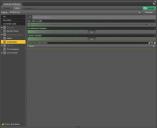
Hair Test Optimization Settings.jpg
864 x 706 - 70K
Daz 3D is part of 
Connect
DAZ Productions, Inc.
7533 S Center View Ct #4664
West Jordan, UT 84084
Licensing Agreement | Terms of Service | Privacy Policy | EULA
© 2025 Daz Productions Inc. All Rights Reserved.
Comments
You can still select the skullcap surface using the surfaces selection tool, and then in the surfaces editor tab, set cutout opacity (or opacity) at 0 for this surface. This should hide it. If not let me know :)
Thank you for the suggestion. Cringingly, I used it. At zero opacity the texture on the skullcap becomes invisible, and thus the hair looks thin and balding. However, the key point is that the skullcap continues to be visible, shading the underlying skin texture. I have attached a screenshot using a mesh light.
Please note that the problem is not particular to this hair. I have encountered it before with other hair models. The problem also happens at the end of hair strands, where opacity maps are used to show the hair ending in loose strands.
On the off chance that the hair doesn't come with iray presets, have you converted the hair's surface materials to the iray Uber shader?
I have seen this before as well. What was really baffeling was it would only appear when I put photometric light in the scene. If removed the light and rendered with Sun-Sky Only the effect would go away.
Yes, while using Digitimes' suggestion, I continued to tinker and applied the IRAY uber shader. I then, one by one, zeroed out properties of the skullcap, hoping I could identify the offending parameter. I removed the transparency map totally and zeroed out opacity, and it still had the effect.
I can set a spotlight to Point light, and the effect disappears. If I set the same spotlight to 50x50 disc, the effect appears. If I take out the spotlight and use a mesh light, the effect appears. Most vexing! I was hoping someone would be able to say, "Oh, just increase this rendering quality value and it goes away", but none such so far :)
It's something else (not much help I know). I alway add geomertry to a photometric spot and never get an effect like this. Does this happen with all hair products?
There are environment and scene lights providing 'fill' beyond the one in question for this issue, but changing the primary light exhibits the problem. As for the hair, it happens with several that I own, not specific to any vendor.
What is the exact version of Studio you are using (Help > About Daz Studio)? And have you moved the models from the default zero position?
Try locating your character at world center -- 0,0,0. If it's the bug I think it is, it's related to where the character is placed on the D|S stage.
You and I must be thinking of the same thing...
Yep! It's an old bug, but it's a goodie!
Is it to the...'it's not a bug, it's a FEATURE stage, yet?'
I have just encountered this same maddening problem, Studio 4.11, using a female character (VYK Odette, based on Teen Josie) and Jolina hair, fitted to the character. She (and her hair) look great in several scenes I've already used her in for an animation. But now I have to have her in a dimly lit interior, so I added Ghost Lights—and the minute I did, the Jolina skull cap lit up like it is emissive! But I absolutely have to have some kind of light on her.
Well, that would be just ducky—except "world center" in my scene is in the bowels of the elevator shaft of a giant lagoon resort, and that isn't where I want her (for what may, or may not, be obvious reasons).
I can hardly believe that my quest for a solution led me to this thread that is three years old. Is there really, honestly, no solution to this?
Select everything, in the scene, go to create > new group. Select the new group node, you can now move the whole scene around at once and not mess up any lights or camera placement, and get your person near the 0,0,0 point. Yeah it's a pain to have to do that.
Well, this puts a whole new light on O'Shaughnessy's lines from his poem, "Ode," about those who work in the arts:
World-losers and world-forsakers,
On whom the pale moon gleams:
Yet we are the movers and shakers
Of the world for ever, it seems.
Why, yes. Yes, it is that, indeed. In spades.
Before I go moving the entire universe, I want to make sure that you (and I) understand that this is a long animation, and that I must exactly duplicate the camera's path throughout—with the character in place for part of it—exactly the same as the already rendered animation I've done without the character in it. Until the character appears, the only thing moving in this long dolly shot is the camera. Sooooo, with your workaround, will the already animated camera maintain its exact same animated path relative to al-l-l-l-l-l the other objects in the scene: environment, buildings, vehicles, water (which the camera dives into), etc.?
That's utterly crucial, because I've got to composite the two sequences once I've rendered the section with the character in it. (I would have to write a book to explain why I wasn't able to have the character in the scene on the first camera pass.)
EDIT TO ADD: Oh, yes: one other vitally important aspect to this: Once the camera comes into the position where the character is visible in the scene, the character moves from the original location (let's just say it's the universal 0,0,0) to some small distance away (probably about 5 or 10 DAZ meters). If that's just going to cause the same bug to manifest, it won't be worth moving mountains.
Actually, I just found out another possible fix, but it depends on what version of studio you are using. If you are using the new beta, set instancing optimization to memory, if using an earlier version, set it to speed. If it's a large scene, setting it to speed might be problematic though, so I hope you are using the new beta! :(
Thanks again for your help, TheKD. I'm using 4.11. I downloaded and installed the new beta, but haven't opened it. I may take a very deep breath and at least try it with a copy of the scene file.
I'm curious, though, why something called "instancing optimization" would have an effect on something that doesn't have any "instances" of anything in it. If you know.
No idea, it surprised the hell out of me to learn it as well. You can run a quick test by just loading up a g8f and the hair, moving it 10000 on the x axis, and render with different instancing settings. I am hoping DS bigwigs report this bug to nvidia, maybe they can figure it out. Pretty sure it's a iray bug and not a DS bug, but I could be wrong.
Thank you again, very much. My character is based on G3F. Not sure that would make a difference, but am going to try it with both.
Okay, so based on all the foregoing in this thread, I've done a fairly thorough series of five tests, using the exact same character in all of them (the "heroine" of the animation I'm doing, which is VYK Odette, with Jolina Hair). The results of my tests, attached to this post, have me pretty well convinced that there's something going on with the "skullcap" issue that has not yet been identified in this thread. (Please ignore the graininess in the quick renders. Or consider it art, like Seurat's pointalism. :-])
I've put the descriptions of what was done into text in each image—and you can clearly see that in the image named "OdetteLightTests-4-skullcap," that's where the hideous "skullcap" comes to haunt things. Here's some brief discussion of each image to expand on the captions:
1. "OdetteLightTests-1": That's my character all dressed up with nowhere to go, including the Jolina hair morphed up the way I want it. She's standing at 0-0-0 with the basic Daz environment settings and dome, Dome Plus Scene set. Zero lights, no camera headlamp.
2. "OdetteLightTests-2": Exactly as in Test-1, but with the addition of one vertical Ghost Light from KindredArts' marvelous first "Iray Ghost Light Kit." It is to the character's right, camera left, with just the default settings.
3. "OdetteLightTests-3": Exactly the same as in Test 2, but I have moved Odette to X=403, Y=787, Z=994. As far as I can determine, this shoots down the "it happens if the character is moved away from 0-0-0" theory. She is, and there's a Ghost Light, and there is simply no difference between this render and the one where she was at 0-0-0. When I moved her, I parented the Ghost Light and the camera to her so they all would remain in the same relationship.
4. "OdetteLightTests-4-skullcap": Or, as I like to call it, "The Skull That Ate the Girl." In this shot, Odette is inside the underwater "lounge" in Faveral's "Lagoon Living," at transition settings the same as in Test 3, above: X=403, Y=787, Z=994. There the hideous skullcap makes its uninvited visitation! Looking closely, you can see the same phenomenon happening under the eyelashes! But I think it has nothing to do with Faveral or the enchanting Lagoon Living resort, or its built-in lighting. In this scene Lagoon Living's Iray "Room Lights" are turned on, and there are two Ghost Lights: a bluish-tinted one to her right, camera left and an orangish-tinted one to her left, camera right. So now ...
5. "OdetteLightTests-5": Here I've done nothing whatsoever different from Test 4, except turn off the bluish-tinted Ghost Light to her right, camera left. And it appears that the haunting skullcap has unhaunted the scene. Odette is in the exact same position relative to 0-0-0, and that is not at 0-0-0.
So what does this tell us? Anybody? Anybody? I hope somebody with a higher payscale than I can make sense out of this and help the DAZ and/or Nvidia geniuses to solve it.
Meanwhile, I've got to figure out some way to light the girl so I can have some hope of rendering an animation that won't take the rest of my life.
Wow, this is some weird stuff. Into almost hour 3 on a render right now, so can't try duplicating those conditions :(
Innit, though! Hope your rendering goes withouot ghosts.
By the way, I want to acknowledge the fact that I haven't tried the "instanting optimization" thing you suggested yet, not because I've ignored it, but because I simply cannot launch into testing in the beta right now due to a number of obligations. I also wanted to do some kind of process of elimination, so started with this five-step series above in 4.11 to keep variables down as much as I could.
UPDATE [Cue "Twilight Zone" theme music]
At the risk of being accused of masochistic tendencies, I spent some time playing around with different settings, and even distances, for that vertical (bluish, originally) Ghost Light that was in the scene and turned on at 4, "OdetteLightTests-4-skullcap," above. No matter what I tried with it, that infernal skull-cap was lit up and glaring when I switched the viewport to Iray.
So on a whim (and with a snippish sniff), I deleted that vertical Ghost Light out of the scene and out of my life, and threw in a horizontal Ghost Light from the same "Iray Ghost Light Kit" by KindredArts. I stretched it out and placed it above Odette's head a few feet, angling it down toward her. This time I used the neutralish preset (6000K), with a Luminance setting of 400. I left the other vertical Ghost Light (her left, camera right) switched on. Lo and behold, the attached file is the result.
No. Skull. Cap.
[Cue "Twilight Zone" closing theme music]
Well hell, it seems to have gotten worse for me. Am getting it even near 0,0,0 on both optimise settings today. Had to GoZ it and hide the cap part inside the skull for last 3 renders lol.
This looks like some sort of odd occlusion. I can't seem to reproduce this on my end, and i've never come across it before. If any of you are still experiencing this, can you try adjusting the hair caps so they are slightly further away from the head mesh, and tell me what happens? I need to know if its the distance to the character that's the problem, or the transmaps on the skull caps. Also, do you guys know a hair product that is particularly affected by this issue? If i can reproduce this problem, i might be able to give a solid answer.
OOT Ryan Hair is the only one I can think of off the top of my head, once my render finishes, I can see if I can find the name of others, and also try moving it farther away. I usually rename hairs and clothes with the name of the character I am putting them on for quick scene finding purposes.
Hi KindredArts. Thank you very much for looking in on this. To answer one of your questions out of order, Jolina Hair is the one I'm currently working with that exhibits the problem, as I mention in my post with the photos above. I've never seen this phenomenon otherwise (although I don't pretend to have the kind of experience that many of the posters here seem to have).
As for this part: "can you try adjusting the hair caps so they are slightly further away from the head mesh, and tell me what happens?" I'm sorry, but I have no idea how to go about that. (See "kind of experience" disclaimer above.) Would this just be a matter of slightly scaling the hair down? The only place I can find "Cap" at all when having the hair selected in the scene is under surfaces, and there are no facilities there (that I can suss out) that would move the cap "further away from the head mesh."
OOT hairs usually got tons of adjustment morphs, although I don't have that one to check. Look in parameters under actor for a morph like adjust forehead depth. You can go into smooth shaded mode to be able to see if the cap part is moving away from the head.
Thanks, TheKD. I'm not going to be able to open Studio to check this until sometime tomorrow, probably, but will definitely experiment with that.
That said—and admittedly without having yet performed what you and KindredArt suggested—I don't understand why only certain light combinations cause it to show up.
I wish we knew what the hair was that the OP had the problem with, but then, he also said: "it happens with several that I own, not specific to any vendor."
I also wonder how much alterations-of-alterations of the basic Genesis figure has to do with it. I'm using VYK Odette, which itself is a character derived from a Teen Josie 7 base.
I'll experiment as soon as I can and report back.
All the ones I noticed any issues with have been OOT hairs, but that is because OOT hairs are just about all I been using for the past year or so. And it's not every time I use em, I even did a test earlier with the moving the person 1000 on x and the eyes, lashes and hair did not get all funky looking. Hopefully I am in a better mood tomorrow to try some more expiriments.