Rigging clothing for Genesis (Learning)
 SpyroRue
Posts: 5,020
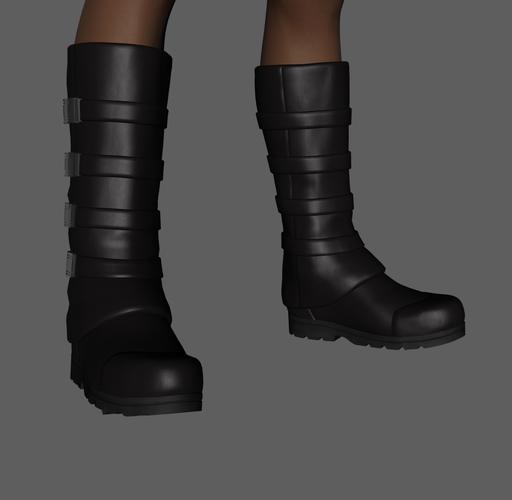
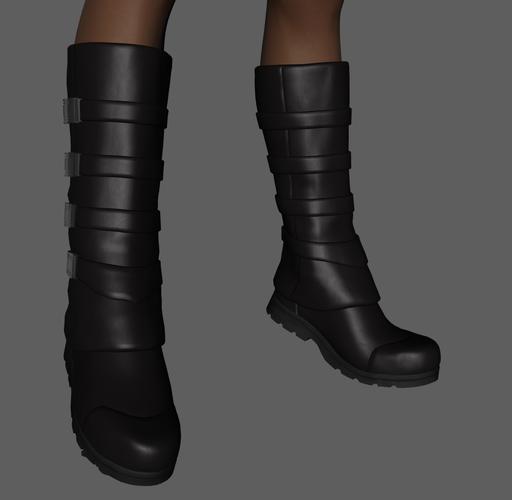
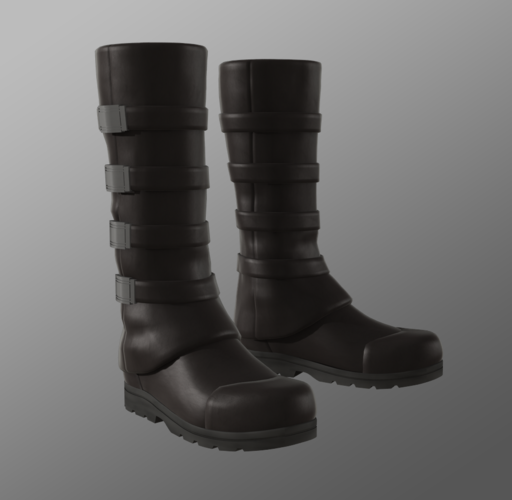
I've been working on a pair of boots for genesis based on some concept art I did in the past. I've spent a good month modeling it, researching and refining the geometry.
I'm in the rigging stage in Daz 4.5 pro... I planned to follow this tutorial video on youtube -
https://www.youtube.com/watch?v=nJIa55eSDZY&feature=plcp
I have transferred the rigging from a pair of boots I have of similar type, which allows it to conform to genesis figure and it can now be posed, and has all the bones necessary to function. My problem is that I cannot follow through the tutorial, the joint editor tool is completely different in DS4.5 to DS4.0 (At least visually by layout). It seems I can only adjust the "Center and End points"
I need to adjust the affect rotations has on the model... You can see why in the attached images. (The lower strap distorts really badly, and foot length morphs make some distortions on the soul of the boot)
FYI - I also have Genesis Clothing Resource Kit, though there seems to be nothing in regards to footwear. I read through the short tutorial with that, and I am still left baffled.
Thanks for any help :)


Comments
Not sure if I can help...but have you tried using the transfer utility with genesis as the donor and then adjusting the bones?
Sickle yields tutorial for rigging skirts does that and then removes the bones not required and renames the leg bones...have a look at it and see if that helps at all. There should be a link in a stickies link somewhere. I'm pretty sure RKane had it in there list on clothing creation tutorials.
Great job with the boots by the way!
You can try painting the weight maps to the shin more in that front area. It's in the Building tab,or select the weight map tool (it looks like a paintbrush) and have a Tool tab up to look at for settings. The forward/back bend is the xrotate. Red is 100% and blue is 0. That might even just be caused by bulge settings, though, so I'd delete those first if they are present.
Whichever bone is selected in the Scene tab is the one whose settings you will see in the Tool tab.
Thanks guys! I just discovered Daz's weight map tutorial video on youtube, while I was looking for possible solutions. I do agree Sickle, it looks like it's weight mapping that I need to be using. I'll look for Sickles tutorial... which forum is it in may I ask?
Pendraia I considered using genesis as the rigging donor... wasn't sure how to go about getting rid of inappropriate bones. I'll give it a go, it might work better as a starting point for me. And thank you for your praise :)
And thanks very much Sickle :cheese:
I don't think it will help, since I didn't cover weight painting, but here it is.
Thanks, it will be good for reference of other items in that case.
Genesis as a donor for the rigging worked beautifully. I'm going to play around with weight maps and see If I can get it to work :-P
Glad that it helped. If Sickle's here she knows way more than me and weight painting would most likely be useful also...I haven't tried that myself yet!
Glad that it helped. If Sickle's here she knows way more than me and weight painting would most likely be useful also...I haven't tried that myself yet!
Don't sell yourself short. It's not something I even use on every item - for a lot of things the transfer utility is just fine. It's good to know for situations like the present or for some kinds of skirts, definitely,but it's not precise enough to just use on everything all the time.
Don't sell yourself short. It's not something I even use on every item - for a lot of things the transfer utility is just fine. It's good to know for situations like the present or for some kinds of skirts, definitely,but it's not precise enough to just use on everything all the time.
Thanks...I must admit that so far the transfer utility has done what I need so far! I just wish I had the time at the moment to learn more. I'm counting the days to Christmas holidays 19 more work days to go : )
Thanks guys... I had to do some things before I could start with Weight mapping. Question... Is there an erase brush in weight mapping? I just want to tweak the original weight map rather than completely remove it and start over.
I cant wait to see what you work on Pendraia, from what I've seen you do, you're very good. I think weight mapping would really make you shine :)
NM I worked it out... I had to hold the Alt key LMAO!
WOW Weight mapping is great!
Joint Editor has only the centre/end point mode when working with a TriAx figure as the other settings are for parametric/legacy rigging - if you were working on a figure of that type you would get the other options too.
I see now. Genesis is a weight mapped figure, so all Gn clothing needs to be wight mapped too? None the less, it is very effective, I'm rather very surprised at how simple it is to do.
Good, I'm glad it's working for you. :-) Yes, it can be a very nice and useful tool, especially if you get to making custom creatures or other such figures and the symmetry and alignment features come into play.
So sickle, now that it's weight mapped, it now conforms to genesis and moves with genesis pretty well, i've already textured it, what am i supposed to do next? Clothing seems so different to props lol
File--Save As--Support Assets--Figure/Prop Assets. Make sure you save it as yourscreenname/yourproduct and make a note of what you do choose, because that's where the data files are that you need to go and copy for the release version. Usually clothes are saved in My Library/People/Genesis/Clothing/YourName/YourItem, with a subfolder called Materials for your mats.
The release version needs:
All files from data/yourname/yourproduct.
All files from People/Genesis/Clothing/Yourname/Yourproduct.
All files from Runtime/textures/yourname/productname (or wherever you saved the textures within the Runtime folder).
So within My Library you should have data, People and runtime for your release version. Always start from My Library. At DAZ you'll need to do a file list with the product's morphs and FBMs and how many textures it has, etc. (you can look at an average PC club item to get an idea what to include). At Rendo you need a separate documentation folder with the license and a readme in it.
Thankyou very much Sickle! I was wondering why I wasn't bieng asked for vendor/creator info and the folder structure lol
FBM's - I'm a little confused as to what they are, and what I've supported. Are they support for characters, such as M5, V5, H5, S5 etc? If so, is that dependent on what characters I have installed when using the transfer tool with Genesis as the donor?
Also, this is the first item as part of a full costume, which is in development. It's based on a concept I did. I'm currently in the modeling stage of the trousers. I'm not really sure what morphs I will do, But I imagine I will have a few particularly for the loincloth. (For that, I'm thinking of adding several bones to the loincloth, to try to make it as flexible as possible, I'm thinking several horizontally across, and several vertically down (If that is possible)).
That's a great-looking design! I love it.
I've used additional bones in loincloths and it's a good way to handle it in my opinion - there's just no way to put in enough morphs to really treat them as they deserve unless they're very short.
FBMs:
These are whatever characters are installed in your Genesis. By default they are supported by Autoconform, which is what is happening when you dial in M5, etc. and the shape of the boots changes to match. Their actual names are FBMMichael5 and so on in the figure, it just only shows the main label normally.
A custom FBM is created when you export an obj of the item, modify it to better fit the morph, and then reload it with Morph Loader Pro and overwrite the autoconform version. If you end up doing this, you will need to have exported some objs of Genesis with the individual morphs on to use for reference. If you do, make sure you reset the scaling to 100% on each one before export. You can check whether you want to do a custom FBM by dialing in each one individually and checking the boots to see if the sole is distorted, the straps look wrong, etc. This is highly subjective and some artists do not do any customs at all.
Make sure you don't load the boots, autoconform and save to library if you don't want to do customs. It will save the autoconform version to library and bloat your filesize unnecessary. Always delete and reload if you're just looking at the boots for testing purposes.
Thank you, I will say it again, "You are a Legend!" I'd be at a stale mate if it wasn't for you :)
Hee. No, Raw and Stonemason are legends. I'm currently at the "delusions of grandeur" stage. :-D But you're ever so welcome. I know I'd buy a loincloth-over-pants outfit.
Haha! But who is the one helping me :) You're a "Modest Legend" then lol.
And thankyou for your kind words :)
I'm having trouble with pants...
It's a sub divided/high Res model ... I've transfered via transfer tool from genesis to the model with added smoothing, but when I raise the legs I get a distorted crotch so to speak. I've played a little with the weight mapping, but it just makes a mess.
This is version 4 of the model, and I don't know what else to do. At first, I thought version 3's mesh was too curved in that area of the trousers, so I remodeled it (The fourth time now) so that it was much more similar to what I studied of Stalker Girls pants... Yet, despite this the distortion remains :(
How are all the clothing creators getting around this? Does anyone know how to fix it?
Thanks for any help!
I've still got a little more work to be done on the pants to add details such as pockets and the fly... I kinda hoped to be UV mapping and texturing it like two days ago :(
Attached is comparison in wire frame Version 3 pants with stalker girl pants.
Version 4.0 Pants - remodeled to follow the same structure as Stalker girls pants (Wire Frame)
And the distort I get when the legs of the figure are bent.
It looks to me like a rigging, not a geometry issue. For some reason TU is painting too hard to the pelvis and not smoothing out to the thighs enough in that front area.
When you do transfer utility, did you select the pants template? I never, never do that. In fact, it's infrequently that I use templates at all - not because they're invariably bad but because they tend to want geometry very much a certain way that may not agree with a design. Try it without one and see if you get a different result?
Hi Sickle, quick question...I've been saving clothing as a wearable, what is the difference between doing that and saving as a morph asset?
Thanks
Pen
Hi Sickle, quick question...I've been saving clothing as a wearable, what is the difference between doing that and saving as a morph asset?
Thanks
Pen
*Cough* It's Figure/Prop Assets. This is what my post has always said. Please ignore the edit timestamp that might suggest I made a stupid error and typed the wrong word.
I would guess that Figure/Prop is a broader envelope encompassing base figures, smartprops, regular props, and clothing, whereas wearables is only for clothes, but I've never actually used the wearables one so I cannot confirm that. :-D
Lol...what timestamp! ; )
I don't currently have ds on my computer as I've recently had to replace the hard drive I wonder if it does more than change what is on the icon? I think it would also change where it shows under smart content though. It would be interesting to know!
Thanks for the info...
Pen
I tried without using a preset ie. Pants/loose-tight
And It sadly has the identical problem :(
I'm wondering if this is caused by the fact that the pants don't cling to the figure in that area? The pants are worn slightly low, so its a bit loose there. But it's not intended to be tights, so I don't want it to be clingy either.
I am totally baffled as to why I'm getting this distortion. :-S
On Another topic...
Smoothing appears to be a requirement, as the thighs distort and become bumpy, if smoothing isnt enabled... but I dont understand why I must use it as I have many outfits I've bought that don't use it and there is no issues with them. With the boots I made, smoothing had to be disabled otherwise the foot soul would distort something fierce.
Snug in the crotch area a little, save as a separate version, and test to see if it still has the problem?
I've encountered the issue with pants that were looser in that area not wanting to bend properly, requiring me to do JCM for them (unfortunately that doesn't help for both thighs together). Sometimes you have to compromise between your design intention and what the weight mapping system can handle.
Okay, I'll give it a go and see what happens.
Okay, made the snug edits to the mesh, then re imported to daz...
Smoothing Iterations remains at default 2
While it has reduced the distortions, it's still there. What do you think?