Importing multiple items becomes a frustrating "pas de deux"
 Roman_K2
Posts: 1,252
HNY... there's probably a good answer to this question but so far it escapes me... it's actually a lot worse in DAZ Studio but it's happened to me in Hexagon too, so here goes...
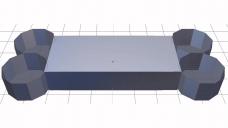
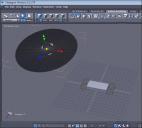
Sometimes when I put something into an existing scene or workspace the new item is placed miles away, relative to the geometry I was working on. I was trying to lay out a biscuit or dog-bone shape so I laid down a box and four cylindrical pieces... looks like a medieval castle, har. Then when I tried to bring in a circular plane to use as a lid on the cylinders, wham-o! A long and tedious dance of objects ensues as I try, over and over, to bring the objects close together. Not unlike the "Pan-Am space clipper approaching the space statiion" scene in 2001: A Space Odyssey except that one had computer controls whilst here I'm skewing wildly all over the virtual workspace, trying to control the objects. What gives? Gotta be an easier way to "dock" or mate up one part to another!


Comments
Not sure if you've tried this. When I want to be exact I put a dummy cube in the scene (this will be deleted when op complete) and in the Properties tab put it at 0.0.0 then move it below the grid and choose the top face and change the Y co-ords to Zero.
Then start building. If I am making a chair I will take the first leg and use the Lay-On tool to place it on the dummy cube -
Grid is hidden so you can see better. In Object mode have the leg selected and select the Lay-On tool, Click the bottom face of the leg, rotate view and choose the top face of the dummy cube. Then you can delete or hide the dummy. The leg is in the centre of the scene with the bottom face of the leg on the floor (ready for Daz Studio). From there use the Snap Align tool to snap whole objects or points, faces.
So the tools you are looking for are the Snap-Align and the Lay-On tools.
#1
When importing wavefront objects into any application, the issue of "object center" comes into play. "Object Center" can be determined on export, using the object's geometry to calculate the true geometric center of an object or it can be overwritten, which is common, based on where the object is relative the center of a scene. The "distance" each numerical value has for the object center, based on x,y,z or some other coordinate order, is set by the measurement system chosen. These measurements and values are translated by the importing application, sometimes resuling in wild results... :)
ie: Objects appear in space where they do based on the Object Center of the object, no matter how it was determined.
In Hexagon, when you have an imported object you're trying to recenter, use the Object Select tool (selects the whole object) and use the coordinate locations at the top-right of the screen to recenter the object to 0,0,0 and then move as desired in the scene. This "should" export the objects properly where you want them.
If you're using the DS Bridge to access/import/export objects, I can be of little help, there. You might want to be sure that both DS and Hexagon are using the same base measurement system. To check that in Hexagon, go to the "Scene" window and click on the "Properties" tab. (The Scene Window is generally docked on the Right of the screen.) Here, you can check/set the measurements being used in Hexagon. If you have a base measurement system mismatch, it may be that DS/Hex bridge is getting flummoxeborked (technical term...) and isn't converting it right. I know virtually nothing about the Bridge, btw.
Note: For objects with Object Centers and rotation values that lie outside of their actual geometry, rescaling such objects can have weird effects, since scaling is done relative to the object's center in many applications or, rather, it functions in that way. So, when an object center exists outside of the object and there are scaling issues that make it "jump" to weird places... that's what the problem is. Any app that can designate/recenter an object's center should allow editing of that, so you could correct it, presumably, in DS and certainly in Poser.
#2
If you are creating objects using Hex tools and they're not appearing properly where you want them to be, you can often manually choose values using the coordinate values in the Properties window for the start location for your next/current operation. You can try changing these values, either by absolute or relative coordinates, during the creation process. Different object/geometry creation tools will react differently to this, of course, so it's not easily useable for all forms of object creation/manipulation. In any event, any vertice or object mesh can be moved in part/whole using this coordinate system. Just select what you want moved and then designate the absolute/relative coordinates.
PS - I am not quite sure I truly understand your issue. I've just tried to cover the basics for "Weird Stuff Happening With Objects And Their Locations." It is also possible you're having an issue with the rendering of your workspace window OR you have created an new object that is waiting for you to "Validate" its creation. If the latter, make sure that you click the "Validate" button after creating a new object. If the former, I listed a set of recommended settings for users of NVidia (and perhaps other) PC chipsets in this forum, somewhere. It works flawlessly for me with no artifacts or weirdness. (Also works for switchable chipsets and Intel-based chipsets.) A search should find it if you're interested and think you could be having vidcard/OS rendering issues on a PC machine.
Oh-oh... I think I will have to pack a lunch for this one...!

I see what you mean, about a dummy, reference "work area" just below the surface. Aha, something to use with my "disassociated" square... see below.
Ok, I was able to work with the "Lay On" tool a bit... I put a pointy triangle thing (red arrow in the attached screen shot) onto a cone-like shape, just like in the Hexagon Reference Guide. At first Hexagon made a strange bright red square on the surface of my conical shape, but that went away once I hit validate.
Off the top of my head I'm not sure the difference between Lay On and Snap/Align... guess that's going to take some time. Also, I was FINALLY able to "unfold" a cube with the Disassociate tool, I believe it was, and after deleting five disassociated faces I was left with just a square. Then, using the Free Tesselate tool I was able to cut out a quarter of the square, and then I disassociated it! Wahoooo, I knew right away I was on to something, although it still escapes me as to what this might be good for, in real-world modelling.
Vaguely related: I forget how the "Close" tool works... in the area of the green arrows in my example here, can I loop those edges -- or any edges -- and close them off or is the tool only for shutting small holes?
Riiiight, I type "0", "0", "0" into the pink, green and blue "Position" fields. Got it. I can't believe it has taken me this long to figure this out.!!!
This is going to sound really dumb but what is meant here (in the Position field) by "Relative".
"Absolute = World coordinates (Zero is the center of the work grids)
"Relative = Object coordinates (Zero is center of the object
Lots of question Roman, hopefully I can aswer some of them.
Quick tip about the XYZ co-ords, if you look at the bottom left hand side of the screen you will see they are coloured -Red, Green and Blue - this is the same in the Properties tab.
The UV view, dissociate UV. This comes in handy if you have an object which has a lot of stretching. Pinning helps but sometimes that is not enough, so you can use the dissociate the offending parts and (with the test grid) move things around to get a more even uvmap.
Edit - Sorry, you said Dissociate and I went straight into UVmapping. Looking at the screen grab I think you meant the Extract tool, never use it, I find it easier to just Cut or Copy a face.
Lay on tool. Best to test this with a couple cubes as its easier to see (one bigger than the other) In Object mode, select a face of the small cube As you do it will change to red, then you select a face of the large cube. The small cube will rotate and lay in the centre of the of the large cube where you selected.
Snap-Align. Again have a couple cubes. This can be done with points and faces. Have a play with this and see what happens :) In object mode, click on the small cube, select the snap align tool, choose a point of the small cube, then click on a point of the large cube.
Put the small cube back, select it again, then choose face mode and click on the a face, choose snap align and click on the same point agin and the same destination.
Close tool, I use the close curve tool but I never use the one you are talking about, it has a habit of making Ngons (not four pointed faces). It is getting a bit late here now, if you can wait till the week-end I will make time to show you a few ways to fill a hole so you do not end up with an Ngon.
I would recommend watching (and trying them for yourself) all the project tutorials Gary Miller did over at Geekatplay.com.
Thanks, I have quite a few videos downloaded, yes.
Any suggestions on why you would want this... would it be useful if you wanted to track smaller accessory objects say, that were orbiting *around* the main object or model that you were working on?
I seem to have forgetten how to keep track of items in the Scene window... for instance, how do you *rename* them again? A case in point: I had laid a circle down on the floor, and drew an arching line next to it, and I thought I'd sweep that... so that's two things that I was working with - a circle and a polyline.
Ok, somewhere along the line (no pun) I'd gotten/created something else, a THIRD object, "Curve0". See the bright green arrow in the attached. When I swept the line - Bingo, really weird shape resulted, like a mushroom! When I tried to delete the third item "Curve0" it would not go away... it was as if it was glued to the spot.
Also, what is meant by "Soft Selection" in the Utilities menu? (I've marked it with a red arrow)
1) Say you are modeling a chair and a door. You know that the chair should be one meter away from the door and you have your Units set to metric/meters. Then, you just enter "1" in the relative distance along the desired axis and the center of your chair is now going to be one meter away from the center of the door. This can also be used in a simple fashion to establish dimensions for objects. For instance, select a face and then move it "2" units Relative and you now know it's 2 meters away from where it was. Using this, you can get fairly precise dimensions and very good relative ratios in object size and position.
You can also use only relative Ratios. For instance, if you know that object B is twice the distance from object A than object C is, then you can place objects B and C at the same point on object A and enter "1" for C and "2" for B as relative units along the desired axis to get your desired ratio.
2) Rename the object - Type a new name for the object in the upper right-hand corner object's "Properties" window.
3) Soft-Selection selects a range of vertices from the selected vertice/face/edge based upon the values input into the Soft selection variables. Typically, the vertices can then be moved with a decreasing intensity radiating out from the center of the selection. This is very useful for many organic modeling tasks.
Sorry I took so long There are quite a few ways to close a hole so you do not end up with Ngons, here are a few I use -
Made this video a while back, it show me using soft selection to make a morph for a chair. No sound, but hopefully you'll work out what I'm trying to do. The DS side of things, normally you can change the General/Morph Path bit using the bridge, but for some reason it did not want to work for me that day (typical Hexagon).
https://www.youtube.com/watch?v=0MggCaVYdZU
FYI - There's a selection of "pre-built" holes on ShareCG made by "Spacebones" and called "Accurate Holes Templates." I think they're in the Object tab. Nifty little resource if anyone wants and there's some cool ones. Spacebones always has the niftiest stuff. :)
I tried for the last of John's examples: extrude, deselect two edges, then Bridge. Wow! Cool!!!
What's more I didn't know that you could just slide out your new model/object/segment away from the circle, and then the circle could be used again?
After I moved the object away from the circle I poked and prodded it a bit, just to play around. There must be a zillion things you can make, using this basic technique. Thanks!
If we use this method with a rectangular line to make a square plane (say) do we need to start worrying about whether the plane will consist of single-sided, or two-sided, polygons? I tried to put a bevelled plane I made, that I shaded to be "glass" in Iray, in front of an ordinary plane that had an ordinary image on it. If I hung down "icicles", would that enhance a frozen winter scene, sort of? Inconclusive results so far as the "glass" didn't seem to want to be properly transparent. I wonder if this may have had something to do with single or double sided attributes.
It took me a while, but I finally got to the one where he suggests ways to line things up. (Youtube link.) Thanks.
Now, there isn't a corresponding method in DAZ Studio, is there? Because there is no position readout in DS? I wonder if -- in the case of primitives anyway -- it would be an idea to line them up in Hexagon first, and then send them to DS via the bridge.
I know a little bit about Daz Studio but you will find more DS savy people in the DS forum.
Daz Studio does have a Parameter Tab, but all that does really is tell you how far an object is from 0.0.0. You can snap to grid, I have never used that option but I know its there somewhere.
You do not always want to use the DS-Hex bridge, the bridge tool is for making morphs. Just export OBJs from Hex and import them into DS.