Advice needed: body parts tangled with clothing in tight/closed poses
 westernnomad
Posts: 90
westernnomad
Posts: 90
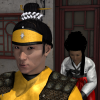
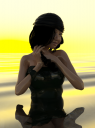
Using the attachment as an example, notice that the dress is wrapping around Aiko's right wrist at the chest.
Is there a way, without loosening up the pose, to force the clothing to stay between her wrist and chest?
Any utilities? Hidden settings?
03132017a.png
681 x 921 - 653K
Daz 3D is part of 
Connect
DAZ Productions, Inc.
7533 S Center View Ct #4664
West Jordan, UT 84084
Licensing Agreement | Terms of Service | Privacy Policy | EULA
© 2025 Daz Productions Inc. All Rights Reserved.
Comments
As there is no space between the forearm and the chest, DS4 tend to put the clothe around the forearm. In this case, you can move a little bit the forearm to create this space until the effect disappear and then adjust the other arm. The little adjustment will not loose your pose The other way would be to use "squish" morph for the right breast.
Turn off Smoothing Modifier. If you get poke-thru on the clothing adding a Push Modifier with an offset of as littl as .05 will often be enough to fix.
You can then also use a Push Modifier Weight Access node (from the Create menu) to add a weight map to the clothing which will let you pant the effect out where it isn't needed.
Richard, could you detail the use of the push modifier weight access please ? I'm interested
+1
sounds like Richard has more knowledge he needs to share. :)
Apply the Push Modifier.
With the figure still selected go to Create>New Push Modifier Weight Node (this is purely a way to access the weight map that belongs to the Push Modifier, hence the Access in the name; deleting the Access node won't remove the effect of any weight map from the modifier).
Make sure the Access Node is selected in the scene.
Activate Tools>Node Weight Map Brush
Open the Tool Settings pane
In the Tool Settings Weight Maps tab the Unused Maps button should say Influence Weights - if so click the Add Map button next to it
You should now see an entry in the map list panel, with a slider under it - that slider clones the Push Modifier's Offset value
Use the Node Weight Map brush and the selection tools in that and/or in the Geometry Editor tool to paint onto the map (or to select and then fill the selection, or to apply gradients etc.) - a right-click in the viewport gives most commands. I suggest starting off by right-clicking, Geometry Selection>Select All, right-clicking, Weight Editing>Fill Selected, and setting the value to 0 - that will give a blank canvas to start with.
Thanks Richard!
I will try to follow your tutorial. For sure a DS4 tool I don't know/master and will certainly be useful in the future
Thanks again