First HDR Attempt.
 Analog-X64
Posts: 110
In another thread, David Brinnen suggested I try doing some HDR with one of my Images and here are the results.
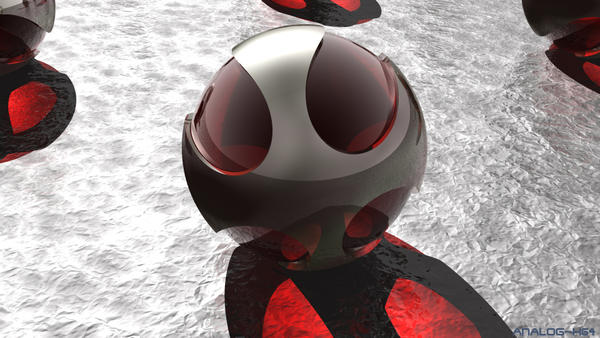
First image is the Original Render.
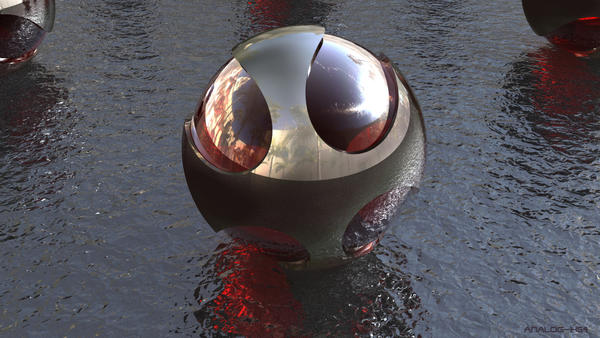
Second image is the HDR version with "Sunny Beverly HIlls.hdr"
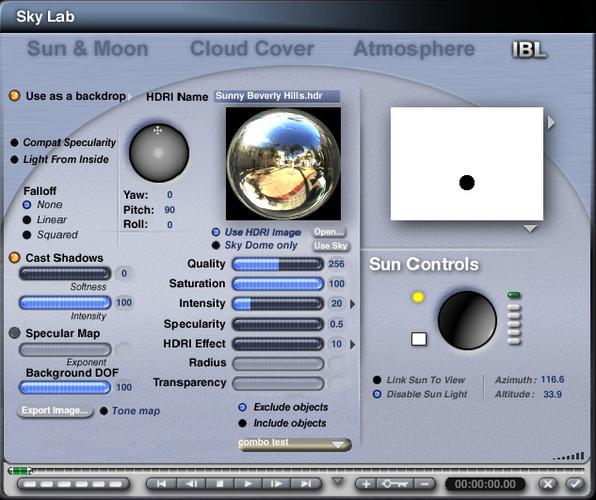
Third image is the settings used.
In the HDR version the metallic pitted ground now looks like its water.

IBL_Settings.jpg
633 x 531 - 125K

Abstract9hdri.jpg
960 x 540 - 615K

Abstract9.jpg
960 x 540 - 411K
Post edited by Analog-X64 on


Comments
The outer shell has a more metallic, polished, look using the HDRI. Personally, I like that look better, along with the now looking water.
Looking good. Turn down Saturation. There's a lot of blue coming from the sky, hence the water-like appearance.
I'd also be tempted to turn the sun back on (when you load an HDR it automatically turns the sun off), that way you'll get your nice shadow and light shining through the red glass back like on your original. You may then need to mess a bit with the intensity and HDRI effect controls.
The HDR reflection certainly adds something though and looks great.
As per suggestions, I turned the sun back on and played with the HDR settings in IBL.
Metallic ground does not look like water, but the image looks washed out.
Yes it is a bit of a balancing act getting the light balance correct and knowing what setting to use when you introduce a HDRI to an already composed scene, but don't be discouraged, you will soon get the hang of it.
If render time is a concern, remember to set the quality down to 16. Your HDRI is outputting no effect, which is fine and as a result you could turn shadow casting off in IBL and be sure to set the specular output to 0 too!
Another thing to try, if you haven't (and to know exactly what is going on I'd need to look at the source) but do turn your Atmosphere off and set it to fully black. Then use "add to sky" option in the IBL tab. That will eliminate some of the causes of washing out potentially. Then consider modifying the diffuse and specular output of your main light source - which is now only complimented with the reflections of the HDRI image and no other light input.
Key settings to be aware of that could cause washing out.
Sun/moon shadows not being set to 100%
Ambient response in materials (set global ambience to RGB 0,0,0)
Skydome colour light pollution (set skydome colour to RGB 0,0,0)
Just a few suggestions there.
Thanks for all the feed back and advice, its is appreciated and I'm actually having fun.
Render speed is not a big concern, I have a previous generation Quad core CPU (Intel Core 2 Quad Q8400 @2.50GHz)
This particular scene took 6 minutes 14 seconds to render, which all cores at 100% when Bryce is rendering. The original scene did already have all Atmospherics turned. I'm going to post all of the sky settings as well the current iteration of the scene.
I wanted to see what "Link to sun view" would do, and it has changed the direction which shadow is falling.
Here then visually,
Thanks for the visuals David, I misunderstood the RGB 0,0,0 to actual controls that would allow me to set values by typing them in :)
So once I got the correct Sun/Atmosphere settings, the image became dark again so I increased the "Intensity" setting in IBL to 24 and here is the latest results, oh and I increased the Ray Depth from 6 to 12 in the render settings.
That's looking great now.
Next experiment with soft shadows. Once you're in Premium Render settings the extra time for soft shadows isn't much.
In the sky lab, set the sun's Shadow Softness option to about 20 or 30, then in the render settings make sure that Soft Shadows is switched on.
It's all that's needed now for a finishing touch.
@TheSavage64 I'm rendering with soft shadows next. The first test resulted in a very noisy image, so I changed the render settings with a higher Ray Depth. So now the render is going to take hours instead of minutes. Will see how it looks tomorrow morning.
Soft shadows at 30
and Rays per pixel bumped up to 64 to get rid of the noise.
This one took 1 hour and 6 minutes.
You can usually shave some time off renders by reducing the Maximum Ray Depth (in your render options).
It's default is 6 but most scenes can get away with reducing that to 4 or even 3.
Edited to Add: I just realised you said you'd set your Max Ray Depth to 12.... That'll be why your render time is so long.
The soft shadows is subtle but it does look more natural now. :)
@Analog-X64 - you can also use the HDRI to light the scene. The HDRI you use has a bright light source (the sun), then you don't need to use the Bryce sun. This would then be called rendering with natural light (RNL). IB light brings bump out nicely. Rendering with soft shadows is a bit of a render hog. If you use soft shadows from IBL, turn the quality down. Your last example uses only the backdrop but no IB light. Another thing to experiment with...
If you hold the alt key down while clicking on the colour swatch (any in Bryce) then you can bring up a little dialogue that allows you to ender RGB values, or HLS or another one I can never remember and don't use.
If you want to use soft shadows it is usually better to go for premium render mode, check soft shadows and also treat yourself to a bit of DOF while you are at it. I've provided tutorials to cover that option. The reason being that the render engine for premium rendering is different from the first three in the Render Options and will handle these things a little more effectively. 64 RPP is usually enough to achieve this effect.
As for Ray Depth, it is rare to have any need to go over 6. I usually drop mine to 4 for most renders, unless I see a Ray Depth issue in the render, and then I lift it until it goes away. A ray depth issue would be a situation where light fails to make it through several over layered transparent materials or can't tunnel far enough down into a reflection to disguise the underlying blackness that haunts Bryce once the ray depth has been used up.
@Horo If I turn off the sun, I lose the shadows and enabling "Cast Shadows" in IBL does not help either. I still have a lot to learn :)
@David I'm re-rending the image at a higher resolution with a lower ray depth will see how long it takes.
1 = this is the global shadow control - it is not well labelled. Turn this off and no direct light shadow are cast. This wants to be set to 100 for most renders.
2 = disable the sunlight should only turn the sunlight off - not affect the shadows cast by other light sources (that's 1's job).
3 = or set these values to 0 and you will have effectively disabled the sun.
Example shows IBL settings, using the same HDRI as you did (though I tone-mapped it for the backdrop, but that doesn't change light and shadows).
Below the result, just lighting the cylinder on the ground plane with this light probe. Renders in 2-1/2 minutes.
Latest render with Horo suggestions.
Here is another attempt, seems there is a fine balance between getting the scene balanced with the sun turned off and HDR only.
I've been playing with "Intensity" & "HDRI Effect" one setting brightens up the sphere and the other brightens the ground. I cant seem to find a middle ground where the sphere is properly lit and the ground is not blown out.
I like the over all look, but I think the sphere should be a bit brighter.
Maybe you could add a tiny bit of ambience to the sphere material. BTW looks great.
@Analog-X64 - I like what you did, but you're the final judge. HDRIs with a bright light source can be a bit of a problem to get the shadows or the parts not directly lit by the bright light source bright enough. One possibility is to turn the HDRI shadow intensity down. It works differently than the Sun shadow intensity, which adds transparency for light to the object and should stay at 100 in most cases.
Another possibility is to use an HDRI without a very prominent light source, like the sun, and use the Bryce sun to give the main light. In this case, the HDRI will give nice ambient light, which is mostly omnidirectional and thus also lights the shadowy parts. If the ground plane is set to not cast shadows, it gets transparent for light from below and if there's too much of it, you can put another plane beneath it and set it to partly transparent to control the light.
Yet another method if you're using an HDRI with a prominent light source, you can cover it with a sphere, which is set partly transparent to control the main light hitting the scene through the sphere and giving that sphere a lot of ambiance. So it looks like the sun it covers but does not cast light, the light comes from the HDRI sun and is attenuated by the sphere. This is a method to balance strong direct light and weak ambient light.
Another thing I usually do when I mix HDR with Bryce sun is to set the specular setting on the sun to 0, that'll stop it from affecting the ground and bleaching out the texture or showing an awkward blurry light spot on the sphere.
Alternatively, with a bit more messing around with the balance of light sources you could try excluding the ground from the HDR. Then you can turn the intensity up to brighten the sphere without it having any effect on the ground plane.
I think for this particular image I'm going to stop here.
I can just keep going and going and going. :)
I like the synthetic look of the original one I made and thank to all the advice here, I also like the HDRI version which adds that realism.
Looking forward to doing more of these renders.
I'm already thinking of my next Boolean spherical shape, which I plan to make more complex.
Yes, it's one of the drawbacks of having infinite options, sometimes each tweak just makes it different and not necessarily better (or worse).
Yes!!!! out of the 7 versions I've posted I like 3 of them.
You liking the results is the important thing, Analog. Only you know if you've accomplished your vision. I've enjoy watching the progression of your work. I actually like all you've posted, each one having something I find interesting.
I didn't create a new topic, since its still related to this particular scene.
So I wanted to do a final render at 1920x1080 and it took slightly over 6 hours.
Is there something I could have done to optimize the render time? or that's just how long a raytrace of this type is going to take.
I'm including a screenshot of the render settings. and the priority was set to high so all 4 cores were running at 100% during rendering.
I could setup network rendering with an additional 4 PC's running Core 2 Duos each. But I'm not sure if the overhead of rendering over a network would help me in this instance. since I'm not actually animating.
Well... it all depends in this case as to the quality of light you are trying to achieve with the soft shadows. By and large, it is not efficient to use premium effects for just soft shadows. If you are in this position, it is often better to simulate the effect in regular mode using multiple light sources instead. Whatever you do though. Don't use soft shadows in regular mode as this will possibly take even longer!
Optimising render times is something I specialise in, but I'd need you to send me the source to figure it out. If it is under 10mb you could email it to me. You might be doing it already by the best method, but without picking your scene apart it would take a long Q and A to get to the bottom of it.
Thanks for the kind comments, more on its way :)
Thanks for taking a look :) I've pmed you a link where you can download the scene. It is 12MB and zipping the file didn't make a difference in size.