Clothes Streching
 CutenToons
Posts: 9
Ok this is driving me nuts and i would love someone to explain in simple form as to why this happens and more inportant how to fix it,
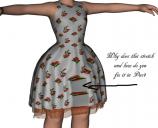
When i fit clothes to genisis especially skirts /dresses they go all weird in the middle and strech
I am still using version 3 as i would like to use version 4 but whenever i try to use clothes this happens and what is putting me off from using this version,surly there is an easy answer for this and time i said what is bugging me
here is a picture,i used a dress from K4 to genisis and as per usal the dress in the middle is horrible
i so hope someone can explain


test.jpg
800 x 650 - 61K


Comments
I'd like to know the answer to that as well.
Is this Genesis? If so, the problem is that there isn't enough gradation in the weight maps between the two thighs - most of the mesh is moving with the legs, leaving only a very narrow bit of geometry to stretch to accommodate the movement.It's also possible you need more polygons there, again so that the stretch can be shared out more evenly.
Is this Genesis? If so, the problem is that there isn’t enough gradation in the weight maps between the two thighs - most of the mesh is moving with the legs, leaving only a very narrow bit of geometry to stretch to accommodate the movement.It’s also possible you need more polygons there, again so that the stretch can be shared out more evenly.
the pic above is genesis/chibi ,
the pic i am now showing is genesis nothing done just loaded her up and a kids 4 dress added and same problem,
what i cant understand is the problem is just at the front and no where else on the dress
,it dont matter what dress /skirt i add in daz 4 this problem always happes why i am asking is there anything to fix it you say more polygons ,whats that i dont make clothes so havent a clue what you are speaking about,can this not be fixed in daz?
Ah, if it's AutoFit then it may also be the way that the shape is converted. But the answer is still much the same - a narrow area between the legs is being used to accomplish all the stretching between legs, and as a result the image there is distorted. You might try using a different template for AutoFit, but othewise using the rigging tools or editing the mesh (or both) will be required I'm afraid.
You might try using a different template for AutoFit,
Ok what do you mean with this?
but othewise using the rigging tools or editing the mesh (or both) will be required I’m afraid.
and again where are these ?
By template I meant the options under What kind of item is it? in the AutoFit dialogue.
The editing tools are in the Tools menu, their options are in the Tool Settings pane (Window>Panes(Tabs)>Tool Settings). The draft documentation is here http://docs.daz3d.com/doku.php/public/software/dazstudio/4/userguide/creating_content/start
I have seen similar problems on skirts. Autofit has improved and now it is retaining morphs but on occasions (probably due to limited templates) it stuffs up and stretches the mesh like that particularly on skirts. It is probably something to do with transferring the template from a figure where the uv's go between the legs at that point to a skirt. I don't think I've seen it do it anywhere else.
This is only a guess on my part and wiser heads (such as Richard) feel free to correct me if I'm wrong.
It wouldn't be a UV issue, but it may be to do with the way the application figures out what to move to achieve the different shape (and then figures out what to move to add the morph, since that isn't a zeroed figure).
If your problem is the same problem that I occassionally run into when auto-fitting dresses, Sub-dividing the dress should help.
EDIT: To sub-divide, follow these steps:
1. Select dress from the scene tab
2. Click on the context button (the button on the uppermost right corner with lines)
3. Go down to "Edit"
4. If you are using the latest version, go to "Geometry", if not, skip this step
5. Select "Convert to SubD"
Hope this helps,
Alexa :)
This definitely comes from the conversion of the mesh from child to Genesis, and there isn't much you can do about it at the moment to get a better conversion. The Projection Templates can help with the weightmaps, but I don't think they are going to cause the refit from the original kids shape to Genesis to improve.
There is an option, though, to help clean it up a little bit. I know you probably don't want to jump through the hoops, but if you are adventurous I would recommend doing the following:
- After conversion, select the dress and apply the Smoothing modifier (Edit -> Figure -> Geometry -> Apply Smoothing Modifier)
- In Parameters Tab, go to the General -> Mesh Smoothing group. This is where you will find options for smoothing out the mesh.
- Make sure hidden properties are visible (Enable "Show Hidden Properties" in the Parameters Tab options)
- Change your smoothing type from Base Shape Matching to Generic
- Set the smoothing iterations to a number that is high enough to fix the middle of the dress but not so high it smooths out all the details or messes up other parts of the dress. Hopefully it did fix it up a bit...
At this point, if you are happy with how the dress looks, I recommend you export that fixed dress out as an OBJ, import it and use the Transfer Utility to transfer morphs and rigging from the other dress to the new fixed mesh. I wont' bother explaining how to do that until I find out if everything else worked for you.
Ok morning cant sleep so i have read and managed to do something,thanks everyone for your help
Alexa i couldnt find the [quoteClick on the context button (the button on the uppermost right corner with lines)]
one at top has aligin,i did do the sub D but it just took out the balck bits
Josh well what can i say a big improvement on the dress yippieeeeee,i did all you said and played around with what you said here
so far i put to 128 and looks loads better even on my chibi so i am very very happy
can you explain next section and why to do this?,pic to show the differance plus will help others whom having this problem
Sorry for the long delay...
Try this:
1) With the dress smoothed and looking good on the base Genesis shape (no morphs applied), go to the Dress's Mesh Smoothing Group in the Parameters Tab. Toward the bottom of the properties list you will see an option called "Interactive Update." Turn that on so that the smoothed results will export. I don't recommend always having interactive update on because it slows things down, but it needs to be on if you want its results to export.
2) Go to the Scene tab and hide Genesis (click on the eye icon) and anything else that isn't the dress.
3) Export to OBJ, setting it to DAZ Studio scale
4) Import the OBJ you just exported, setting it to DAZ Studio scale
5) Run Transfer Utility (this assumes you still have Genesis loaded) and set Genesis to the Source, set the imported dress OBJ as the Target and choose whatever projection template you want (such as skirt/dress/none). Check the option to add the smoothing modifier. Please note that I only recommend doing this for dresses. Other content may or may not need it, but dresses pretty much always do.
6) Click Accept. The dress should now work with a really low smoothing iteration so it will be a bit more responsive than setting it to 128 like you are doing.
7) Now you can apply texture presets to it to get it to look like it is supposed to look.
8) Since you did all this work, you will probably want to save it as a DSF file. Go to File -> Save As -> Support Asset -> DSF Figure or Prop File. Save it to someplace easy to access and you don't have to go through the conversion anymore.
After that lengthy explanation, here is a different option that will probably work. Anytime I just list the step, it is because it is identical to the above explanation.
1)
2)
3)
4)
5) Run Transfer Utility and set the original dress as the Source, the fixed dress OBJ as the Target. Check the option "Replace Source With Target" and hit Accept. This should give you very similar results as above, but it just updates the dress you already have loaded so you can just skip to step 8, I believe.
thanks
Pen
edited to say
Thanks for the info Josh...