I made an object in Blender. How could I fix this strange shadow in DS?
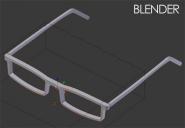
Using Blender, I made this glasses and exported to DAZStudio.
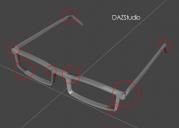
Then, it got the strange shadow in DS. (See the attached image with the red circles)
I tried OBJ, DAE, FBX format, but the result is just the same.
The polygon amount is about 2,000.
It's UV mapped with material settings.
How could I get rid of this shadow?
Is this a fixable problem?
Did this happen because of the way I made the "faces" of the glasses in Blender?


180104001_K.jpg
500 x 346 - 74K


180104002_K.jpg
923 x 661 - 93K


Comments
Check that you don't have any hidden polygons (for example, end-caps where two sections join) and that theer are no doubled-up edge loops. Also check to see if the model has exported with normals, those may be badly aligned. Essentially what is happening is a consequence of the way DS shades surfaces to smooth them out - something in the mesh is confusing the algorithm, causing aberrant shading (I think, you can check by selecting the glasses in the Surfaces pane and turning Smoothing off)
Thank you very much, Richard.
I checked the data, but it doesn't seem there is doubles in the glasses.
Then, I found out that another glasses I made looks just fine in DS (Attached file).
I guess that some unusual problems happened in that data in Blender.
Oh well, it would be better for me to make it from the scratch again.
That thick framed glasses was my first prop I made for DS.
Then, that strange shadow....!
To be honest, I was quite worrying about DS might be something totally different from the other 3D applications and so difficult to use.
It looks like it's the normals. One thing, your shader on the glasses seems to be set to flat. It looks very angular. If you set it to smooth in Blender, you will probably see the normals shading similar to what you see in Studio.
Try here to see if it gives you some useful info:
https://blender.stackexchange.com/questions/23596/smooth-shaded-model-has-odd-shading
https://cgmasters.net/free-tutorials/bevel-modifier-hack/
To help detect problems like this before you export, consider learning how to activate "matcap" shading in Blender. When you're working on an object and matcap makes the outside, visible surfaces look strange, something is usually wrong, even though you may have difficulty finding out what's causing it.
Be aware when you look into the inside of an object, so you're seeing faces on the other side from where the normals point, matcap shading will look weird--but you'll soon get used to it and be able to use that effect to assure yourself that the normals are pointing in the right direction.
Also, there is a way to get Blender to draw little lines showing how the normals point, and to make those lines longer so you can actually see them. That's under the Display section of the panel you toggle by pressing N in the 3D view.
Thanks for the tips, Cris and Inkubo.
I tried "Odd Shading" trick. Then that glasses looks fine.
I'm going to try to rebuild it again using that technique.
I haven't used Matcap before, but it looks very useful especially to check the faces.
I'll try that, too!
Sorry to reopen this but I'm having the same issue - frustratingly I can't post any images due to this being a commercial product.
I find I'm getting the weird shadows when I export a mesh that's had thickness applied to it through the solidify modifier in blender 2.8. This is regardless of whether vertices have been merged or if the new edge loops have been UV'd - I'm using default obj export options and auto smooth is enabled.
The mesh originates from marvelous designer, exported as thin, unwelded, single object. Any pointers would be most welcome!
EDIT: it would appear applying subD in DAZ fixes this, who would have known!
When you import an OBJ into Daz it applies the Iray Uber shader with shade Smoothing ("Smooth" parameter) set to "On", and the edge split angle ("Angle" parameter) set to "89.90". It will do this even if your object in Blender was set to Flat shading. So if your object is set to Flat shading in Blender, and you want it to have Flat shading in Daz Studio, you will need to set the "Smooth" parameter in the Uber Shader under the Surfaces Tab to "Off."
Alternatively, you can leave the shading set to "Smooth" and adjust the angle of the smooth shading under the "Smooth" parameter. (Similar to how the Edge Split modifier works in Blender.)
As an example, if you create a cube primitive in Daz Studio with just one division, you'll see that under the Surfaces tab the shader for this cube has Smooth "ON" and Angle set to "89.90". The faces of this cube primitive should appear flat in your iray viewport. Change that Angle parameter to above the 90 degree angles of the cube though, say to 91, and now the smooth shading kicks in for this cube.
Hopefully this is your issue, and that this helps.
Hi Richard,
It's worth mentioning how much that last bit within the parentheses just corrected/helped an issue I was having atm.
Thanks.