Iray help needed with Indoor and Emissives
 3dOutlaw
Posts: 2,481
3dOutlaw
Posts: 2,481
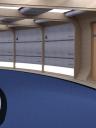
I am using some cool space corridors that were made for Poser a while back. I want to render it in Iray, and I have change the light panels to emissives. They are low poly as seen, so I am thinking that is not an issue.As seen in the render, the scene seems to have enough light from the emissives, and I have it "cut open" and have a dome environment that probably bleeds light in there as well.
Anyway, the issue is that the render attached is about as good as it gets after a LONG time. I have a pretty good laptop (i7 16gb RAM) with a decent Nvidia graphics card in it, and rendering outside HDRI and other scenes go real fast.
This isone of my first forays into the world of indoor iray. Any ideas?
Daz 3D is part of 
Connect
DAZ Productions, Inc.
7533 S Center View Ct #4664
West Jordan, UT 84084
Licensing Agreement | Terms of Service | Privacy Policy | EULA
© 2025 Daz Productions Inc. All Rights Reserved.
Comments
So I quit the render at 32 minutes, and had to use a surface blur to despeckle it. It worked OK, I guess, but I would like to know if there is something better to do. I grabbed Scene Optimizer with my coupon in the meantime, and am going to give it a whirl.
Does iray run faster if you set it to scene only and then enclose the scene in a box? I remember doing this with a render engine in the past...
It's hard to say without know what those Emissive panels were set to for light output. Have you determined if DAZ is dropping to CPU only or staying with the GPU for the render? (The log will tell you, as will watching an app like GPU-Z.)
But you may also want to look at the various Ghost Lights products for help in lighting the area.
https://www.daz3d.com/iray-ghost-light-kit
https://www.daz3d.com/iray-ghost-light-kit-2
https://www.daz3d.com/iray-light-probe-kit
TD
Indoor scenes generally have far more shadows than outdoor, so you're going to get grain. You can try rendering at twice the dimensions and then manually scale it down in an image editor, which will squish the grain.
Also, you can play with the shadow settings by right-clicking on the Render Settings tab and selecting Show Hidden. Not sure exactly which way you should set the shadows, but at least it's there to work with.
For emissive light panels/lamps etc in a scene like that, I set the Units to Watts, and set the total wattage as 100 x however many items are in the scene, so if there are 6 light emitting panels in a section, that's 600w total. For smaller lamps with a single bulb, depending on their assumed type and the room's theme, I may set them to less than 100w each, but for flourescent style lighting such as in your prop, I'd say 100w per panel per section.
Skydomes may add to the scene, but it really only works if you have windows, and if the exterior light source is shining through those windows. If it's overhead, you may actually increase the shadows on the interior.
Iray likes light. Lots of it. Adjust the tone mapping settings to a faster ISO equivalent (lower exposure) and increase the lighting.
For indoor scenes, try turning on the Architectural sampler. It may help out with some of that.
If you don't need light from outside, you can just set Scene Only. Light panels should be enough to light the whole corridor.
What are your tone mapping settings? What are your light settings?
OK, I am reading these, I am just working on some promo artwork, that I need to finish, and then will get back to that to post light settings and info! Sorry for the delay!
So each of the emission panels in the image above (the white panels) are set at 75000 cd/m^2. That is what was needed to make it that bright.
My tone mappings were set to: 200iso, f8, 1/128
I do have a ghost light about 6 ft in front of the character, to remove some shadow on her face.
I understand that Iray likes light, but since this is an interior, it looks unrealistic to wash out the shadows with more light (I tried, and everything looked flat)
Ok, set your Tone Mapping settings to ISO 100 @ EV 13.
I suggest you use Lumens for lights. Set the ceiling lights to 12,000,000 lumens. For the trim lights set them to 80,000 lumens.
HTH
OK will give it a try. I'll render a 5 minute example at current settings, then change and render 5 minutes at new settings for an apples to apples. Thanks
OK, so the left is the original in 5 min. The middle is your settings, after about 1 min, I stopped it... (a little too much light!) The right is Lumens, but 1,200,000 for light, and 100,000 for the trim. The right seemed to get a little less grain in the 5 min span.
Oh, I missed by a lot, I considered 1 panel lighting 12 squared meters, but I see they are spaced closer and in the end you needed each panel to light 1.2 squared meters.
I am trying "Scene Only" and "Scene Only in a Box", and those are attached below. Scene lgihts in a box seemed to do much better. I remember doing Lux with reality, and they would box in the scene and make "windows" for some of the lights to come through windows...to decrease all of the light bouncing that was not in the scene. Not sure if that applies here, but it did seem to help!
Results posted above...
The middle one there is actually a pretty good match for the "more dakka"... erm, "more light" technique. Try that one again, then after it's run for a couple of minutes, open the options panel and adjust the Tone Mapping settings to bring the brightness back down to a less eye-burning level.
Note that you might need to juggle the luminance values for the ceiling and lower trim lights (if they're separate materials) to get a proper balance of light across the height of the corridor and shining on any objects in the scene.
Have you tried switching on the "Architectural" setting yet? And do you have the light surfaces set to "Two Sided = Off"? If you have light emitting from both sides of those panels, it will slow the render quite a bit because the light coming out the back isn't actually doing anything.
I find that when I adjust tone mapping during render, the render basically restarts from initials dots again.
I did not try architectural or two sided :) I did them below, and the one-sided helped, but the architectural really slowed it down. Then I double-checked OptiX Prime acceleration, and I had that turned off. That helped a lot.
I did use the Scene Optimizer, and it seemed not to help much at all decreasing the texture map size...maybe they were small enough, since they are just corridor walls.
The one on the right is the last best, and the one on the left is the new...big difference! Latest had 4.36% of image converged (364 iterations)
Scene Optimizer got me to 5.17% of image converged and 381 iterations, a little better but not a visible difference
I am pretty satisfied with that level of image at 5 minutes. Much better than what I was getting! Thanks for all the tips!