Michael 4 to genesis 3
 kittynoir
Posts: 25
kittynoir
Posts: 25
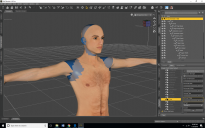
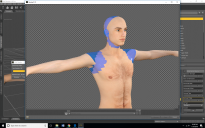
I'm using the geo graphs to place the M4 maps on genesis 3 but the I cat figure out how to map or cover up the geo graphs. does any one know what the problem is?
Screenshot (1).png
1680 x 1050 - 695K
Screenshot (2).png
1680 x 1050 - 864K
Daz 3D is part of 
Connect
DAZ Productions, Inc.
7533 S Center View Ct #4664
West Jordan, UT 84084
Licensing Agreement | Terms of Service | Privacy Policy | EULA
© 2025 Daz Productions Inc. All Rights Reserved.
Comments
The geografts must be selected in the Scene tab when you load the textures.
Did you save the original maps as .duf files. I think that they have to be in the duf format in order to be applied to the later figures.
Also, if you are trying to use the base maps that came with M4, the hips are applied separately to M4 as is the torso. For maps that are set up like this, you will have to use Photoshop or GIMP or a similar program to make a map that combines the two. I think there were instructions to help you do this at least one of the products. Caymen also explained how to do this in one of his product threads in answer to a question I asked.
Is this the Cayman Studio Product? It's called Legacy UVs for Genesis 3: Michael 4? If so I know your frustration a bit from when I used that product.
1) Select Genesis 3 Male
2) Smart Content: Utilities-> Preset: Prepare G3M (Content Library - People - Genesis 3 Male - Anatomy - Legacy UVs)
3) Smart Content: Utilities-> Preset: Apply M4 UVs (double left mouse button click)
4) (Scene Tab - Right Mouse Click Select - Clear Selection)
5) Smart Content - Michael 4 - Left Mouse Button - double click to load Michael 4 into scene
6) Scene Tab - Left Mouse Button single click on michael 4
7) Content Library - Products - M - Michael 4 - Material - M4 Standard-Res -> Preset !All_Natural left mouse button double click (or another material / texture preset)
8) LMB - File - Save As - Material(s) Preset - (navigate to where on yur computer you want to save your michael 4 material preset as a .duf file you can use on Michael 4 Legacy UVs on Genesis 3 Male
i) Best to save the file in your DAZ Content Library Folder - same flder that has folders called data, runtime, and Presets. In the Presets folder in the Materials folder create a directory called YourInitial or YouName or ... and then Michael 4 and then save your material preset of Michael 4.duf
9) Smart Content: Utilities-> Preset: Apply M4 UVs (double left mouse button click)
10) Content Library - Presets - Materials - YourName - Michael 4 - Michael 4.duf : Apply M4 UVs double left mouse button click
Little Know Facts:
a) If your DAZ Studio product texture preset ends with .ds instead of .duf you must load a M4 or V4 character and load the texture and save a material preset from the M4 or V4 character and then use that saved material preset to load onto your G3M or G3F.
b) Same applies for texture presets that end in mc6 or pz2
c) If it ends in .daz then I think you must load also on M4 or V4 and save as .duf for newer Genesis (please someone sorrect me if I'm wrong.
My directions are a bit messy but not too much.
You are not allowed to have images of human buttocks, genitalia or female breast nipples on the forums so you should delete that image.
It still aggravates me that I had to save those ds, mc6, and pz2 files as duf files.
What I eventually did was buy a product at Renderosity called 'Texture Transformer 2.0' by BlackSmith and convert M4 and V4 textures to native Genesis 3 textures. That is a bit expensive though but those products go on sale from time to time.
Ultimate Unwrap 3D repaint will also do this
and for free Blender
thanks for the tip, It was part of the problem I was having so I didn't think it was a big deal to let people see what I was having issues with. BTW, that little video that daz sent me was so simple that I didn't have to apply each texture one at a time. It wasn't even nessasary to buy the texture transformer. I thought about getting that before, but now I know it's not needed.
Load a m4 compatible male
save as a material preset
delete character
load a g3 male
apply the legacy geographs
then apply the saved m4 compatible material preset.
then hit the apply m4 uv button.
that it.