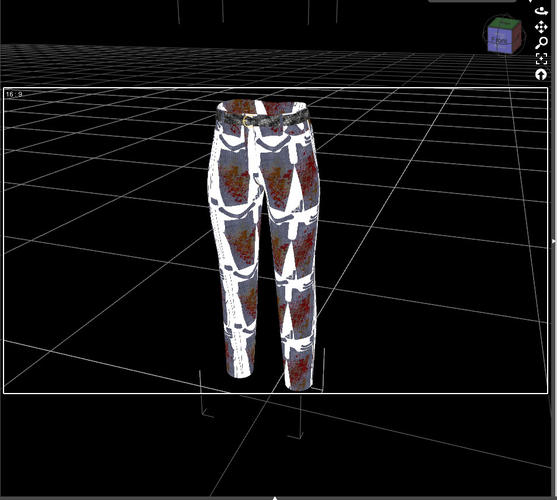
Why is this texture tiled?
So I downloaded the Genesis Jeans Freebie and my objective is to paint some blood and grime on the textures to complement my zombies. :D
So I exported the obj from DAZ and created a UV Map from UVMapper.
Using photoshop I copy pasted the original denim texture from the product and painted the blood and dirt over it within the boundaries of the uv map.
When I applied the new texture it turn out to be tiled.
How can I fix this? I am tinkering on the Shader Mixer but I couldn't find a way to turn off the tile.


tiledTex.jpg
953 x 855 - 112K


Comments
might be a dumb question, but why would you need to remap the UV's? You should be able to copy, paste, and edit the original taxture map, then bloody that up, no? I am speaking from a daz studio idiot perspective, most of my experience is in carrara and blender lol. I totally suck at daz studio. I have used that method a ton of times on poser clothes, and they load fine in carrara that way.
Oh, now I see the problem I think. Instead of using a texture map template setup like most clothes I have seen, this product seems to use tiled square textures. It took me a minute to remember my shareCG account name and password to grab it :(
There is no texture map for this one. Try downloading the file from the hyperlink above and you will see what I mean.
Even without installing I can see it is packed with textures.
Runtime -> textures -> Pusey Designs
THEY DO HAVE TEXTURES but they are NOT MAPPED that I will be able to modify it. Even if I paint over the given textures, it will be looking awkward.
What I need is to turn off the TILE EFFECT and have the clothes accept a mapped texture.
Have you tried changing the tiling to 1 and see if that works?
Go into the surfaces tab and find the tiling at the bottom.
I can see what you did but I'm not sure I can tell you how to fix it.
It looks like you took the UV map, painted on it and saved that image as your texture. What you then did was apply the UV map image as a texture on the jeans. You can see the UV map guides on the image.
The UV map isn't the texture. It's a map telling the texture where to paint.
What you need to do is edit one of the textures included with the product and then apply that texture to the jeans. Depending on the size of the texture image it will most likely tile to fit. I THINK - not an expert so you'd have to try - you can create a bigger texture image and use that to eliminate/reduce the tiling.
The other option would be to export the jeans object to something like Hexagon and paint your texture directly onto the UV map. You then wouldn't apply any texture to the jeans when you brought them back into Daz.
Someone who is better with this stuff might be able to provide you with more details.
Yes this made the effect I needed! Thanks!
I think I see where the problem started; what do you mean by "mapped"? I'm not sure if you're using this word the same way as everyone else is.
If it's anything to do with UVMapping, then from the appearance of the tiled texture, the clothes figure is already properly UVMapped — that's what matters, it's nothing to do with the texture itself. The tiling might have been introduced accidentally when you applied your reworked texture.