How to get a stardome to render outside a 3D window?
 Seeker Stock Art
Posts: 76
Seeker Stock Art
Posts: 76
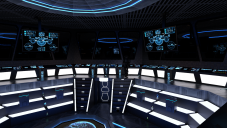
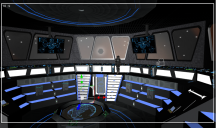
I'm brand new to Daz as of this week. I've created my first render (attached). When I look at the scene in Daz (see also attached), the star dome I included (01_DVSD_Stardome) shows through the windows. But when it renders, the stardome disappears. I hope to learn this because I'll be doing this same type of image multiple times for multiple book covers. Just not sure what I'm doing wrong.
Addendum question: I assume the reason why the render turned out much darker than the view in Daz Studio is because I need to increase the Luminous Flux of my spotlight & default camera exponentially. Have I got that right? Note that I didn't create a three point light system because I ran out of time.
Any help would greatly be appreciated. Thanks!
Daz 3D is part of 
Connect
DAZ Productions, Inc.
7533 S Center View Ct #4664
West Jordan, UT 84084
Licensing Agreement | Terms of Service | Privacy Policy | EULA
© 2025 Daz Productions Inc. All Rights Reserved.
Comments
So this is an Iray render? How is the star dome loaded - as a physical prop or as an HDRI map in Render Settings?
It isn't the dome that isn't rendering it is the reflections of the interior lights that are overpowering it. Try looking from a brightly lit room to a dark outside.
I'm rendering with Iray, yes. I basically double-clicked the dome added the material I wanted (blackhole spacescape), and then tried to render. Then I found another idea (I think by Fishtales (thanks for posting on this topic!) with settings to make the stardome transparent. I confess I'm not sure I understand why a transparent background would help. I suppose it must be HDRI (but I don't yet know what that even means yet--still looking for a tutorial on it at present). That didn't work though, even though I tried to match the settings he screenshotted.
Next I thought I'd try loading a 2D starscape into the Environment map area if I can figure out how to see if that will at least retain a backdrop of some sort.
Fishtales, do you mean just have no backdrop? Delete the stardome and have nothing out there?
Thought I'd share a screenshot to show my settings for this at the moment. I'm unclear...do I omit an environment map when using a stardome?
A solid dome will casts ahdows, so it will block any distant lights (even if their avatar is placed in the room) and environment lighting, and will itself be lit only by light shinging inside the enclosed area.
Do either of you know a tutorial that would address how to get domes to be visible and look right? Your replies are much appreciated but I don't have enough technical knowledge to take your advice into Daz and adjust my settings to make this work. I tried loading 10_black hole.duf.png as a 2D environment map but that didn't work either. Unsure what to try next.
Let me ask a question in another way that will hopefully help me grasp this better. It sounds like the DigiVault Stardome is 3Delight based, not iRay. Are there stardomes that are iRay appropriate that will allow me to double click to apply them and then render them without a profound understanding of the settings needed to make it look good?
First I would click on the Environment Map and add the Skydome image there. If it isn't obvious you can find what image that is by opening the Surface tab and click on the Skydome to select it and then click on the Diffuse map which will open a menu with the image ticked. Then delete the Skydome.
Second is why two distant lights?
Three to get the dome to show outside the window you will have to lower the lighting intensity inside and raise the intensity outside or use an image with some bright light e.g. a planet, moon or nebula. Also the Tone Mapping would need adjusting.
Oh! Ignore the second distant light. I was just fiddling around trying to get more light fast before I did a test render. I need to go ahead and delete it. Forgot. LOL! I will go do your other recommendations immediately, though I'm not 100% sure how to raise intensity outside. I'm really struggling with this concept for some reason. I didn't ever find a setting called Diffuse Map. I found diffuse adjustment sliders, but nothing else.
Would something like this help with my current project's lighting issues: https://www.daz3d.com/iradiance-hdr-resources-hawaii? The reason I ask is because it says its specifically for Iray and mentions this:
"You'll find Interior presets which set the HDRI up with enough light to travel through windows etc into your scene. White Balance and Tone Mapping presets subtly change color and contract to help produce the look you really like. Dome settings quickly change things like visibility and rotation for that perfect shot."
I plan to do a deep dive into lighting so I understand as much as I can, but I'm also on a deadline. Ergh.
I'm heading to bed but here is some reading.
http://docs.daz3d.com/doku.php/public/software/dazstudio/4/referenceguide/interface/panes/render_settings/engine/nvidia_iray/environment/start
http://docs.daz3d.com/doku.php/public/software/dazstudio/4/referenceguide/interface/panes/render_settings/engine/nvidia_iray/tone_mapping/start
http://docs.daz3d.com/lib/exe/fetch.php/public/read_me/index/21981/21981_quick-start-guide-to-the-iray-dome-and-the-use-of-hdris.pdf
For stars, I would use UV mapped sphere. (In a pinch, a solid primitive plane will work too.)
Using HDRI requires a "special modified image", as the "distortion" is calculated to a specific type of deformation, to create a sphere-like environment. A sphere also has similar mapping requirements. There are about 10 types of "HDRI mapping" types. Daz/IRAY uses a cube-form distortion, for fast rendering. Though it projects, as if it were a sphere. (A spehere has equal "stretch" across the tops and bottoms. IRAY has a cubed-stretch, at four points in the image. The types also determine where the "distortion-centers" should be.)
Using a flat-image of a checkerboard will help identify the HDRI type. Then you can use another program to distort your panoramic stars image, into an actual HDRI environment image. Though, it will not setup the actual HDRI "environment" settings. (Where your light-sources are, the "ground", the horizon, etc.. You have to manually set that up in Daz, from the default settings.)
Going back to a "Plane" or a "cylinder" or a "sphere", mapped for your stars... (You will lose any HDRI settings if you are inside a solid shape. Set the rendering to "Scene only", for lighting type. No sense wasting processing of something you can't see. Also, turn off the ground, which is ON by default. That is a time-killer.)
Apply the UBER shader, or EMISSIVE, and set the image you want into the "Emissive color". With the actual color as white. Slide the "Temprature" to 0, so it does not alter the color-tone of the lighting from the image. Also be sure to turn off any gloss, reflections, etc... so the surfaces does not capture any light from other sources, or itself. (Setting gloss color to black, and diffuse, usually is enough.)
Now all your stars will be "lights", which is what stars should be. The setting does not have to be high, but you could crank it up for some added penetration of light. (You may want to make sure your "blackness" is actually black in the image. If not, it will ALSO glow, the non-black colors could be used for star-cloud/dust effects.)
You can also check your glass values for "refraction"... You want NO distorted-refraction [refraction index] on flat glass-planes. (That should be 1.0, but can be 1.5 in some instances, for some reason. Make sure it is also set to [thin-walled] ON, or it will treat the glass like it has deep volume, like a glass-block or a bottle of water. You may also want to make sure the COLOR of the glass is white, and not tinted any colors. As well as NOT having any "Glossy roughness", which will blur the images trying to pass through the glass.)
If you don't like the speed-losses of using refraction, just use the opacity value so the glass is mostly transparent. You will also, naturally, lose some of that glossy surface look, as that will also be "transparent", at the same level of the glass.
Thank you for the great info! I finally figured out that there was a glitch in Daz, and once I restarted the program and my computer, it went away. It wouldn't upload Environment Maps at all until I did that. That said, I do have some HDRI (renders) that I could add in (see screenshot below), but when I attempt to do so, nothing happens. I assume I'm using them incorrectly. What *should* happen if I actually was using them correctly? Would they look like uploaded .hdr environment maps?
Double clicking on the Background one loads the image into the Environment Map of the Dome and sets up some Parameters there so you should see an image. It will only be visible in Iray Mode though or when rendered in Iray. To see it open up the AUX Viewport (Windows/Panes(Tabs)/Aux Viewport) and using the drop down in the top right of the window, not the camera view one the small one to the left of it, change it to Nvidia Iray. This window can be docked somewhere and hidden when not needed.