We all love Grain
 plarff
Posts: 278
plarff
Posts: 278
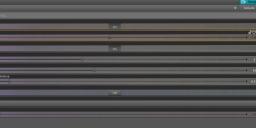
I am sure this is a TOPIC that has been covered over and over (I know i have posted a few ).... I do think mine is slightly different.
I have attached a part of a larger image and as you can see very grainy. I have extra lighting setup in the Club scene and most of my renders in different camera angles work and looks good. However this scene with them sitting it just does not want to render fine. The settings i have are the same for all my other renders in teh club so i know it works. IF i apply too much lighting the white couches becomes very washed out.
I have 4 models in the image and then the Club seats, glasses, table etc... I seem to have difficulty with certain props i use and others are fine. I am using ILPK lighting which i know works and Dome and Scene selected. I am trying to get a slightly dark feel (as its in a club) but without the graininess...

Daz 3D is part of 
Connect
DAZ Productions, Inc.
7533 S Center View Ct #4664
West Jordan, UT 84084
Licensing Agreement | Terms of Service | Privacy Policy | EULA
© 2025 Daz Productions Inc. All Rights Reserved.
Comments
Try turning the DOF off in the camera and see if that is causing it to look grainy. Also check the Max. Time under Progressive Rendering, add a few zeros on so that it doesn't stop rendering too soon, the default is two hours, 7200 secs.
HI Fishtales, will have a look.. I like the DOF feel to it but yeah ill turn it off. I have my Max samples set to 1200 as i have found this is most times ample time to give me a good quality render. IVe never really needed anything more than 2000max samples.
I know you have adviced someone else in another Topic with similar issue to up the Nominal Luminance to 100 which ive done but it needed more in my case around 150 BUT the Auxiliary Viewport image had loads of white dots in it so i left it off. I use the Auxiliary Viewport a lot before a render ive found this to help me see fairly close to what a final render may look like. It's not accurate but it helps.
If i may also ask... the girl in teh middle i see two issues here. One her dress is flying so to speak and going into the seat, apart from using the dress's settings to bring it in or use the sit pose option what else can i do to fix it?
Then the bottle is reflecting onto her left leg, i suppose getting rid of that i may have to introduce a spot light above them?
Not the Max Samples the Max Time. I have Max Samples set at 15000 but I have never seen it go that high as far as I can remember :)
I have my Firefly Filter on and at 100. I also have Noise and Bloom Filter off and Pixel Filter on Mitchell set at 0.5.
I'm not sure there is much else you can do with the dress.
It might be that the front light is too strong and may need lowering then compensate with the Tone Mapping settings.
The white sparkles in the AUX Viewport can be caused by too strong a light or too much Glossiness on the items.
Thx will give your advice a whirl...
Hi Fishtales,
I tried your hints related to Firefly and Pixel Filter.
Yes - indeed. It speeds up the render time. But on the cost of quality.
1. Firefly Filter:
Normally I worked with Firefly Filter = ON, but value = 0. This corresponds to OFF ?
As I set the "nominal Luminance" to 100, it missed a lot of brilliance. Not that much for a studio-lights setup, but really dramatic as I used it with the sun-sky dome. It is especially decreasing the glossy shine. For outdoor it looks like my old 3DL renders. --> left picture: 0, right picture: 100. Lower values (between 99 and 1, also negative) pretty darkened the character in that render.
2. Pixel Filter:
Now I compare the clothing in the two partial pictures (upper and lower picture).
The first I noticed were the artefacts on the white fabrics in the lower picture following your filter suggestion. Additional there are those small corners visible along the border of the belt. With the standard setting (gaussian) in the upper picture it is almost smooth.
OK - it is always worth to play around with the parameters and find the best solution for the personal likes.
I only wanted to demonstrate the experimental results.
Andy
I can't argue with the difference in the first image but in the second you aren't comparing like with like. The Gaussian and Mitchell filters are basically the same but with the Mitchell one using a different algorithm regarding the pixels. The setting I use, 0.5 is for the size of my render which gives a sharper image, which is probably too much for your image. The Gaussian filter is a blur filter and set at 1.5 will be less sharp than the Mitchell set at 0.5. Setting them both to the same setting would be a better comparison, as would a different render size, as the lower the setting the sharper the image.
I haven't noticed any marked difference in any of my images that you are getting either using indoor or sun and sky lighting. You can see my renders in the link in my signature.
Hi,
OK, the sharpness argument - accepted.
But what's going on with the glossy effects and the Firefly Filter? Are you rendering with nVidia Cards or CPU-only?
What of both (Firefly, Pixel Filter) is causing the speeding up?
I don't see the big differences shown in your examples. I had this render going and I did some using different settings.
2018-04-27 15:14:50.020 Total Rendering Time: 13 minutes 20.59 seconds
My default settings.
2018-04-27 17:26:17.839 Total Rendering Time: 14 minutes 42.63 seconds
Firefly lumens 0.
2018-04-27 18:15:29.858 Total Rendering Time: 13 minutes 52.17 seconds
Gaussian 0.5
Hm,
your lighting situation is completely different to a naturally (physically correct) lighted out- or indoor.
It was what I had at the time. Here are some Sun and Sky only.
First one is my default settings.
Second I changed Luminosity to zero.
Third is Luminosity at 100 and Gaussian 0.5
Fourth is Luminosity at 100 Gaussian 1.5
Fifth is Luminosity at 100 Mitchell 1.5
Have you tried cranking-up the lighting, then adjusting the "Gamma" and "Crush blacks" and "exposure-times". (Exposure-times almost counteracts the implied lighting-levels. It virtually tuns down all light-sources at once. Which may introduce grain back onto the image.)
There are also some post-processing effects, like layer-blending, which may give you the desired result, faster. (Using a light-blown-out image, layerd with "Multiply", or "Darken", or "Screen"... While also adjusting various layers "Gamma", "Contrast" and "Saturation". Because layer-blending can often over-saturate images with color too.)
Generally speaking, you need longer times to render with "limited noise", in a poorly lit scene. You need less light in a well lit scene. (Which is why a model, alone, with just a "sun and sky" or "HDRI dome", renders super fast. It is sourrounded by light, in almost all directions. While interior lights do not have that luxury, without costly time-consuming reflections, which create more noise, because they eat-up your render time that would normally resolve light.) [You would need reflections to "scatter and transmit", not just "scatter", from a surface.]
I would go into more complex "tricks", but they are often scoffed by others, or blatantly deleted from threads. (Claiming that they contain misinformation. Which is irrelevant to the post. Instead of just editing the post itself.)
Check your "refractions" and "reflections". Remove what you can, keep what you NEED.
Turn-off (after you set the values to 0.00), any "smooth surfaces" values, especially on floors, walls and other flat surfaces. (Default is ON and some crazy values of 89.8, trying to avoid 90.0-deg, which would turn a cube into a sphere.)
Extend your MINIMUM ITERATIONS to 5000 (May need to unlock it.) With your time extended to 9999999 seconds, so it never reaches it.
Also, if you are hitting your 98% resolved, realize that is a ficticious number. Increasing the "quality" value will alter that time to hit 100%. That last 2% can take hours beyond 98%, to hit 100%, in a multi-GPU system. Essentially, they are saying it is 2% rendered to "full resolve" completion. I Have noise in 100% resolved, forced to 4.0 quality, and over 50,000 iterations. Oddly, after a while, it starts adding noise back into the image. Math-Fails, I assume, or database corruption of the pixel-values.
Also note... Camera-blur and pixel-blur is NOT actually blurring pixels. It still draws indivdual pixels, but the "values" in a pixel, extend to other pixels. You will simply have raw pixel-noise in a blurry image. (Unlike doing that stuff post-processing, which would remove most of the actual noise.) [That is a de-noiser, which is not yet in IRAY, at this current Daz/version. That will "use surrounding pixel-data" to "guess the adjacent color/shade", leading to less noisy renders.]
When light renders at a value of RGBA, then it transfers a portion of that to the adjacent "cells", by some formula. (That is post-processing, you are doing at each iteration you "draw on the screen".) The actual pixel value itself, may be unresolved, and will be "off-color", while the others around it, will not, if they are more resolved. They have a higher light-value, so that lower value will not be seen. Which is why it still shows as a single pixel of red/green/blue/white/black/fast-render-image-map... etc...
Try turning your "update interval" a bit, and "min update samples", so it spends more time rendering and less time trying to draw it to the screen, before it is aywhere near being done, and applying all the post-processing, at every "update".
Using the "depth of field" and "pixel-blur" (AKA: Full-screen anti-alias), together, is almost redundant. Do one or the other. Realizing that the MORE time you spend rendering "blur", the less time you are spending "rendering light".
This is as about as low-light as I normally go, without expecting much noise. This takes about 15,000 iterations. (20-min on my system, with 2x Titan-Xp and 1x Titan-X.) It was done way before that point. I just like the added correcness of lighting values from the extra 10,000 iterations.
NOTE: I had to black-out the picture on the wall. It was an artistic nude that would not be suitable for this forum. The rest is just the raw image. Though, I don't use DOF and I use a 1.10 pixel-blur radius, for rendering.
Perhaps it depends on the "Base Mixing".
I use the Iray Uber Shader, so it is set to Metallicity/Roughness.
The "sharper" the glossy roughness, the more dramatic the outcome.
So the reflection of the eye's cornea completely disappeared.
The 100 is a starting value that I find speeds up most renders because it isn't checking for pixels it thinks is a firefly. The situation you have there would require that setting to be raised. It is the same when I use the Bloom Filter where I raise the setting to match the brightest light in the scene or it thinks it is fireflies and corrects it and the bloom disappears :)
The Zero setting is Infinity and it will keep checking any render until it thinks all the pixels are at the brightness they should be, which on any reflective area could take for ever.
I did a few more tests just changing the Luminosity setting. I also added a Spot Light set to Disc Height and width set to 1, Luminous Flux at 1500 and Temperature at 6500. It is set in line with the camera shining directly on the face.
The first is at zero. You can still see Fireflies above and below the right eye and across the scalp.
2018-04-28 08:27:49.272 Total Rendering Time: 5 minutes 21.36 seconds
Luminosity 0
The second is set to 10. All reflection has gone.
2018-04-28 08:37:30.947 Total Rendering Time: 3 minutes 0.46 seconds
Luminosity 10
The third is at 100. The reflections are back with no fireflies but the eye reflection isn't great.
2018-04-28 08:46:09.780 Total Rendering Time: 4 minutes 45.0 seconds
Luminosity 100
The fourth is at 2000. The fireflies are back as well as the eye reflections.
2018-04-28 08:54:47.069 Total Rendering Time: 6 minutes 9.3 seconds
Luminosity 2000
The fifth one is set to 500. The fireflies are gone and the eye reflections are back.
2018-04-28 13:58:17.414 Total Rendering Time: 5 minutes 47.38 seconds
Luminosity 500
Yes,
for photostudio like lights this corresponds to what I observed.
First I thought, in your previous posts you missed a zero and wrote 100 instead of 1000.
With luminosity = 1000 the eye's reflections are back, but still not that great as without that filter; whereas the fireflies were fully back. The differences in render time are strange. Seems to be no rule.
Base Mixing setting doesn't make any difference (glossyness <-> roughness).
So each user has to test different settings for himself to find that what suits most.