How can I make a bloom effect?
 Super cheese sandwich
Posts: 633
Super cheese sandwich
Posts: 633
in The Commons
How can I make a bloom effect like in the image attached? Thanks
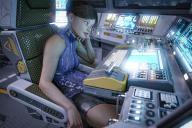
2454.jpg
1800 x 1200 - 549K

445.png
514 x 413 - 30K
Daz 3D is part of 
Connect
DAZ Productions, Inc.
7533 S Center View Ct #4664
West Jordan, UT 84084
Licensing Agreement | Terms of Service | Privacy Policy | EULA
© 2025 Daz Productions Inc. All Rights Reserved.
Comments
Its a thing you need to play with, eG I would change the filter threshhold to 6000 and increase the radius to 0.1 in the given scene but it dependes on the light sources you have and the environement
I find the built in one in Iray to be cumbersome so I tend to use photoshop. There are filter which you can use to achieve this look postwork.
I use Photoshop as well for this. It's not that I think the Iray one is bad, it's just that doing it after rendering is a lot more controllable, so if you decide later to remove that bloom layer, or change the tone, or change the amount, or add it into areas you didn't consider during rendering, you can. Once you render in bloom, it's pretty much stuck there.
+1
If you create an "emissive" canvas when you render the image, you'll get all the emissive surfaces rendered on a black background. Add this as a layer over your bloomless main image in photoshop or gimp, set the blend mode to "addition" (in gimp) and use gaussian blur along with the layer opacity to create the desired amount of glowing effect. Any sources that you don't want to have the bloom on, just paint them out on the emissive layer.
If you want to make it work using only iray with no postwork, here's the Daz documentation on it http://docs.daz3d.com/doku.php/public/software/dazstudio/4/new_features/4_8/start#bloom_filter. It takes a little work, but I think it's worth it. This is where iray preview comes in handy, because you'll have to make small adjustments to get the effect you want. Also, you may want to practice on a simple object with simple lighting, that way iray preview updates faster and you can get familiar with the controls easier. Good luck!
When you say filters, do you mean actions? I'm not a PS person, so I don't know. Where can you get these filters?
In Photoshop there's the (Gaussian) blur filter. FILTER is the menu it's in. It...blurs things...vary the amount to go from glow to halo to.....
Another way is to make a new layer and add all your bloom effects to just that layer.
1) Grab the eye dropper tool and 'sample' the color of the area you want to add bloom to.
2) Use the Air Brush tool to paint over the object and a little glow around it.
3) Use the FILTER/Gaussian Blur and season to taste. You can also use that layer's opacity setting to make the effect more subtle and nuanced.
There are many filters some of which are free, and some of which you pay for.
One of the easiest to use is Topaz Labs Star effects. There is a free 30 day trial. Since bloom isn't controllable, you work on a new layer, add the stars/glows, and then erase what you don't want. I use this all the time.
Topaz Studio is free with hundreds of effects. You can download this, and checkout all the community made filters
Filter Forge also has some glows, which I've been known to use.
In general I make a new layer in PS with a duplicate of my image. Apply the effects, and then reduce the transpareny to get the strength and intensity I want. Understanding an using layer styles is really a big plus with PS... You can get the most of it that way.
Those are nice, thanks for the link!
Is there a way to get the bloom effect to render only on one specific surface in a scene without doing so on all of the other surfaces?
I use the in-render bloom filter all the time...I seem to have the best luck with it. However, the caveat is that if you need to go back and spot render a specific part of your scene to fix something later (like poke through or whatnot), then the bloom amount can and will change...because the in-render bloom filter depends on what is in the actual frame...so that could easily mess up your ability to blend in the spot render in post. I've tried to learn how to do good bloom in post so I don't have to use the render filter, but I haven't been able to figure it out yet. I have the paid version of Topaz Studio so I'll have to look into that. I don't render canvases at all, compositing my work is just not how my art flag flies (we're all different), so I'm not sure I could do the recommended emissive canvas while still rendering out the whole image? I'll have to try at some point.
Come to the dark side. If nothing else, rendering to a single beauty canvas gives you a 32-bit image that has greater colour depth to work with for tone mapping, etc. Or you could render separate diffuse, specular and glossy canvasses which you can balance against each other. What's more you still get the same jpg or png you'd get without using canvasses.
But don't get me wrong: you're doing fine without them.
I tried doing a single beauty canvas before and I ran into the issue with getting the HDRI to show. A solid majority of my work is lit primarily with HDRI and unfortunately that never seems to show up on a beauty canvas.
I haven't tried if yet but maybe you could enclose the surface you want bloomed in a geometric volume of proper size and shape, apply a frosted glass material shader preset (several available for free in DS UberIRay presets) to the newly added geometric volume that encloses the one you want to bloom, make it emissive the new geometric volume, and render away.
That sounds like a heck of a lot of excessive work and system load with adding in additional volumetrics. Light with volume is one of the heaviest hitters for render times and resource use.
That's weird. I've never had that issue. Did you check the Alpha box? That would cause that problem, I think.
What I sometimes do is a beauty and an environmental lighting canvas. Then I subtract the environment canvas from the beauty canvas, which gives me one layer with the environment lights, and another layer with all the other lights.
Could be the alpha thing...I'll have to check next time I do a render. Can I do a full beauty canvas with everything and then get the emissive canvas as the same time?
Yeah, you normally only have to do one render and you get as many canvasses as you set up. I've done over a dozen in complicated scenes. To be safe, select the emissive object and assign it to a node. Then do two canvasses with that node: one canvas using it as a "Light Group" (alpha unchecked) and one using it as an "Emissive" with the alpha checked. With the alpha checked, you get a mask and have more options in post.
I've been thinking of doing a step-by-step for canvasses. I gave a little example of what you can do with three light sources on different canvasses, and what a difference emphasizing one or the other can make, while only rendering one time.
https://www.daz3d.com/forums/post/quote/350226/Comment_4929941
Sorry. It's this, And yes, there are other tutorials about canvasses already.
Edit: Just watched, and it's really good. Everyone interested should watch
Well volumetrics is alot of work. The new GPUs are starting to make short work of that sort of thing though. Adding the geometries with appropriate shaders is easy.
Actually another ideal: if you have the 3D Toon Clouds product or know the technique, just size the clouds appropriately and apply the shader preset with the density you prefer.
I'd like to know this too.