Genesis 8 Figure Collision Item issue
 Doku3500
Posts: 19
Doku3500
Posts: 19
Hello,
So I am having a little bit of an issue with a figure attachment for my Genesis 8 female character. The figure works fine as long as I have the collision item set to none. However the default setting when the scene starts up is for collision item to be set to Genesis 8.
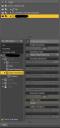
This wouldn't be a problem if it wasn't for the fact that I want to batch render scenes, but the scene always loads up the figure attachment to collide with Genesis 8. I have tried locking the Collision Item setting so it is set to none, but it keeps reseting it to Genesis 8 when the scene is opened again no matter what. Is there anything else I can try to get it the scene to stop opening with Genesis 8 as the default collision item? I have attachted an image with the collision item selected to give you an idea of what setting I am talking about.
Thank you very much for your time and help.
Sincerely,
VB
Daz 3D is part of 
Connect
DAZ Productions, Inc.
7533 S Center View Ct #4664
West Jordan, UT 84084
Licensing Agreement | Terms of Service | Privacy Policy | EULA
© 2025 Daz Productions Inc. All Rights Reserved.
Comments
Do you need the smoothing modifier at all? If not you could remove it (Edit>Figure>Geometry>Remove Smoothing Modifer), save, and use that version.
Unfortunetly, without the smoothing the figure attachment looks much worse, lots of jagged and hard edges on Genesis 8 female. Is there anything else I could try that might achieve the same effect?
LOL, you don't have to black out the words SH G8femgen. Try increasing the resolution/subdivision of the gen figure. If you are getting a bad fit though, then smoothing is the main way to keep a good, snug fit.
@ Doku3500
You can convert the effect of the Smoothing Modifier to a morph.
Unfit the item, hide everything else, go to Parameters pane and set the mesh resolution to base, go to File>Export>Wavefront Object (OBJ) - make shure "Ignore Invisible Nodes" is checked and use 100% scale, open the MorphLoaderPro select the exported OBJ use 100% scale, hit Accept and you have the smoothing as a morph in the Parameters pane.
Now you can save the morph to the library with File>Save As>Support Asset>Morph Asset.
I was worried that maybe Daz3d forums would have a problem with me asking for help with an adult product and maybe censor my thread or something if I showed it was SH G8femgen. They don't even allow nude images for their character promo images, even though they literally start off buck naked as soon as you load them in. Heck, they keep the fact that they have their own genitial for G8 females in the pro bundle for V8 a top secret.
Cool. I will give that a try and see if that works.
So I gave it a try but I didn't get smoothing as a morph in the parameters. However, I noticed under Edit>Figure>Geometry there was a "Bake Smoothed Morphs" option. I selected that while the figured had smoothing still enabled, baked the smoothed morphs (whatever that means), and then removed the smoothing modifier. Everything seemed much smoother then when I removed the smoothing modifer previously. Is this an okay solution or did I wreck my figure in some way?
Sorry I tried to keep the instuction short but missed some important step without it DazStudio dosn't create any morph.
After you have exported the OBJ and before using MorphLoaderPro you have to turn off the Smoothing Modifier, there is a button Enable Smoothing for that in the Parameters pane.
With the unsmoothed item in the scene MorphLoaderPro will add the smoothed shape from the OBJ on top. Also better use the setting Reverse Deformation: Yes.
This will make shure that no other morphs maybe currently dialed on the item become part of the new morph shape you create.
Bake Smoothed Morphs, I dont know exactly what it does, never tried but I guess it is using the current Smoothing Modifier settings and it applys them to all morphs in the figure. Could be usefull to eliminate pokethrougs in all morphs of a clothing item with the collision settings on. But having all mophs smoothed at once isn't always what you want.
All changes you made to the figure should get saved to the current scene file. You can always load back the original figure from the library or revert to a pervious save.
As long as you don't save the new morph(s) with File>Save As>Support Asset>Morph Asset they don't show up in the original figure added to a scene.
Awesome. I just did it and it worked perfectly. Thank you so much for your time and help, I really appreciate it.