Transfer Utility Problem
 witcherask_a3dd58a1c6
Posts: 194
witcherask_a3dd58a1c6
Posts: 194
I used transfer utility to rig model. but there seems to be problem with her face and also some meshes inlegs seems to be streteched.
Can any1 tell me if there is a way to fix this
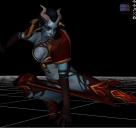
qop.JPG
893 x 842 - 65K
Daz 3D is part of 
Connect
DAZ Productions, Inc.
7533 S Center View Ct #4664
West Jordan, UT 84084
Licensing Agreement | Terms of Service | Privacy Policy | EULA
© 2025 Daz Productions Inc. All Rights Reserved.
Comments
Is this a new humanoid model? How close is its shape to the figure you rigged from? If it's distant you can't really expect the Transfer utility to help, if it's close you'd be better off using morphs and GeoGrafts to customise the original figure, which would also have the benefit that you could share or sell the modifications as a new add-on character.
I must say for such a low resolution game character geometry the transfer already produced a pretty good result.
The stretching you see is to be expected in transfering meshes that differs much. The Weightmaps usualy have to be cleaned up lateron even with transfering to geometry that is very similar in terms of toplogy and shape.
You may also need to adjust the rigging to shape in the Joint Editor pane.
Adjust Rigging to Shape is for morphs, if the mesh is still in its base shape then nothing will happen.
This is what i did.
1st exported a base genesis female model to max. Then matched pose of my model to genesis model.
Then i imported my model in daz as obj file and used transfer utility tool. Which resulted in above.
After that i tried manually painting weights in weight map editor tool. I painted her full face red still her lower jaw doesnt seem to move with her head.
I guess in the Transfer Utility you had activated the transfer Face Groups option, have a look at them in the Geomerty Editor. If the head group is eventualy a big mess of polygons, you could revert back to the originals that come from 3ds max or you have to fix them in Daz Studio.
Once you have propper face groups for selection like the whole head, switch over to the Node Weight Map brush tool where you can use the Fill Selected action to fill the weightmap with 100% for the selected bone and map.
Next I would press Ctrl+ Grow Selection a few times and use the action Smooth Selected to get a smooth transition to the neck.
Panting weights with the brush option Respect Selected at the bottom of Tools Settings pane can help while panting and smoothing just in the area of the selected polygons.