Geo Graft Gaps on Morph
 Defenistrat
Posts: 68
Defenistrat
Posts: 68
Trying to create a custom geo-graft (based on the no-face from Silent Sally, but I wanted eyes).
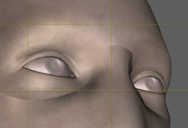
So, clearly not a finished product, but I was able to get the geo-graft to connect seemlessly gaplessly around the nose and eyes, like the image below:

However, when I apply a morph, gaps appear in the graft:
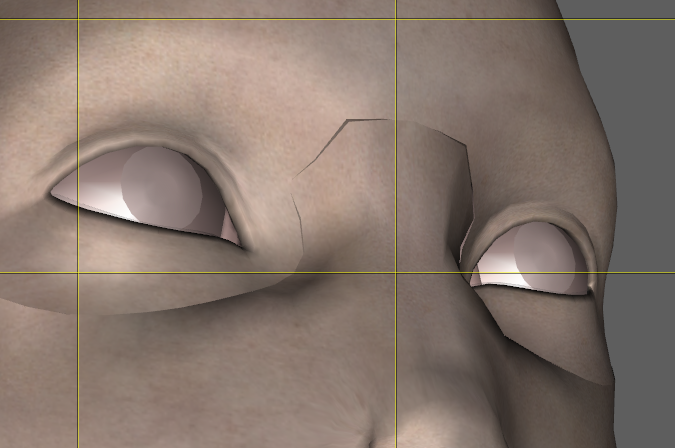
I'm not exactly sure what is causing this. The closest I can find is a comment by RawArt that suggests that maybe the verticies are not exactly in the right place. When building the graft I exported a G3 female at base resolution and positioned all the verticies from the graft in the same place as the corresponding verticies on the G3 face. I suppose that might suggest that it's a modeling issue, but was wondering if there is any other way to ensure they are lined up correctly.

Daz 3D is part of 
Connect
DAZ Productions, Inc.
7533 S Center View Ct #4664
West Jordan, UT 84084
Licensing Agreement | Terms of Service | Privacy Policy | EULA
© 2025 Daz Productions Inc. All Rights Reserved.
Comments
Yes, mismatched vertices is the likely cause. You could try selecting the ring of the base figure, delete eveything inside it, extrude the first inner ring of your graft, then delete the remaining area of the figure outside the graft - that will guarantee correct alignment.
Uhg, what a simple solution. Wish I had thought of that. I just removed the outer verticies of my mesh and attached everything to the actual verticies of the original mesh instead of trying to snap everything to the original verticies locations.
Working perfectly now, even when applying multiple morphs.
Those floating points will get you every time....
Thanks!
I should have known I would have another question...
Knowing from experimenting with the source graft that applying a modifier to the Genesis 3 figure would also morph the graft, I originally thought that I would just create a modifier for my graft for each face that I used it on. Maybe it's not as dificult as I am thinkin it would be (I'm struggling to get my head around how I would create a morph for a graft on a character that's morphed...), but I'm not really looking for fine tuned details on my "no-face" here...
Might there be a way to prevent the graft from being morphed based on closest vertext on the face, and instead be influenced by the graft faces for attachement? I'm thinking there would need to be some sort of weight mapping involved, but ideally if the face as a whole shrinks, then I just need my graft to shrink, or if the face as a whole become more shallow or elongated, I just need my graft to pull back or forward.
A Rigidity Group can block all projected morphs, and can be given a reference group that it will match. That is all or nothing, however, you can't weight it for a transitional area..
I tried this tonight, and momentarily had rigidity working, but when I tried to adjust the rigidity using a map, it all fell apart.
Actually... I'm not sure how I got rigidity working at all. I got it working once, but then when I tried it again, I couldn't reproduce it. Depending on whether I created the Rigidity group in Polygon Selection Mode, Vertex Selection Mode, or using the menu in the Tool Settings, I may or may not have the ability to create a Rigidity Group, or just had the option to create participants and references. Also, depending on what method I used to create it, the group may or may not appear in the Target Group options of the Grouping Tab in the Geometry Editor. Is it possible there is a defect around the UI in this area?
I'm thinking I need to reconsider morphs. I'm debating on whether I should do morphs by region (probably more reusable but might not always result in a smooth experience) or morphs per character (less resuable, but always have a nice clean option for a character if Ihave used them before). Based on this, I have two questions:
1. I'm assuming creating a morph for a graft must be similar to creating a morph for a figure... But I am struggling to get my head around the idea. I import the graft, convert it to a figure, export it again, and then when I import the change I just import it as a morph? Is that the gist of it?
2. Let's say I do decide to make the morph specific to my character. I'm struggling at a high level to picture those steps as well. I apply the graft, add the character morph, export the whole thing (figure, with morph applied, and the messed up graft), make the fix... and then.... I guess I just import back in the graft as a morph? I believe I have seen on clothing and poses where morphs are automatically applied based on popular figures or shapes. How would I make the graft morph to always happen with it was applied to a figure with the same morph?
Rigidity groups are vertex groups.
1 In Morph Loader pro in the import Morphs For list there should be a graft option - I don't have DS open to check the wording.
2 the OBJ file that you import as a morph needs to have the name (not label) of the morph it is to match. You can get the name from the Parameter Settings dialogue, via the gear icon on the slider.
I think I know how to do what I am wanting to do next, but I must be making some noob morphing mistakes that I can't figure out.
When I load a morph, it is just pushing all the verticies in seemingly random directions. I thought maybe all the editing I did was messing up the "vertex order", but now that I am looking at my export parameters again, I don't see how this would even be maintained in the first place.
So I figured I would make as simple an example as possible to try to figure out what is wrong. I exported just the default no face from RawArt and using the sculpting tool in my modeling software, just added a large nose like protrusion:
In DS, I highlight just the No_Face-G3F graft object using Morph Loader Pro, load my .obj with the above morph. Then when I try to adjust the morph the verticies all go in a direction that doesn't even look like what I loaded:
Any insight as to what might be causing this?
Could you post your options in Morph Loader Pro too, please.
After giving it (quite) a few more goes, I figured out that the problem was that I was creating a morph for my graft before I was converting it into a figure. It appears that converting it into a figure cahnges the vertex order, which was messing up my morphs. Thanks to SickleYield and mlominy for their discussion here: https://www.daz3d.com/forums/discussion/270901/where-did-it-go-wrong-in-blender-or-daz#latest
Applying corrective morphs, as it turns out they are called, is outlined here: http://docs.daz3d.com/doku.php/public/software/dazstudio/4/userguide/creating_content/assembling/tutorials/creating_morph_controlled_morphs/start
Thanks Richard, for walking me through all of these steps. I now have a functioning morph.
Great, glad you were able to trace it through.