creating a laser scanner light beam
 sriesch
Posts: 4,241
sriesch
Posts: 4,241
I attempted to create the light beam from a laser scanner, but it's not working out. Suggestions?
This attempt used a cube with the uber light surface applied, sandwitched between two cylinders to project a narrow beam. No matter what I crank the intensity up to it remains almost invisibly dim in lit areas.
Previously I tried a spotlight between two planes, which was also dim (although I didn't test how dim) and also I couldn't make the beam narrow enough and the spotlight stuck out above or below the planes if they got too close together.
I can't paint it on the affected surfaces because it wouldn't be bright enough in shadows.
What other options do I have, or are there ways of turning the light way up, or am I doing something wrong?
Daz 3D is part of 
Connect
DAZ Productions, Inc.
7533 S Center View Ct #4664
West Jordan, UT 84084
Licensing Agreement | Terms of Service | Privacy Policy | EULA
© 2025 Daz Productions Inc. All Rights Reserved.
Comments
Take a look at this thread: http://www.daz3d.com/forums/discussion/27196/
They're doing exactly what you want.
Does the PATH of the beam need to show or just the Light falling on/over the scanned items?
You can UP the light setting on any light by using the Gear icon on the Intensity setting.
I want to see the path (ie, a scan line. I'm not going to animate anything though, it will be fixed in the single frame, and not moving in a path.)
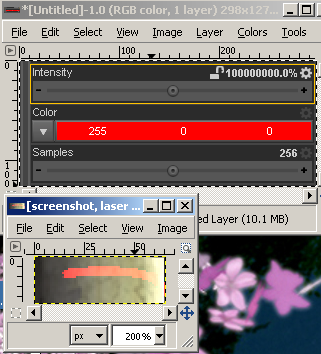
Although I unlocked the parameter and tried turning up the spotlight to I think 20,000,000, it still doesn't seem any brighter. I haven't checked the manual yet for the limit but I assume it tops out at a much lower value?
(I also just noticed that the uber surface light has thrown at least one pixel of light way outside the path, presumably bounced off something at an angle. I haven't done a full render yet, I'm just doing test spots so far. that will be the next challenge if I get that far with this idea.)
Another thought I just had, I could make the scan line itself an object and apply the uber light to it, but then I'd have to match the profile of the items being scanned. I haven't actually placed the item in the scene yet so I don't know how hard that would be, but I'm assuming pretty hard, so I'll keep that thought at the bottom for now.
EDITED TO ADD: Also, I retried the spotlight test using cylinders instead of planes, and that blocked the light as desired after all; I guess the planes were just a hair too thin or I did something incorrectly in the last test, so that part is no longer an issue.
Falloff on the spotlight might also be a problem, depending on how noticeable it is. Although it is not correctly positioned yet, the light source was in the end going to be moved farther away from the test surface and somewhat centered in the room, so it might still work in evenness as long as it can be made brighter. Falloff on the uber surface was disabled to avoid that issue.
I did another test, deleting all the other light sources in the scene. When I do this, the surface becomes relatively evenly lit by this light (left side of screenshot). It's mostly just being washed out and overridden by the other lights. However it's still pretty faded, definitely not the laser-red color one might expect, so I tried messing with the surface (which won't be possible since I need to see it's texture under the other lights) just to see what would happen, and if I make the surface pure red the reflected light gets marginally redder of course (right side of screenshot.) It doesn't have to be red, that was just the obvious choice, maybe if I pick a color that's less commonly seen it won't be as obviously faded.
I wonder if there is some way to block the other light in the same zone as the beam as a workaround if nothing else works?
Also I checked the version 3 manual, and it looks like 200 is the maximum value for spotlights, unless that changed. <--EDITED TO ADD: I was incorrect, values above 200 do change things, although I'm unclear exactly how, see new post below</p>
Clarification to the previous post, the screenshot doesn't actually show the test with all the other lights deleted, just the ones that were getting in the way.
I tried a brute-force method of just adding additional lights by copying the laser scan light to try to raise the brightness of the scan line, however going from 1 laser spotlight to 4 spotlights had no noticeable effect, surprisingly.
I have discovered a few more things in my continued unsuccessful attempts.
One, I stated above that I thought the limit was 200 for spotlights, but that is incorrect. Although I was not seeing the effect of turning it up in previous tests, I have seen a difference in a new different test. Here I moved the spotlight light source into a dark part of the scene for testing, since I have not found any way for it to compete with other light sources yet. Interestingly, when I crank up the spotlight light, the beam appears to get wider and sharply jagged on the edges (looks like it's loosing the antialiasing that softened the edge of the light or something. So rough and jagged in fact it looks like I just tried to draw a red line with the mouse.
Speaking of which, I also considered the option of postwork since I can't get the lights to do what I want, and actually DID try drawing a red line with a mouse. It looked pretty bad. Don't do that. Possibly with the right combination of color and opacity of the brush it could be done, but I couldn't manage it.
Another thing I discovered is that if I increase the angle of the spotlight from 60 to 90 to try to make the beam wider, light started to escape from outside the two flat disks that were sandwiching the light source and keeping it in a flat plane. I haven't looked yet to see why or if it can be fixed.
As your Spread angle increases the Size of the Planes will need to Increase to block the spill light.
EDIT: I have tried with other lights in the scene and it does cause the beam to Wash out. I'm not having any luck over coming it either.
Your laser beam made with a spotlight acts on the diffuse and specular component of the surface and that will indeed be washed out by other light sources.
To get what you want you'd better create a 2 layer shader in shadermixer. Use an opacity mask to get your beam color on top in the ambiant channel