Please help with a newbie question about select a vertex.
 otodomus
Posts: 332
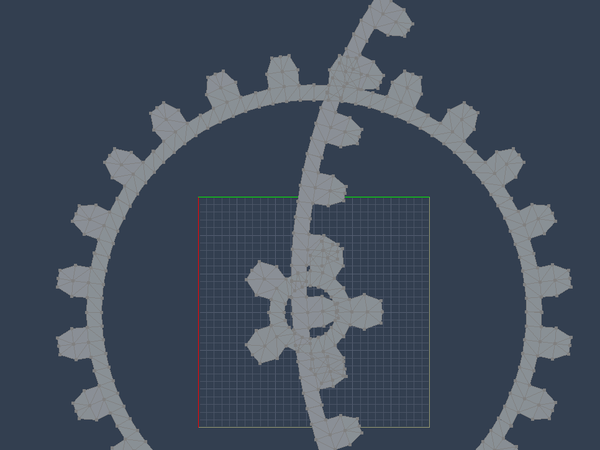
Hello friends, sorry for the dumb question here, in my past I have never been modeling in vertex mode in Carrara, but I found a cool tutorial on YouTube, but I am stuck in a step that I am sure would be an easy one, I have a vertex object that it will be a group of gears, the guy on the video do a selection by one of the vertex part, and after that he selects the entire gear, I can´t do that! If I choose select all, I do select the four gears and that is not what I want, and in addition the gears are overlapped, here a picture of the gears. I wish I am be as clear as I want.


Vertex_Gear.png
966 x 725 - 59K
Post edited by otodomus on


Comments
I need to align each Gear, but I am not selecting each one, here a sample of my trouble:
Not a dumb question. If I understand the issue, I think the answer has to do with two different "select all" concepts. One is using the "select all" choice from the selections menu (or shortcut key) and the other is "double-clicking" a polygon in the vertex modeling room. I think you want the second - which is double-clicking a selected polygon in the vertex modeling room. This will expand the selction to all of the polygons connected, but not those not connected, even if both sets are technically part of the same vertex object.
In the attached images, I inserted a vertex object. But, in the modeling room I constructed two different cubic gears (and rotated 1). Both are still part of the same vertex object and both would be selected if the menu option "select all" is used. Instead, I selected one polygon on one cubic section. I double-clicked (left click) that selection and Carrara expanded the selected area to include the other polygons connected to that polygon - but not the polygons on the 2nd cubic gear.
Hope that is the question that you asked and hope this is helpful.
As diomede64 suggests, double clicking the polygon (not the edges or vertices) is the way to select all connected polygons. Look at the Statistics at the bottom of the Model tab in the Properties Tray. (usually docked on the right side of the screen.) It will show the total and selected elements for the Vertex Object you are working on. Take a look at the total number of Polymeshes. At that point in the gears tutorial the number of Polymeshes should be 4. If you have more than that try hand selecting all the teeth in a single gear and perform the weld operation.
Another way to troubleshoot vertex connectivity problems is to select a single polygon and use the Grow Selection button (Properties Tray: Selection Tools: [+]. Keep clicking until the selection stops expanding. If it stops expanding where it looks like it should continue check the vertices in that area to be sure they are welded properly.
P
Hi there, are you Pete right? I really appreciate your help guys. Pete, I did what you said and is not weld properly, at this point how can I fix the problem? Other thing, I followed your steps carefully, the weld option I choose was the one what it was as default, what did I do wrong?
Thanks much for your help!
When I set up the tutorial I did two weld steps per rack of teeth. Once just after duplication so that the individual teeth could be combined into one continuous rack and once right after the distortion (bend) step so that the two ends of the rack could be joined where they meet to form a continuous circle.
The Weld operation averages the positions of the selected vertices. In our case the vertices needing to be welded should be at the same position, so the tolerance can be set very small. I have my default set at 0.10 cm. (The default Weld setting is here: File>Preferences>Vertex Room>Welding Tolerance.) but I typically use the custom setting of 0.01 cm because I don't want to alter the shape of the object by averaging the positions of the vertices. However, if the tolerance is very small the vertices may look like they are being welded but actually are not.
The other thing that can make a weld fail is if the operation would result in a single edge being shared by more than two polygons.
when I am checking for unwelded vertices I typically put one hand on the UNDO keys and take the mouse and just select and move different polygons around the object. Move one, undo, move another, undo... It's a little tedious, but if there are unwelded vertices that you can't see with the naked eye, it will show up here. As for fixing them. that is a little bit trial and error as well. If I can Identify which two vertices need to be welded, I will try to select just the two of them by themselves and redo the operation.
Part of reason that I set up all three gears in the same Vertex Object was so that I could highlight the Split Object command in the assembly room. You may want to try setting up one gear at a time in the vertex modeler to eliminate some of the confusion when things start to overlap.
Out of curiosity, when you checked for polymeshes, how many were there? Also, what OS and Carrara Version are you using?
P
Looks like an interesting tut - please post link - I need all the help I can get modeling in the VM :>)
Here's the link
http://youtu.be/zAyvyTc5uIA
Yes, I do understand the reason to work with the entire vertex object.
The statics on polymeshes are these. Polymesh 81, Polygons 1296, Edge 2511, Vertices 1296 I am working with a Mac OSX 10.5.8, and running the Carrara Pro 5
I think I will start over again from the beginning.
Thanks again.
I love that tutorial!
I have had a link to it in the Carrara Information Manual thread since Pete posted a link to it in the forums here. But the thread had grown faster than I could keep up with it - so now I have placed it properly in with the Carrara and related 3d Art Tutorials page so we can find it easier. I still left it in the Carrara Introduction because I think it fits nicely there as it has a lot of valuable vertex modeling technique information that's really good to know.
Thanks again, Pete, for the awesome tutorial!
EDIT:
I will be working a lot more on that whole thread very soon.
Thanks for the link, Pete. Great tutorial - cleaR explanations and good pace. You really should do more of these:)
Thanks to you too, Dart, for keeping it all together - I should have known you would have it listed and looked there first :)
Cheers
Don't need to Thank me, Roygee... I do this all for you, my friend!
And I agree... Pete should just keep teaching.