Strange Problems with Materials and Rendering Them
 Fauvist
Posts: 2,152
Fauvist
Posts: 2,152
I have THREE different problems with one render.
I'm using DAZ Studio and iRay. Genesis 3 Female, and V4 textures called P3D Milana, and OOT Cathy hair with the iRay materials.
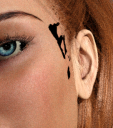
#1) When I render with the OOT Cathy hair visible in the render, I get solid black blotches on the the skin surface between the eye and the ear. When I remove, or make the OOT Cathy hair invisible and render, the blotches are gone.
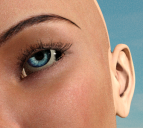
#2) I'm using the Macro Eyes for Genesis 3 by Parris. When I render, I get solid black areas on the eye ball, that don't go away no matter what I try.
#3 I'm using V4 skin materials with Legacy UVs for Genesis 3 (Victoria 4). They apply fine, and render fine, until I use N.G.S. Anagenessis 2 - Revolution to improve the old V4 materials. When I render, the materials now look fantastic, but the Anagenessis doesn't apply to the areas of Genesis 3 masked with the Legacy UV product. So I end up with bands of pale skin on the head and ears, the shoulders, etc.
I'm using a lot of really great products, but something is going wrong.
Any ideas?
Daz 3D is part of 
Connect
DAZ Productions, Inc.
7533 S Center View Ct #4664
West Jordan, UT 84084
Licensing Agreement | Terms of Service | Privacy Policy | EULA
© 2025 Daz Productions Inc. All Rights Reserved.
Comments
1) A couple of items have issues like this, all I can suggest is opening a Technical Support ticket - someone else may have a more helpful suggestion.
2) do you hae an example? Have you edited the Max Path Length property in Render Settings?
3) have you tried manually selecting the geoGrafts and applying the Anagenssis preset to them?
What is the Max Path Length?
An option in Render Settings, under Optimisation. By default Iray bounces the path off surfaces until it it too attenuated to chnage any further, but this setting can put a cap on the number of times it will bounce - so speeding rendering at the expense of accuracy. If you (or the Render preset/scene file you are using) have set the value too low eyes are one of the most likely things to show an effect. (It's pretty much the equivalent of the ray trace Bounce setting for 3Delight, but that doesn't have an option to go without limit.)
I sort of fixed the black splotches on the face caused by the Cathy hair by adjusting parameter dials for 3 hours.
Okay! I made the face invisable and rendered the eyeballs - and there appears to be HOLES in the eyeball textures (Macro Eyes). With the face made visible, the holes appear as black areas. There are no holes in the actual texture map of the sclera. Why would there be holes in the eyeballs, and how do I fix it?
I just don't understand what's going on. When the character is facing the camera, there are no black marks on her eyeballs. I rotate the whole character -15 degrees and the black marks show up on her eyeballs. NOTHING else changed between the renders.
Ah yeah, this is a long-running problem with Iray now, and they won't fix it.
It's caused when two geometries of different materials are overlapping close together. If one material is set to zero opacity, it'll do so for the other material too. In your case, it's caused by the cape of the hair. Try adjusting it so that it either the cape is pushed in or out of the skull of the character, if there's a slider for that.
Apply your V4 materials to V4 herself.
Apply the Anagenessis shader to V4.
Save the newly Anagenessis materials to a .duf Materials preset somewhere in the Daz Studio section
Apply Legacy UV to G3F.
Select everything on G3F, including the Legacy UV geografts.
Apply your V4 Anagenessis material preset. It should apply correctly to all surfaces. You may or may not need to run one of the Legacy UV scripts to get things to recognize the V4 UV afterward, but usually not.
Alternatively, you can go through, match up the surfaces on G3F to the ones on legacy UV's geografts, and copy/paste settings and materials on the Surfaces tab. You almost certainly will need to run the Legacy UV adjustment script after that. Depending on how hard it is to get Anagenessis to work with V4 herself, the first method, even though it looks longer, will probably be easier, plus you'll have a preset you can use afterward.
Thanks! Do you have any idea about the eyes? It is the same problem?
Yeah, caused by the eye moisture geometry sometimes. Usually happens because you either scaled the figure to much bigger or smaller, or moved it somewhere way off the centre of the scene. It's weird. Only way to fix it is to make a morph for the moisture and make it bigger or smaller than the geometry of the eyeball itself.
I just had that problem on a render today and it was because the character was at -1500 on the Z-axis. What I do in all my scenes now is create a group and put all enviromental sets & props & vehicles in the group. Create another group that has only cameras. Another group with only lights. Another Group with only characters. Then if when setting up the scene how I like and I start to render & get bugs like you have it's easy to get rid of the -1500 Z for example by typing in zero directly on the character not the group for the characters. I then move the entire group for each of the lights, environment, & camera by 1500 Z and then that makes my character a 0 (or very close to zero if I have multiple characters). I repeat the process for the X axis and sometimes even the Y axis.
I will try both of these! You are right - the figure is moved 1000 away from the 0 position. It's so strange though, because the black marks depend on the direction the character is facing, not the the direction the camera is facing. It's like a reflection of black.
Makes me think of medication: all those pills are great themselves, but nobody knows what can happen when You use 10 different kind of pills at the same time
The black blotches on foreheads are created when the hair/scull-cap object clips into the head object. If you can adjust the size of the hair to stretch or scale it so that the hair's scull-cap is fully outside the head, it should render as intended. Switching to smooth-shaded mode helps to view the areas that are clipping.
No, the blotches are created because Iray loses precision since it only uses floating-point numbers, so it can't detect which mesh is in front of the other. The solution is to change the Instance Optimization setting to "Memory" (on), which recenters your camera at world origin and restores the lost floating-point precision.
To further expand, thin squiggly lines on the forehead are usually the result of skull cap intersection with the head or geometry shell and can be solved by increasing the skull cap size, either through a morph (eg. Expand All or Head Size) or by applying a push modifier with a small offset. Larger blotches, as Margrave explains, is a different issue and appears to be what the OP encountered.
The thin squiggly lines and the big black blotches are the same thing. Iray's limited precision gets worse the farther from world origin, so the self-intersection caused by it becomes more apparent. Moving the skullcap is just widening the distance until the imprecise numbers are large enough that Iray recognizes which one is supposed to be in front, while setting the Instance Optimization will just fix it outright.
The technical reason may well be the same, but the issue with skull caps tends to be actual intersection - the skull cap partially sits within the cranium of the character. The squiggly lines mark the point of intersection between the skull cap mesh being inside the cranium and outside of it.
Changing instance optimisation won't help until you fix the intersection, whether that's using morphs, smoothing, or a mixture of the two. One must remove the intersection for any fix to work.