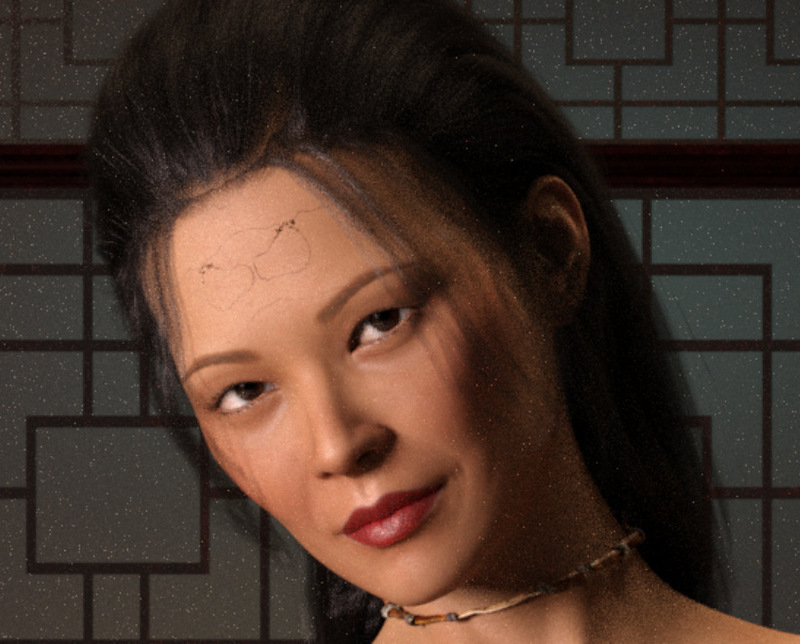
Hair causing artefacts on forehead
 V.W. Singer
Posts: 33
I tried searching for a previous Q&A but couldn't find anything similar. I'm using DS4.10 and Genesis 8, rendering in Iray.
Using various hair sets I get strange patterns or artefacts on the render when hair is applied. I tried resizing the hair or cap in case it was some kind of poke through, but without a reliable result. Has anyone seen this before? Any ideas? TIA.

The image was captured early in the render, hence the grain.


Comments
Recenter the model at (0, 0, 0) fixes that bug most times. You'll have to adjust the set, camera, and maybe lights by the same (x, y, z) translate offsets
Not an obvious fix :)
Thank you. I'll try it.
Yep, it worked! Thanks so much! Shifting everything wasn't too hard. I just parented everything to a main object and that object to Genesis 8. Typed 0.0.0 and viola :)
That's what I always do now. A make a separate group for lights, one for camera, one for enviroments & unparented props, & one for characters.
Does anyone know what those artefacts are? Why would a coordinate change cause funny lines specifically on the forehead?
That used to be what I did but it didn't always work and often made the hair look too sparse.
Sometimes when I use G3F hair on G8F I need to scale up the hair a little bit to fix this problem.
Are there any new fixes to this problem?
try this, in the image editor, set the image gamma of the opacity map to 0
edit: nvm, i didnt read the question before answer :D
maybe you better add an image
Hidden properties of any object can be accessed by selecting the object in the Scene pane, right-clicking on the Parameters tab, and selecting Show Hidden Properties(?) in the popup menu.
I feel like changing the instances could work, because today when I have freshly loaded everything the problem does not occur. So it's a memory problem maybe indeed. However, sadly I don't have the instances optimization option in the render settings pane.
I used the search in the render settings pane and also searched on google. I cannot find that setting in Daz Studio 4.12. Where exactly should it be located? Maybe you can provide a screenshot? Big thanks to you :)
Render settings tab under optimization, it's a dropdown box menu thingy
Ohh damn I had the same problem. Tried various G8 characters and Hair (All purchased in the Daz shop) all gave the same problem. I think it may be caused by the set then, because the 0,0,0 positioning thing worked. I had to seach a bit for some more explanation on how to do it (sorry Noob here). I found this other quote:
I think Daz should fix this, since their products are all affected - so it's a bug. (is there a bug list somewhere ?
Thanks a lot, this technique appeared to work for me... this has been bugging me now for years, Up until now I have been manually fixing after render in PSP pro, which is a pain.
It's not a bug, it's a limitation - of the way nVidia's Iray is written, so not even soemthing Daz has any control over.
I've been fighting this problem for a long time.
All I did was to remove the artifacts in PSP but that's not the best fix.
When I get this problem (quite often - especially with OOT hair) I just use one of the adjustment morphs to move the forehead out a little. It seems that if the hair cap is sitting very precisely on the head, IRay produces those annoying dark lines. If you move the hair cap away a little, the lines go away.
This worked for me, at least on one image I just tested. Thanks a ton! Been struggling with this for a year at least.
Ive had luck showing the invsible parameters for the hairs "head" node, then adjusting the x,y and/or z scales with the nudge value set to very small increments. it is a PITA though.
The artefacts correspond to the intersections of the skull cap with the actors skin. The skull cap extends down the forehead but has an opacity of 0 to make it transparent. The cap should be floating a small distance outside the skin (like a geoshell with a small offset), but for non-support actor morphs it may end up intersecting the skin. The intersection reveals a bug in Iray rendering where the precise points of the intersection are not rendered correctly; my guess is that the math at the point of intersection sends the rays off in the wrong direction.
The same bug can happen when other transparent objects intersect the actor skin; e.g. some garments use transparent regions to alter the garment shape without actually morphing it.
Normally the issue can be seen more precisely in a smooth-shaded render, but this isn't always reliable; the Iray render typically uses different subdivisions which can be seen in moving "poke through" in other cases. The work round, or fix if you prefer, is to use the skull cap morphs to ensure the cap is outside the character skin in the forehead area. It doesn't matter for the rest of the skull because the hair itself obscures the lines.
This has been happening to me with a couple of different hair products, so thank you for the thread and suggestions. One the hair products is from OOT (has the worst artefacting so far), but the other is not.
Did a quick test with increasing head size (in hair actor adjustments) by .3%, 1% and 5%. .3% and 1% were too little, 5% looked like it was working well. Switched to -3% ForeheadDepth (so as not to alter areas that don't need to be) and doing a full render - will adjust as necessary.
If the hair doesn't have any scaling or adjustment morphs that work, you can select "Show Hidden" in the Parameters-Tab, drop down menu (right-click) or Pane Options (Four horizontal lines) -> Preferences -> Show Hidden, and you can use all the activated morphs of the character to adjust the hair.
The activated morphs of the character are transferred to all the fitted items, they are just hidden.
Sometimes if the morphs that are activated, are not giving what I want, I go find one that does and change the value of the dial to 1 or 0.1, something that's enough to activate it on the character, then I can go to the fitted item, search for the morph, use the gogwheel to open parameters, remove the autofollow and hidden checkmarks and I have the morph I needed.
I had this recently with dforce hair. The trick was to disable the visibility of the cap element.
Hope it helps someone.
Still a problem in 2022.
When I see it happening rather than waste a lot of time on fixes that may or may not work, I've simply resigned myself that I'm doing two renders. One with hair and one without. Then in PS with the layer mask I remove the artifacts by revealing the materials as they should have rendered to begin with. Since both renders are of the model under the same conditions the results are seamless.
It's a pain, but what are you going to do?
Not sure if this is helpful but, I have always changed the scalp paranters to fix it.
Try the Push Modifier, set it somewhere within 0.020-0.060, and it should solve the problem with most hair (particularly OoT sets)