Need help with figure visibility in shade (outdoors)
 flord22
Posts: 5
flord22
Posts: 5
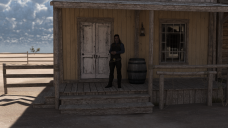
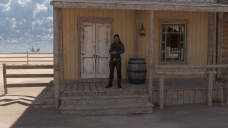
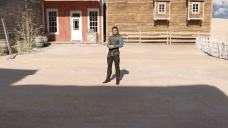
I've attached an example screenshot in which you can see my problem. The figure is just too dark. I've tried everything I could think of, various options in render settings, camera settings, different light presents (orestes HDRI skies, skies of iradiance, etc.)... But this is the best I did, and it's still bad.
Screenshots attached in order from darker (crush blacks high) to lighter (crush blacks low), from figure in the shade and on the sun. Even the lighter one in the shade is still too dark.
Does anyone know how to make the figures in shade more visible/less dark? They look fine in the sun on high "crush blacks".
Thanks in advance! :)

Daz 3D is part of 
Connect
DAZ Productions, Inc.
7533 S Center View Ct #4664
West Jordan, UT 84084
Licensing Agreement | Terms of Service | Privacy Policy | EULA
© 2025 Daz Productions Inc. All Rights Reserved.
Comments
Try adjusting the gamma setting. The only other option would be increasing exposure/ISO, which will cause the brightly lit areas to overexpose.
In the Render settings, Tone Mapping, try decreasing the F-stop. This will let more light into the camera. You can also increase the ISO speed setting for the same effect. This will raise the overall brightness of the scene.
If you're comfortable with modifying the image in post work, I tend to use the following for my renders:
This will give you the widest range of highlight to shadows for the render, but you'll probably have to adjust the overall brightness / contrast using an image editor afterwards.
In real-life photography, photos like that are difficult because the light and dark areas are either overexposed or underexposed. Eyes are better at this than cameras; and normal PNG/JPG files do not allow such a range of brightnesses. The solution nowadays is to take a high dynamic range photo which includes the complete range of light levels, then use a tonemapping program to map it back down to a regular 32-bit image file. Another solution is to do what photographers do and add an inconspicuous fill light for the shady area.
Thank you all for replies.
I have messed with tone mapping before posting and nothing helped with the visibility in the shade. Some extremes helped but then the light-up parts were just way too bright.
@Jonny, I've tried the 0-0-1.0 with the f-stop brightening up and the shade is pretty good for the surfaces in the shade except the figures themselves. Figures are still too dark. I've managed similar results beforehand.
@Ostadan, I'm a rookie when it comes to cameras and stuff, so I have no idea what your solution means and how to do any of that so I had to google most of what you said there.
How to get a "high dynamic range photo which includes the complete range of light levels" and what program should I use for the other part?
Do you have any tips for the "inconspicuous fill light"? I tried adding some ghostlights but it didn't help at all. And I'm pretty sure pointlights will suck because of the shadows.
Thanks in advance!
On a real life camera, you could do various things to increase its sensitivity to light - change the shutter speed, aperture (f stop) or film sensitivity (iso), but each of them has a side effect - motion blur, shallow depth of field and graininess respectively. None of those side effects apply to Daz cameras, so the three values are interchangeable. Just use whichever one makes the most sense to you. Or use the Exposure Value instead (lower numbers mean brighter images).
If tone mapping doesn't work for you, you're going to have to shine more light into that shaded area. Use one or more spotlights positioned behind the camera, with a light geometry of disc or rectangle, the height/width parameters set to quite large numbers, and the luminous flux left fairly low (you'll have to experiment here). That should give you a gentle light without hard shadows to pierce the gloom a little.
Finally, there's post processing in Photoshop or similar. What I do for a quick fix is load the picture into Paint Shop Pro (in my case), duplicate the layer, and apply a "one step photo fix" effect to that layer (PSP has a nice plugin for this called Perfectly Clear). I find the end result a bit fake, but by reducing the opacity of the top layer and letting the original show through a little, I can adjust it till it looks how I want it.