Monster bride: head HD details creates issues
 Blazmeth
Posts: 36
Blazmeth
Posts: 36
When ever I put the setting for "Monster Bride HD Head" over 15%, I get some horible poke thru the face in my render, which I dont see in the preview windows.
What could be the issue? I cant believe the product is supposed to behave like that!
I attached an example
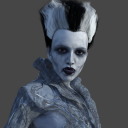
bug.png
500 x 500 - 240K
Daz 3D is part of 
Connect
DAZ Productions, Inc.
7533 S Center View Ct #4664
West Jordan, UT 84084
Licensing Agreement | Terms of Service | Privacy Policy | EULA
© 2025 Daz Productions Inc. All Rights Reserved.
Comments
I don't know what the issue is, but it gets worse with subdivision. At zero, it previews and renders without the spiky bits, but lacks the detail you'd expect from HD.
ETA: Try changing the Subdivision method to Loop (you can have subdivision level > 0). You can crank the "Monsters Bride HD Head" all the way with no poke through with the mouth closed, but there's a little bit of it with the mouth open.
Thanks, but where is the Subdivision setting? (I am new!)
I also noticed that it does the same thing with the head HD details...
Select Genesis 8 Female in the scene tab or viewport. Go to the Parameters tab and select Mesh Resolution. Click on SubDivision Algorith and select Loop (Catmull-Clark Legacy isn't too bad, either). With either of those selected, the SubDivision level doesn't seem to matter much when > 0, then you will see the difference with the Bride HD Head dialed in. Both are a little smoother than the default Catmark, so there is a small trade-off.
Which "Head HD Details" do you mean? This Bride HD Head seems to be the only one affecting it, unless there is a conflict with some other add-on.
----
Aargh! I think I see what's happening. Just realized this while filtering the parameters with "bride". When loading the character, the full-body "Monsters Bride HD" slider is 100%. Normally this also sets other sliders that control individual parts (like Head and Body) to 100% also, but not in this case. When also dialing in the Head HD, you are adding it again, which probably pushes the morph way past its useful range, causing the distortion. Compare the character morph (People-Fantasy Sci Fi-Monsters Bride) with setting all the individual morphs for HD Head, HD Neck, HD Torso, etc. You will see that the are the same.
Thanks,
I did change the algo to loop and it fixed the problem. What exactly does that mean? How can I recognise an issue that need to be fixed this way? (I appreciate the fix, but I would like to understand it so I dont face the same problem in the future!)
I am a newb so I cant comment on the default sliders values, but I just tried it and you are right, individual parts are set to 0%. I tried to set the full morph to 0 then set it back to 100% and then increase all parts to 100% and I am still getting the same issue. Any idea how I should fix this? Or just raising the global monster bride to 100% should be enought? Or should I keep the global to 0% and instead increase each individual part?
Since the individual parts are additive to the global setting, use one or the other, not both. The global one is usually used on its own, the individual parts allow you to selectively mix them with other character morphs, giving better control over different areas.
There is no real issue to fix, in this case, it's just about knowing how to properly apply the morphs. For this character, the individual controllers are not tied to the global controller, which is not usually the case, but there is always more than one way to do something.
Load a blank Genesis 8 Female character and pick a character slider to use, say, Victoria 8. Dial in 100% and select "Currently Used" in the Parameters tab. You'll see "Victoria 8 Body" and "Victoria 8 Head" also at 100%. Now slowly drop down the Victoria 8 slider and the other two will also drop accordingly. You can still control each one individually, but that breaks the link (sometimes) until you set them all to the same value again (0 or 100%). Here, if you load Victoria 8, but want to mix the head with another character, you might need to dial back only the Victoria 8 Head, and add the other's. Having both at 100% might give unwanted results because the two morphs together might cause too much distortion in the mesh.
Thanks for the great reply! I understand now ;-)
Glad to help! I learned a couple of things, too. Have fun...