Daz 3D is part of 
Connect
DAZ Productions, Inc.
7533 S Center View Ct #4664
West Jordan, UT 84084
Licensing Agreement | Terms of Service | Privacy Policy | EULA
© 2025 Daz Productions Inc. All Rights Reserved.
Comments
3Delight has a built in pathtracer modul that can be accessed through scripted rendering. Google pathtracer if you are not familiar with the concept. IRay is an unbiased pathtracer that calculates light rays in a physically "correct" way, although I prefer to think of it as plausible;) The 3DL pathtracer behaves just like that in many ways, but there are differences since 3DL is a biased render engine. You can turn off shadows, you can have invisible stuff cast reflections and so on.
You CAN get pretty close to IRay using the standard 3DL and shaders, as I mentioned, I've seen some truly amazing stuff in the arts forum, but that requires a deep understanding of the aspects of lighting, shaders and everything else involved...not exactly a walk in the park
Edit to add: Tried to find some AWE render examples similar to your scene, this was the closest I got. This is just one way of lighting your indoor scene, the main light is the HDRI, which shines through the windows and bounces around, creating indirect lighting. Two additional bed table lights with the light bulbs made emissive to cast some direct light. Also part of the ceiling is made emissive, using very low intensity.
Thank you for the response.
First, I am so sorry, that I still have the same problem here
This time, I've applied these settings below,
- Default shaders, UB2 (intensity 28%) with occlusion soft shadows,
- Distant light with raytraced on
- Add 3 spotlights, placed around character.
I do appreciate your petience, seems like i still miss some settings, so my scene still doesn't look alive (Pic below). I'll figure it out which settings did I have skipped.
Meanwhile, I will try another way by using aweShaders.. I had the commercial pack with me now. Perhaps you can show how to use for a newbie like me.
Thank you so much,
Regards.
I just can't wait untill the day i can finally create the scene like this. It's so great.
Once again, I hope you don't mind guiding me so that I can make a good render, either with UE2 or aweShaders.
Thank you!
Well, for some reason (wrong depth of field settings on the camera or too much pixel filter width or too high shading rate?) your pic is very blurry, but I can already see some improvement here:) Did you remember to also turn on raytraced shadows for the spotlights?
Ok good to know you own the commecial pack, then we use the same stuff! I'll try to come up with a simple introduction (hmm, is there such a thing?) to get you started
A tip: If you don't have these, I strongly recommend getting them for use with 3DL. They have some advanced features that the standard lights lack, and they render very fast.
So here is a brief introduction of how to use aweSurface.
1. Open/Create your scene, load the props you will use. Doesn't matter if they are IRay or 3DL materials, you need to convert them either way. Let's leave characters out for now.
2. Right click in the viewport and select all, or expand and select everything in the scene tab. Open the surface tab and select all surfaces. Go to your content library/shader presets/wowie/awe shader kit, double click the aweSurface script to apply aweSurface to all surfaces.
3. Add some light source so you don't have to work in the dark:) You can delete them once you have set up the lighting, or you may want to keep them, I suggest loading one or more of wowie's light emitters (content library/light presets/wowie) When working with awe, you will use the included PT area light shader to light up your scenes. This shader is also in wowie's shader presets folder. It is highly optimized for speed/performance with the pathtracer, and is really all you need. As I mentioned, the standard DS light and AoA lights will work but rendertimes will basically double. Get used to using the arealight shader. Of course you can use HDRI lighting, but as we focus on indoor scenes let's use the arealight for now. Wowie's light presets are very simple. It's a pivot point with a plane parented to it. The plane has the PT arealight already applied to it, you just need to place it by moving and rotating the pivot, and adjust light intensity according to your needs. (Select the emissive plane, adjust light intensity in the surface tab)
4. Set up the surfaces. You can do it manually or use the included presets for things like metals, glass, fabric, skin, reflective surfaces etc. Note that there are no awe presets in the store, you will have to learn the shader and set it up according to your needs and visions. You can make your own presets along the way. I can help you with that, don't worry if you can't get things right right away, it has a learning curve. Note! Sometimes, especially when converting from IRay Uber, some maps (opacity maps, normal maps) may not load, and you will have to browse to their folder location and load them manually.
5. Testrender to see the results. In the rendering editor pane, double check that gamma correction is on and gamma is set to 2.20. Then choose Engine: scripted 3Delight, from the script menu choose raytracer final. Progressive mode is for quick preview, turn it on while setting things up. SAVE YOUR SCENE!!! Hit render! A tip: Use the spotrender tool if you work with some detail in the scene. You can either spotrender in the viewport or to a new window. Options are found in the tools pane.
6. Progressive mode is a limited type of rendering, it's usually faster than non progressive, but quality will suffer. I recommend using it while setting things up, but turning it off for the final render.
Well that's basically it. You will most likely create your own workflow after some time, you may not want to convert everything at once, for exampe, you can do it one surface at a time if you prefer that. Note that it's easy to miss a surface when dealing with complex scenes. Those surfaces will render pitch black. That's why I prefer to first convert everything, then tweak individual surfaces.
THIS IS GREAT!
I am expressing my gratutude for your kindness. I found huge diferrences using Awe (especially to the character at the scene that looks so much better and so real), this is awesome.
I would like to ask you a further questions as I had another difficulties while experimenting aweSurface, specifically for the living room (https://www.daz3d.com/cottage-living-room) that still have some problems, and still can't be rendered as good as the character had.
Regarding to your introduction to aweSurface:
1. Done
2. Done
3. I set some spotlights around the scene, the character looks fine, but the area (living room scene) seems doesn't change or shows any effect of aweShader yet. I also can't adjust the light intensity after loading emitters, Perhaps you can show me how to light up the living room scene as well as to apply the correct shaders into it.
4. What do you mean by "Set up the surfaces. You can do it manually or use the included presets for things like metals, glass, fabric, skin, reflective surfaces etc"? do I have to load the preset to each surfaces, for instance, fabric to sofa; skin to character's body or face; and so on. In other words, should i load the preset manually to every materials?
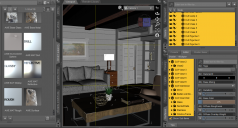
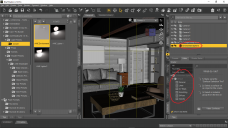
5. render settings (pic 1), i tried to choose rayttracer final, but it took so long to render, for this result (Pic 2, took 75% of rendering in nearly two hours). Moreover, I also choose render script:Point-based occlusion, it too an hour of rendering.
6. -
Well, as you can see at my render here (Pic 2). For me, it works with the character but not with the living room. I hope that you could show me something that i missed, hence.. the living room still looking flat (i can tell it from the ceiling lol). I do hope that you could guide me make that living room works fine :)
Thank you,
Good to hear:)
If you want to use the standard DS spotlights, there are a couple of things you need to do to make them work like "real lights".
First turn on the raytraced shadows as discussed, adjust shadow softness and lightspread according to your needs. Then you need to set decay to 2!!! That will give the light a physically correct light fall off. Then set intensity scale to around 20000 or so, for a "normal" work range of some meters. Adjust from there. Here is a screenshot of some test I did, the important part is intensity scale and decay:
Note that the default max softness is 100%, but you can turn limits off (click on the little cog wheel on the upper right to open parameter settings, turn limits off) and set the value to whatever you want. Also note that with a 180 degree light spread there are only perfectly sharp shadows, no matter the shadow softness settings, call it a bug if you want:) Maybe stick to a spread of 90- 150 degrees? Also note that the softer the shadow the more shadow samples you will need. (Shadow samples in rendersettings: scripted rendering: raytracer final OR raytracer draft, the default is 128, you may need double or 4 times that in some cases.)
An emissive plane positioned where the spotlight would be and scaled down to maybe 10x10 cm (with added intensity) will render atleast twice as fast as any standard light and shadows will look better.
The presets just provide a starting point for speeding up the workflow. You can just apply the awe base shader and adjust it, if you prefer that:) But basically you will have to tweak every single surface in the scene, except maybe metals and glass. (I usually tweak those too). It is a bit tedious at first until you get familiar with the shader. The specular/reflective settings make a surface look glossy or rough depending on specular roughness. A high spec strength combined with a low roughness will result in a surface lik high gloss paint, while the opposite will look like fabric or paper.
Regarding characters: There are presets to convert all skin surfaces with one click for Gen4, Genesis1 - 8. (Shader presets/wowie/aweShading kit/Base Character MATs. Note: These are a bit outdated but still provide a good starting point. (Will be updated with the next awe build). Set diffuse strength for all skin surfaces to 100%, after applying a preset.
There are only two scripts that tap you in to the pathtracer: Raytracer final (for final renders) and raytracer draft (for testrenders). Don't use anything else!! The longish rendertimes are probably a result of not lighting the scene properly and not optimal surface settings. Remember, progressive rendering will be faster for most scenarios.
Right...made a simple scene, just a room figure, to demonstrate one way of setting up lighting.
Start by loading the aweEnvironment into your converted scene. Content library: Light Presets: wowie: AWE Environment, or your smart content: Environments: skydome. It loads in two parts, the environment light and an environmental sphere parented to it. If you select the env. sphere and go to the surface tab, you can load any skydome image into the diffuse color slot. (TIFF, png, jpeg, or .hdr). A HDRI will provide both direct light and global illumination just like in IRay. A png or jpeg will produce only ambient light.
The env. sphere will cover the outside completely and leave no transparent areas that would make reflective surfaces look weird. And it will provide some ambient light through windows and openings. The awe Environment can control the appearance of the light from the environment sphere, such as light intensity, temperature (warm or cold) and some other things. It will work globally for every surface that uses the environment shader. (Also found in shader presets:wowie:environment shader).
Quick render of what we have so far:
There are three light panels in the ceiling, I applied the PT Area light shader to make them emissive. Settings as follows:
If you want the panels to show in render, turn on camera visibility. If you want the emitter to have a reflective surface (glass), enable specular and reflection, set roughness to a low number. Also enable Reflections&Refractions in the visibility section, as shown above.
To simulate light shining in through the windows you can use this method. Load one of wowie's light emitters, or create a plane primitive with 1 division and apply the PT Area light shader to it, scale and position it as shown here:
Result after adding the emitter outside: (Sorry for the quick and dirty render)
Settings for the emitter: (hidden to the camera)
A tip about surfaces converted from IRay: You need to check the bump strength settings, as IRay often uses insane numbers like 500% or more. That is because bump and displacement is not implemented the same way in IRay. Set bump to min/max -0.1/0.1 with 50% strength as a starting point. Your renders show me there is way too much bump on things like the carpet and the floor boards. Check them all and testrender with my settings.
Sorry for the long post, I hope this helps some, I've probably missed some obvious things, so feel free to ask:)
Edit: Just to clarify: Emissive lights use the PT Area light shader, select the emitter and adjust intensity scale in the surface pane, as pointed out in the screenshots. If the max value of 8 is not enough, add to it with the intensity scale offset. Or scale up the emitter, which will also add to the shadow softness.
Hi, Sven.
Thank you for your fast response.
Here are the quick questions I stumbled before I follow your instructions above.
Before (applying aweSurface)
After applying aweSurface
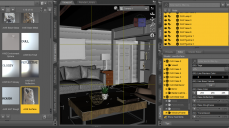
As you we can see the changes, after applying it, the room changed into something flat (i can tell it from the painting). So far, did i apply it correctly?
I am afraid, I've got mistaken from the beginning.
Well, the next question is about the aweEnvironment. After loading it, I only have the environment sphere, it doesn't load the environment light. Thus, I can't follow further instructions as you mentioned above. I can't adjust the light intensity, temperature and so on.
Thank you once again.
Yes that looks ok. The painting apparently has a glass surface. Try applying glass preset 2 (thin glass) or glass preset 3(uses opacity), it will be transparent when rendered. I suggest using nr 3 in this case.
Well that's odd. Did you try loading it from the smart content: Environments: skydome? If that doesn't work, try locating wowie's AWE Quickstart scene and open it. The aweEnvironment should load, along with G2F default and an emitter. Save the aweEnvironment as a scene subset and load it into your scene. Should be in smart content: Scenes or content library: Scenes. Also, did you check DIM for an aweShading Kit update? Looks like you have the first build, the current one is 1.3. Let me know how it goes!
Edit: Hmm, thinking about it, I'm pretty sure you have the first build, there were some issues with the aweEnvironment, I remember doing just that, loading the starter scene and saving the aweEnvironment as a subset:) It was fixed in the following build. You should use the latest version, there are so many improvements, and a lot more render speed optimization.
Sven,
Not sure if this is the right forum but i want to know how do i make eyes with 3delight shaders? i feel i cant find anything about start or creating eyes for 3delight and iray materials. i feel there is a need for anime eyes in daz for NRP renders. do you know what program i use to create eye texture then in turn how do i get them to .duf format. any help will be much appreciated. I am going to post this wuestion around the forum just in case you dont reply t this one.
If anyone knows how to make eye textures please help me lol send any tips.
Regards.
D.Burgess
Well there's only so much you can do in the surface tab (tint the diffuse color, play with glossiness, etc). To create new textures you need an image editor (Photo Shop, GIMP). Suggested workflow: Open your character, head into the surface tab and check the location of the eye textures. Import them into the image editor and modify them or use as templates to make entirely new ones. Save them as .png (lossless) or .jpg (smaller file size) to a folder of choice. Go back into DS and in the surface tab go to diffuse color (3DL) or Base Color (Iray) and browse to your folder to import the new textures. Adjust settings to your liking and save as a materials preset (.duf). In the save options box uncheck everything except the eye surfaces you want to include.
I hope I got you right! If you simply meant editing surface settings in DS, that's a different story...I can probably help with that although not at all into NPR myself;)
Yes Wow thank you so much. I literaly have looked everywhere to try and find how people create eyes. Once again thank you.