Import clothes in DS
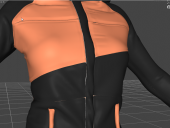
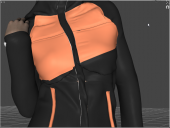
I made a jacket with marvelous designer and tryed to import it in daz. I used transfer utility but when i changed pose of figure clothes gets broken in chest area. I'm noob and just wached few tutorials. In none of those this problem appears. I have a guess that it has something to do with weight maps, but not sure as there almost no tutorials about them. Can anyone nudge me in right direction?


2019-01-16 15_04_00-DAZ Studio 4.11 Pro Public Build - 18jacketjoint.duf.png
945 x 711 - 318K


2019-01-16 15_03_35-DAZ Studio 4.11 Pro Public Build - 18jacketjoint.duf.png
954 x 718 - 353K


Comments
Looks like a mixture of not having the parts welded together and weight maps/morphs projecting differently into the sections (or the effect of SubD, if you have that applied to the jacket).
SubD dont matter. Changes very small.
What do you mean by "parts welded together"? Google show me some strange stuff when i search...
Here my weight map... i dont think it correct though.
Did you hand paint that or just use the Transfer Utility map?
First I would fix the Geometry issues then run the Transfer Utility with the new mesh and finaly you could edit the Weight Maps.
The terminology in the 3D geometry can differ from real world we call it "welded" or "connected" - for real world clothing you would call it "sewed together".
The patches that this clothing is made of seems to get ripped appart slightly at the seams if the Daz Studio SubD (subdivision of the geometry mesh) is applied.
I have no idea if or how you could prevent that with marvelous designer. The clothing could look perfectly fine in the original shape but the geometry mesh seems to consist of various parts that are not connected.
There are geometry editors like Blender or Hexagon where you can fix this making it a single connected mesh.
In Hexagon the function is called "Average Weld" I guess and in Blender it is called "Remove Dublicates" in both programs you need to select the geometry first.
Blender example
Hexagon: Average Weld Vertex Modeling [Documentation Center]
To work on the Weight Map select the clothing then the joint - its the pectorals bone I guess.
Pose the figure until you see the deformation. Then choose the Node Weight Map Brush tool from the tools pallet and open the Tool Settings pane.
The pane should look like this screenshot below: select the Map at the bottom, choose the Smooth Brush at the top and activate Symmetry. Also notice the Respect Selection checkmark in the middle to paint only on what you have slected with the Geomerty Editor tool for example. Then paint on the clothing below the pectorals there should be a smooth transition between the red and the blue color currently there is some jagging edge. If the figure is posed you will immediately see the difference it makes with a smoothed weight map.
Alternativly you could select some part of the geometry, right-click the viewport and choose Weight Editing > Smooth Selected.
Utility then paint.
Ok. I removed duplicates in blender (~2k removed) and imported again in DS.
Used transfer utility with dress knee-length without smoothing modifier and used smoothed brush. There is no edges on map but there almost no changes in clothing.
Which bone is selected there?
Left Pectoral
Just a question to make shure: you started with the base shape of the figure and there are currently no morphs dialed up on the figure right?
Otherwise I still guess the weight maps are interfering somhow below the chest, you may have painted to much in on some of the bones.
Select some nearby bones and have a look at the other maps and smooth them also. For example the Abdomen bones there are a few down the spine also having influence up to the belly and chest.
With Weight Editing > Smooth Selected its even possible to smooth all maps of the selected bones in the Scene pane at once.
I would first use the Geometry Editor select the chest form the Face Group list, then select all bones of the chest and abdomen in the Scene pane and right-click the viewport for Weight Editing > Smooth Selected.
Turn up the second slider in the dialog for itteration and have a look if it fixes the maps by smoothing them evenly.
PS: I can't realy tell it by the low resolution in your screenshots but there are some white stripes on the left and the right down the front touch fastener. I wonder if they are intentional extra material or if this is still a gap with unconnected parts. Could make sense to let one side unconnected if you want to add opening morphs but I would make shure both sides overlaping.
Yea. Also i dont know how to do morphs yet.
Just a question to make shure: you started with the base shape of the figure and there are currently no morphs dialed up on the figure right?
Well i didnt painted anything myself (except that add some to one breast). Everything is from transfer utility template.
Ok, done all bones. All smooth. Didnt do anything... Its frustrating. Pics of weight maps of all related bones down there ...
I could not do that, if i select geometry editor, i dont see weight editing, only geometry editing. Last picture.
It is my first clothes so white stripes should not be there, my bad. There is material underneath that i didnt hide properly. I was thinking to make additional morph for one side to disconnect.
Do the selection in Geometry Editor first then switch to the Weight Map Brush. Press the plus icons behind the Face Groups like Chest, ChestUpper, Abdomen.. in the Tool Settings pane on the left or use Geometry Selection>Face Seletction from the right-click menu. With the right-click menu you have acces to Geometry Selection in both tools the Editor and the Weight Map Brush. Notice that there are also useful other commands like Grow/Shrink Selection and Select Connected. Have a look at the screenshots. Before you finaly use Smooth Selected I would also select the two Abdomen bones in the Scene pane.
I hope you get this to work by smoothing the weight maps, its a nice looking well made jacket.
Tnx, found where it is done. Unfortunatly didnt work. More so, i tried to just break clothes with weight maps (painted red in problem area), but i cound not even do that (worked on a sleev though). Nothing changed. So i have feeling maybe problem is somewhere else?
OK it was worth a try. Then I suggest to have a look what settings you can change in the Transfer Utility to get better weight maps on the clothing instead of trying to fix them with the pain and smooth brush.
I think the issues with this jacket comes from the Transfer Utility and the template "dress knee-length" that isn't "suitable" for the shape of the jacket.
I guess the default settings in the Transfer Utility works best with skin tight clothing while your jacket is more of a loose shape and not as close to the body.
Another cause for those deformations I think could be how the Genesis 3 and 8 weight maps and the JCM morphs got projected with the wrong Transfer Utility settings.
To see if there are JCMs working in the backround try this: while the figure is posed select the clothing and have a look at the Parameters pane under "Currently Used" also make shure Show Hidden Properties is checked in the Paramertes Option Menu the button on top with the lines and the arrow. I'm shure there will be hidden morphs that are named JCM those morphs are working in the backround on I guess any joint bending on figures with General Weight Maps rigging.
There are a few settings in the Transfer Utility options that you could try. The first is the Distance Tolerance slider that you can turn up to increase the projection distance so the weight maps and morphs of the Source figure will get transfered to even further away from the body Target clothing items.
Also make shure you select Shaping and Pose in the Morph Targets Options. The transfer process will take loger with this, but all the neccesary character shapes and morphs of the Source figure and the posing related Joint Correction Morphs (JCM) should get transfered along with this.
The default setting Morph Targets: None is OK for a fast transfer but as soon as you use morphs like character shapes on the figure those morphs gets automaticly generated as hidden properties in the clothing figure. You should be aware of those "autogenerated morphs" when it comes to fit the clothing to a character shape dialed up on the figure.
No, when i made jacket i specifically made it tight and fit the body as close as possible. It not loose at all. It just appear that way in some areas.
Yep, you right! I zeroed chest side JCM and problem disapeared. Finally! Thank you, Thank you, Thank you.
But now i have some strange rips in clothes after posing and returning to base pose. (last pics)
No effect.
Ok as i understand besides JCM there is problem with auto generated weight maps. Maybe utility does not work well with MD? Anyway, is there good tutorial on how to do them manualy? The ones i watched had too little info about it. All did them with transfer utility.
I guess there are very few to no video tutorials on how to paint weight maps manualy because in general we use the auto-fit or Transfer Utility to have them "projected" automaticly onto the clothing items.
The weight maps have to have the same map strength like the figure underneath otherwise the clothing wouldn't follow the pose of the figure.
In times of Genesis 2 figures and the TriAx weight maps it was easy to edit the weight maps and the "bulge maps" to fit the clothing all within Daz Studio and the Node Weight Map Brush.
Now with Genesis 3 and 8 figures and the General weight maps system editing and creating clothing that fits has become more challengeing. You can't just ignore all those JCMs those are an essential part of how the Genesis 3 and 8 figures deform while you pose them and the clothing need to have them too.
1st screenshot: I see there are still issues with the mesh. Above the left breast the orange chest part seems to be another layer of cloth while the dark cloth underneath is poking through. To avoid this its best to only have one layer of cloth covering the body, its the same issue like with those white stripes down the front. Both layers of clothing are too close to each other and its almost impossible to avoid them intersecting not just with the weight maps but this will also be an issue with shape morphs lateron.
2nd screenshot: This is strange with no morphs in zero pose this shouldn't happen.
I realy thought a higher Distance Tolerance would give you better results. How much did you turn up the value?
Anyway if you want to continue on this project and the generated JCMs don't give you good results I would export them as seperate OBJs load them into a geometry editor like Blender and smooth them with the sculpting smooth brush to fix those deformations. Then you could replace those fixed JCMs with the originals, all in all very advanced stuff and much work to do.
Keep in mind that most clothing item products also use the Smoothing Modifier with target collision settings to avoid possible poke-throughs. But this should only be used for smale poke-through issues and the clothing should fit the figure before you activate the Smoothing Modifier.