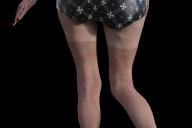
Skin on legs different color than rest G2F
 My 3D Spin
Posts: 608
I have an actor that has a default skin - but the leg skin looks strange. -On the promotion images it looks perfect.
See attached image:


Skin problem.jpg
1800 x 1200 - 593K
Post edited by My 3D Spin on


Comments
I have seen similar problems crop up, I think when I am messing around with textures. Can't put my finger on it though.
Some shader settings seems to be off on the Legs Surface compared to the Torso. I can't remember exactly but I think Genesis 2 figures have a seperate surface for the legs and arms while Genesis 3 figures have a single surface for both called Limbs.
Fixing this real quick is easy just open up the Surfaces pane, then go into the Edit tab, expand the surfaces list and select the Torso Surface for example. Next open up the Content Library pane, select a content folder of your choice, press the button with the plus icon at the bottom and choose to save a Shader Preset. Then go back to the Surfaces pane select the Legs Surface and apply (double-click) the saved shader preset from the Content Library while holding down Ctrl. In the following dialog choose Images: Ignore. This should give the Legs Surface exactly the same shader settings like the torso and the issue should be solved.
I think you should open up a support ticket so the vendor can fix the shader settings and update the product download.
I went to the Content folder and selected a folder but there was no + sign active. There is a + and a - on the
lower right side of the pane but they where inactive..
OK I just checked and there are some conditions to fullfill to have the buttons activated, I havn't thought about at first.
You have to select a folder in the most upper "Daz Studio Formats" section and it has to be a subfolder of one of the Content Directorys there not the root directory itself.
Then if you click the button a menu will show up where you can select to save a Shader Preset.
Ok -Thanks this worked fine exept i had to use Choose images: Replace - not ignore. Thanks for your help. I appriciate it!