Iray issue with Predatron Step Van (Taco Truck) - FIXED
 CrissieB
Posts: 195
CrissieB
Posts: 195
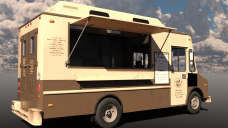
I bought Predatron's Step Van Bundle to get the Taco Truck model, so I could change the textures and to make a coffee truck. I've changed the required textures, and my coffee truck looks pretty good ... except for a black area on the truck body, beneath the wing mirrors on each side (see first two attached renders). The black area also appears with the original textures (see third attached render).
Does anyone know what that black area is, and how to make it go away? Is there any contact info for the artist, so I can contact him for help?
Thanks,
Crissie Brown


Daz 3D is part of 
Connect
DAZ Productions, Inc.
7533 S Center View Ct #4664
West Jordan, UT 84084
Licensing Agreement | Terms of Service | Privacy Policy | EULA
© 2025 Daz Productions Inc. All Rights Reserved.
Comments
I havent got this but the only time I have seen something like this is when there are reversed normals. Not sure if it is that but could try selecting them with the geometry tool, and flipping them to see if it is that.
Thanks for your reply,
Had those normals been reversed, I would have seen the problem in Substance Painter when I was doing the textures. (SP does not display the 'back' of a surface.) Regardless, I tried flipping the normals on those polys, and it didn't solve the problem. So it's something else....
strange cant think what that is then.
Works okay for me. Can you use some of the other material settings? That particular area is part of the "20_Signs" material zone, which overlaps with the "14_MainBody" zone. If you have contrasting materials, you can see a bit of an interference pattern in the preview, which usually indicates more than one material occupying the same space (how it decides which to show on top, I don't know, they seem to be using the same mesh, or different meshes in the same place). However, the Signs material zone also covers most of the truck's sides and half of the side doors, and those don't seem to cause you problems. Have those reluctant polys been included in the surface group? I am quickly getting out my depth here...
Hi NorthOf45,
I tried the other truck presets and had the same problem.
Are you viewing/rendering in Iray? Those polys look fine when viewed in the standard Texture mode, and they render fine in 3Delight.
This happens when viewing/rendering in Iray, and it happens regardless of whether I've converted the materials with Iray Uber Base.
Crissie
It looks okay in texture-shaded or Iray preview mode, 3DL or Iray renders, original materials or converted to Iray. Loading the Taco Truck, or applying the Taco Truck materials to another makes no difference. Is it the same on both sides? Looking at the maps for the signs, that area is masked out by the opacity map, and the main body doesn't have a mask. Try sliding the opacity level to zero and back on the 20_Signs and 14_MainBody surfaces to see if that gives a clue. There is a bump map on the main body, maybe try zeroing that out to see if it makes a difference.
Hi NorthOf45,
Hrmm. I zeroed the opacity on 20_Signs, but that didn't change the problem. And when I move the truck around in the scene, I get the problem in more areas (see attached render). Maybe I need to use the Geometry Editor to select the 20_Signs polys and simply delete them? That would fix the problem for my coffee truck, as I painted the signage directly on the truck surfaces. It wouldn't solve the problem if I decide to use any of the original truck presets, though, and I get the problem with all of them.
Crissie
The bottom half of the door and the area under the poster are also in the Signs group. Removing it might take care of your coffee truck, but doesn't cure the root cause. I am at a loss, but I am no expert. Maybe someone else can jump in with their experience with this item...
FIXED!
As NorthOf45 suggested, the issue was that two sets of polys (the truck body and the signage) were in the same place. Iray didn't know which to render and, depending on the angle, simply didn't render either. I had this issue with all of the original models/materials, as well as my coffee truck.
To solve the problem, you need to modify the geometry of the truck base model. I used Blender, but you can do it with any modeling software. Here are the steps:
The 20_Signs polys and truck body polys no longer occupy the same space, so the truck will now render fine in Iray (see attached render).
Note: When importing an obj file from DAZ into Blender, always click 'Keep Vertex Order' and tick the 'Poly Groups' check box. When exporting an obj file from Blender for DAZ, always tick the Selection Only, Apply Modifiers, Include Edges, Write Normals, Include UVs, Write Materials, Polygroups, Objects as OBJ Objects, and Keep Vertex Order check boxes. I have these selections saved in Blender as DAZ defaults.
I haven't attached the fix.obj file because it's not my model to share. But it's very easy to fix.
Thanks to all for your help!
Wow, that's dedication. In retrospect, I'm thinking maybe some kind of displacement map on the signs would do the same...?
You could also use a Push Modifier in DS, apply a weight map, select by Surface to get the signs, and fill that section with a weight of 100%.
Hi NorthOf45 and Richard,
A displacement map on the 20_Signs material zone might do the same.
A Push Mod would also work, although I don't know how to apply a weight map to a Push Mod.
Regardless, the fix was to get the 20_Signs polys out from the truck body polys.
Thank you all!
Crissie
Now the push modifer should affect only the sign, and you can adjust the offset in the Parameters pane as needed. This shoudl probably use less memory than a displacement map, and won't use any GPU memory as - unlike a displacement map - it's applied before the render.
Wow, Richard ... thank you for that step-by-step!
Crissie