Why is my render so dark?
 denisnormandin
Posts: 158
in New Users
Hi everybody,
Why is my render so much darker than the viewport preview?
I never had that problem before. I made a few little changes in my previous scene but didn't make any in the lighting conditions (I don't yet know how to do that, I'm keeping this feature for later in my learning process). I'm joining a render of my previous version of the scene and one of the latest one, plus a screenshot of my viewport. Can someone tell me why they are so differnet from one another regarding the lighting conditions when, like I said, I have made no change there?
Thanks
Denis
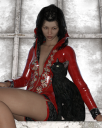

La femme et le chat 3-2 (a).png
1024 x 1280 - 2M
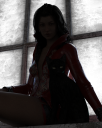

La femme et le chat 3-2 (a').png
1024 x 1280 - 2M
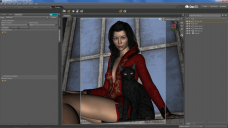

Screenshot Render Viewport 3.2b.png
1920 x 1080 - 1M


Comments
The difference between the two could be one or two things.
1) The headlamp for the camera is on in the first one and off in the second.
2) You have moved the light you are using from the front of the figure to the left.
3) You have changed the Tone Mapping. I don't think it is that though, more likely #1.
Thanks Fishtales,
Like I said, I have made no change at all in the lights.
1) But still, I did some checking-up and found that the headlamp on the camera was on auto, I switched it on... but it didn't change anything, the rendering was still as dark.
2) I don't see how I could have inadvertently moved a light, but if I did, how do I undo it?
3) I'm very new at this, so I have no clue what the Tone Mapping is and even less how I can change it.
Is it possible you rendered the first one in 3Delight and the second in Iray.
I can see by the screen shot that it is set for Iray at the moment.
Tone Mapping has settings similar to a camera for setting the amount of light entering the lens.
http://docs.daz3d.com/doku.php/public/software/dazstudio/4/referenceguide/interface/panes/render_settings/engine/nvidia_iray/tone_mapping/start
Good morning :D
The preview uses a different technology! On the upper right corner of the viewport, you can select the modality, and in this case, you're using Texture Shaded.
The render, on the other hand, uses Iray.
Iray itself has different modalities, that you can see in the pane "Draw Settings" (to access every pane, go to windows in the menu and then to the pane name). The final render uses Photorealistic Iray, while Iray preview sometimes uses Interactive mode, that's less demanding but less accurate.
Never use the headlamp, it doesn't look natural at all: select the camera, go to parameters, then headlamp off.
In this case, you need to adjust a setting called "Exposure Value", that you'll find in Render Settings->Tone Mapping. The default value is 12, lower it to 8 or something and the render will light up.
In any case, the figures will always look a little bit dimmer, so you probably want to learn to create ghost lights!
In my signature, you'll find a YouTube playlist with all these information and more. It may be long, but it's surely shorter than figuring out those things day by day.
It looks to me as if you rotated either the light or the scene. Not saying you did, only that the lighting from the first image to the second looks like the light is hitting the scene from a new angle.
The first thing I'd suggest is going to sound crazy, but it just might work. I see you moved the camera between the two renders, so try moving the camera a wee bit in one direction or another, or zooming in or out a bit. It may not make a difference, but it doesn't take long, and there are a lot of posts in the forums where issues were cleared up by simply moving the camera slightly, so it's worth a shot.
If that doesn't work, it's possible you made changes you didn't even realize you made, IF you applied, (double-clicked on,) any icons as you were working. Do you recall if you made any changes to the Render Settings->Environment when you set up the scene for the first image you showed us? If you didn't make changes, the current settings should include, (render machine is off for the night so this is from memory,) Dome and Scene, with the ruins hdri. Is that what you see when you open those settings?
Thanks TGFan4
I did that and it yielded a better result. Though, with a much more granular aspect. (I'm uploading that)
Thanks for that L'Adair,
I tried but it didn't work.
The only change I ever made to the render settings was the "Dimension preset (Global)", actually I didn't touch that directly, it changed itself (I think) to "Custom" when I changed the "Pixel Size (Global)" and the "Aspect Ratio (Global)" to get the "Model" I want for an upcoming painting on a 16" x 20" I plan to make soon.
Other than that, I try not to touch to much what I don't understand... and there is a lot at this point that I don't understand.
So, to get back to your question: Under Environment there is Dome and Ground (not Scene). I see that the "Draw Dome" and "Environment Lighting Blur" are OFF, is that an issue?
Do I have to tweek the other settings? (I'm uploading a screenshot)
Now, here's another question: Are the lights (4 of them called "Strip Light") in the West Park environment actually supposed to be a source of light for the rendering process, or are they only props? Can they be turned on and off or can there intensity be controled?
When I go to the "Lights and Cameras" tab, I see that I can add lights but I don't see where the default ones (if any) are.
Thank you for the new screenshot. In the Render Settings->Environment, in the right column, you'll see Environment Mode is Dome and Scene. If I'd had The Beast on, I could have been more specific. Sorry. Anyway, it looks like everything is default there.
In your scene tab, I see you have expanded the set list so we can see what is included. Looking at that list of objects, most of which are not in the camera frame, I think you previously had at the very least, the ceiling hidden. Click on the "eye" next to the ceiling bone directly under the first node listed there, and see if that solves your problem. (You'll probably need to set the Exposure Value back to 12 or there abouts, if the ceiling being visible was the issue.)
First question. It looks like you are using the included West Park product. Those materials are 3Delight, which for the purpose of the Strip Lights means they won't light up your scene. In 3Delight, you can make them look as though they are giving off light if they're on camera, but you'd have to add lights to the scene to mimic the light they'd give off.
It's possible, but inefficient to use them to light a scene in Iray.
Second Question. I don't use the Lights or Cameras tabs, anymore. I prefer using the Parameters tab, which will have all the same information. (Less tabs, less clutter.) To add a light, camera or a host of other goodies to the scene, go to the main menu at the top of the window and click on Create. The first item in the list will be "New Camera…" and the next four after that will be Lights.
Just a little correction...you can absolutely have emissive surfaces in 3Delight, they might not be included with the set, but the OmUberArea lightshader ships free with DS. Content library/light presets/Omnifreaker/Uberarea light;) You just need to select the surface you want to emit light, and doubleclick the preset.
Or you can use the awePT area lightshader with scripted pathtracing, that can be downloaded for free or purchased with the awe shaderkit, or you could use the Reflective Radiance by Marshian (RR3), so there are a few possibilities;)
Thanks again,
I just tried hiding the ceiling, that enabled me raise the Exposure value back a bit but not all the way to 12. The render is lighter than my darkest one and has less grain than the one with an Exposure at 8, but it has less contrast.
Tomorrow, I'll try adding a light on the right of the camera to see what it does. For now, my pillow is calling me.
;)
As I expected, hiding the ceiling lets more light into the scene. Even though it doesn't give you the same lighting you had before, it does suggest the biggest difference in lighting between the first image and the second in your original post is what parts of the set are visible in the scene. You could try hiding any thing that's not on camera and see if the lighting is closer to the original. Then if you don't like the result, add back in a few things at a time.
The windows in the original image are not as bright as those in the latest image. That could be Tone Mapping, but not if you set the Exposure back to the default. You could try leaving the ceiling and floor visible, but hide everything else that isn't seen in the frame. That is, if you really want to find the original lighting.
On the other hand, learning how to use the lights is a really good thing, too.
I admit to jumping into Iray when it was introduced in the 4.8 beta, without becoming adept at 3Delight.
Would the OmUberArea lightshader make the surface capable of lighting the scene?
Certainly, you can light any indoor environment by selecting the light bulbs/ceiling lights and applying the arealight;) Just need to enable cast shadows, light falloff and set ambient color and number of samples. You can plug a texture into the light color slot, if needed.
Making ghostlights is as easy as enabling Fantom.
Example of aweSurface and the awePT arealight shader:
Thanks Sven
I played around with that, and though I didn't get the results I wanted. It is a very good thing to know and will surely be very helpful in the futur.
I came back to the idea of hiding the ceiling... and decidet to also hide two wall sections and tweek the Exposure value to get both the light intensity and the color smoothness I wanted.
I still don't understand how this all came necessary from one render to another. But now at least I know how to solve the problem. (Or at least, get around it)
Here my last render. This one will do just fine for the starting point of an acrylic painting on canvas. It doesn't look that different from the previous one, but the details in the face and the reflections on the coat are better.
Thank you all for your help.
Denis N
I'm not only having trouble with the Daz environment, I even get screwed up trying to edit quotes. LOL
Maybe that's why I couldn't get the result I wanted with my attempts to add lights to my scene. I didn't enable cast shadows, light falloff and set ambient color and number of samples.
That will be for my next try. I'll be doing a 4th scene in my series of "Woman with her cat". That one was the 3rd.
You will certainly be hearing from me some more. I am bound to come across some other problem sooner or later.
Just remember that if you use IRay you need to ignore what I said;) I only use 3Delight, but if you have questions about emissive lights in 3DL, or 3DL in general, I'll do my best to help. Documentation is pretty much non-existant, so asking over here is your best bet:)
@denisnormandin, I apologize. You're working with the Iray render engine. the information Sven shared is for 3Delight. While there are many things that will work for both, to one degree or another, discussing 3Delight settings and options while you were troubleshooting an Iray issue only added to the confusion. Sorry.

As I've said in my first answer to your post, in my signature you'll find a Youtube playlist, there I've made a video that explains step by step what you're trying to do in Iray ;)
Thanks for setting that straight
It made me curious, so I tried a render in 3Delight... Quite different!
But another problem arose, probably because of a bad setting or the lack thereof (since I left everything at default):
The hair did not render well and a part of the head stayed white!
The colors and shades were very different from my Iray version but quite interesting in their own way.
Maybe I should open a new thread about this instead of continuing here if I'm no longer talking about a render that came out too dark?
But here are the two renders anyway.
The part of the head that stayed white is actually the skull cap of the hair. If you hide the hair, I think the rest of the image will render in 3Delight just fine. Different, but fine. :-) You can check to see if that hair has 3Delight materials. If not, the easiest thing to do is change the hair to one that does.
But you did prove my point. Some things for Iray will work rendered in 3Delight and some will not; Some things for 3Delight will work rendered in Iray, and some will not.
Well, that only make things more complicated for buying things on Daz. I tried to find some hair styles for my models and found out that nothing comes for free and that they don't always come out as expected. I never payed attention to the render modes available. Now, I guess that I'll have to be more careful.
Elysa Hair for Genesis 3 and 8 Female(s) seams to be for Iray only. Too bad, I kind of liked that the final 3Delight render was closer to the Viewport's image, hence, more predictable than the Iray one.
Most of the clothing, accessories and hairs can be converted to 3DL, it just takes a bit of fiddling and testrendering to get it right, and there are IRay to 3Delight converters in the store if you don't want to do it manually. I don't use them myself so don't know how well they work. My guess is that you want to tweak some settings anyway, after conversion, most of the time. But you need to get a basic understanding of the various shaders and which one is for which render engine before you can get a really good result.
I don't have Elysa Hair, but I do have other hairs from that vendor. I loaded up Super Messy Updo to see if I could get it working in 3Delight. It takes a bit of work, but I did get something. Anyway, here's what I did to the hair:
It's a bit of work, but doable. Results will vary depending on the hair, and the vendor. Only you can decide if the results are sufficient for your needs.
Here the render. (Background added in Photoshop.)
If you're going to go to the manual effort to change surfaces from Iray to 3Delight, don't forget to save them as a Material Preset to you don't have to go back and do it all over again the next time you want to use the same hair. :)
Thanks again, (to you all)
I see that I have a lot of exploring (and learning) to do.
3Delight appears to have a lot to offer. I'm pretty sure that I'll be back with more questions
I've been having the same problems with lighting. I found one video about how to adjust the lighting but sometimes that doesn't work. One thing I've found that works most of the time is to delete the preset lightings altogether. Viola, let there be light.
The easiest thing to do (I'm going through this right now) is to reset the render window to default and re-build. That is what I just did and it worked. I must have changed something I could not remember or by accident.