Texture being stretched
 luan.hide_b30c2d0622
Posts: 3
luan.hide_b30c2d0622
Posts: 3
Hi, i'm havin an issue where with every character i've tried so far (G3M, G8M and variants). The issue is that by default without any custom textures or changes every character gets this "stretchy" look everywhere but in the face, which is quite noticeable when using complex textures like the one in the attachment. Am i doing something wrong or this is the default behaviour? Any way to fix this issue?
Thanks in advance!
aaaasda.png
1026 x 847 - 564K
Daz 3D is part of 
Connect
DAZ Productions, Inc.
7533 S Center View Ct #4664
West Jordan, UT 84084
Licensing Agreement | Terms of Service | Privacy Policy | EULA
© 2025 Daz Productions Inc. All Rights Reserved.
Comments
You shouldn't get that with maps made for the figure, but theer is a marked difference in scaling between the face (all of a map) and the back of the head (just part of a map that is usually the same size) so some, lesser, degree of softness is to be expected if you are zoomed in.
Its most obviouse in the Viewport preview and especially because the character textures include the hair. The simple OpenGL preview shrinks down all textures, the default is set to 1024x1024 I think. See the Preferences (press F2 to open) in the Interface tab you can change the texture quality and size. But these settings will only affect the preview quality in the Viewport, once rendered it will look much better. You can also try the Iray preview mode for a better representation of how it will look like in the final render image.
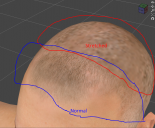
In the screenshot below you can see why there is this stretching on the textures, its because of how the UV layout of the genesis figure is designed. In order to have high resolution details on the face texture this surface gets a 4096x4096 resolution map on its own. While on the other hand the backside of the head takes up a much smaler space on the torso texture map. In comparison the both head parts get aproximately the same space on the texture as the ears. The technical term for this is texel density that usualy should be evenly distributed on the model. I guess Daz decided that the texture details of the Face and the Torso are more important than the backside of the head, that is in most cases covered by other hair items anyway. The default UVs are actualy just an issue if you try to apply hair textures on those. I've talked about a workaround with GeoShell Hair Scalps in this thread: Better scalp for hair (Geograft or geoshell)
Thanks for the reply! These are just G3M with default texture from G3M essentials, though.
Thank you for the comprehensive answer! I saw a reply by you in another thread (https://www.daz3d.com/forums/discussion/198916/turning-a-multi-surface-mesh-into-a-single-surface-mesh-preserving-uvs) where you mention blender and the "pack islands" function as a better workflow to rearange the UV "texel density", did i get this right?
I need to export the model, so rendering in IRAY is not an option sadly.
Edit: Nevermind, i'm going through your tutorial. I will report back if i encounter any issues. Thanks!
The "pack islands" function is some automated process that tries to puzzle all or at least the currently selected UV islands into the UV space giving you an instant UV layout. The results are not always desirable, for example often I don't want to have the UV islands rotated. In order to match all UV islands into that space pack islands scales everything evenly so the overall proportion and the difference in "texel density" between the UV islands stays the same. There are better automated solutions for this in Blender like the "UV Packmaster" addon for example UV Packmaster at BlenderArtist.com.
The function "Average Island Scale" found in the same UV menu of the Blender UV-Image Editor does change the texel density to have it evenly distributed. To see better whats going on just apply a checker map texture and see if the pattern on the 3D model is aproximately the same size everywhere. If you apply Average Island Scale on the Genesis 3/8 UVs you will see the face UV island will shrink down to a size that it will fit right on the torso map between the backside of the head. But this is not desirable in most cases, the UV layout was made to balance the details to have high resolution textures on the face for closeup renders so I usualy leave it like this.
Here is another Daz Studio tutorial by me dealing with the UDIM UV design on Genesis 3 and 8 by using the Texture Atlas and Map Transfer.
DazStudio LowResUVs G3F
I recommend these Youtube tutorials for Blender UV mapping:
What is Texel Density and How to Master it
Texel Density Addon for Blender 2.8!
10 Essential UV Tips and Tricks | Blender Tutorial
UV Unfolding, Unstretching & More in Blender
Thank you so much for your help, after going through all this info i was able to get great results(see attachment). You really helped me out, bro!
I'm glad I could help and yes the result looks far better.
You can consider yourself lucky in that I just recently made these posts about the UVs on the genesis figures, hair scalp and all that, like the youtube tutorial about the Low-Res-UVs that I can now reference to.
It's not that I wanted to repeat myself, I wanted to make a point about why it looks like this so you understand the basics of UVs and why I think the UVs on the genesis figures are designed as they are.
I've also discovered something new by doing this it's the UV Packmaster Addon for Blender that I saw in this video: Texel Density Addon for Blender 2.8! - Youtube
Here is another video of this Blender addon looks like it got all options you can ask for: UV Pack Master Addon for Blender! - Youtube
I've worked with Blender since a while now and probably most of the time with the UV/Image Editor. Well I think I became an UV expert to some degree by doing so learning everything from youtube videos. The basic functionality of Blender UV/Image Editor is already good but there are a few addons I recommend you to check out to make things alot easier. Have a look at this demonstration: [Blender Add-on] Magic UV (v6.0) Tutorial - Youtube