Is it a bad idea to light a scene just with emissives?
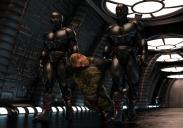
I let a scene render (IRAY) over a long period of time and it's still awfully grainy. I'm trying to find out why. The scene doesn't contain an excessive amount of elements, large textures, or anything all that complicated. I've had much better results previously with scenes that rendered the same amount of time.
The scene is only lit by a number of emissive objects. No lights, no sky-dome, no auto-headlamp. Is it possible that this has a negative effect on the scene? If so, why?
(The other reason I can think of is that the scene is a closed room and the walls, ceiling, and floor all are a little bit reflective. Perhaps the light bounces around too much, or something like that.)
I'm attaching the render. The unconscious character's head is particularly grainy, as well as parts of the background.


Comments
You could denoise it with Intel denoiser!
If you want to quickly light it up, there's this set: https://www.daz3d.com/iray-light-probe-kit
You can limit the bounces the lightrays do in Render Settings! Try something like 12. The reason why it's not usually modified is because it can give you black eyes, but in this case there are no eyes in sight!
Check you haven't got DOF set in the camera, that might be why the distant wall looks grainy.
The grain on the face is reflection from the lights and the floor and it might just need a bit longer to render as it looks like fireflies, although there doesn't appear to be any elsewhere. I would also check the glossy skin settings and see if changing them makes a difference.
I often light scenes with only emissives, I don't see a problem with it. If you need more lighting, you can make ghost lights (make an emissive plane and turn Cutout Opacity really low, like .0000001 so it's invisible). Just don't overdo it or you'll eliminate your shadows and ruin the mood you're trying to set.
If there are just a few areas that need grain reduction, you can spot render them. They should render pretty quickly, then you can blend them in with Photoshop or GIMP.
Thanks for the answers so far!
So the main problem is that there's not enough light in the scene in general? Pity, I kinda like the moody light... :/
I'm currently trying another render with all off-panel walls switched off, so the light shouldn't bounce around as much.
If that doesn't work I guess I'll have to place some additional lights.
@Fishtales: I do have DOF switched on, the far end of the corridor is supposed to be blurry. But aside from the guy's face I see several spots that are more grainy than I'd like.
@TGFan4: Did not know I could limit the bounces! But I intend to make more renders in the same set, also with visible eyes. So maybe that's not the best solution here.
@Kitsumo: Didn't realise you can save spot-renders. Definitely very useful to know!
I'm not an expert in that matter, but the amount of grain also depends on the type of light! So it should be perfectly possible to make nice renders with low light. In general, the stronger the light, the more noise you'll have.
Which other areas are you seeing grain? If it is the wall behind and to the left of the figures then that could still be DOF depending on how far away the rear DOF plane is from the figures. Remember the DOF planes will be angled and facing the camera not square to the rear of the figures. On that tact, how far away from the face is the front DOF plane? It may be affecting the face with a little DOF if it isn't far enough in front.
You also say that you left the render running for a long time. Did you stop it or did it stop on its own. It may be it didn't render long enough.
It is also possible that the lights are too strong which can cause as many problems as too dark. I would play with the light intensity and balance that with the Tone Mapping settings to get the look you are wanting.
My light ray bounces are set at 10 and, in general, that works. There are times when I need more bounces, some eyes, windows or mirrors, where I will turn it up higher but generally not by much. Think of it with two mirrors facing each other with a figure between them. In real life the reflections would go on until they weren't discernible. Now, in a render, if you set the bounces at three then you would get three reflections, now change it to twenty and you get more bounces and more reflections and so on. It is the same with eyes, if there are four layers then only having three bounces will cause some of the eye to be black and not render raising the bounces higher will let those parts render. The higher the bounces the better the render but there comes a point where the bounces aren't really doing anything so they are basically wasted, which is what happens if the bounces are left at the default. This can have an impact on render time if you are rendering indoors and have walls removed or a window where the bounces just keep going unless there is something outside solid for them to bounce back from, this also has an effect if the surfaces around the area are too glossy and are therefore very reflective. Even then it will depend on how far away the object is from the opening. Lowering the number of bounces stops those wayward bounces at the amount specified.
Ok, switching off the off-camera walls did nothing to the quality or overall look of the scene. Which makes me think bouncing rays may not be the problem. Still, I'm really glad I learned something about this subject!
I was not aware that too strong lights can lead to graininess! I'll look into that next.
@Fishtales: Thanks for your extensive response! I really don't think DOF is the issue, though. I've used DOF in the past and it didn't look like this. DOF is supposed to look more blurry, but this looks more grainy.
I don't know whether the render finishes or not, but either way I'd like to not increase rendering time (it's currently at 20h. I'm using a mac and it's not the newest either.) I'm planning on making several renders with this setup and if each render takes an eternity it's just not fun for me anymore. I've made good renders before with more complex scenes, so I'm hoping I can figure this out despite the limitations of my hardware.
Attaching a picture where I point out the worst grainy areas.
Oh, now I see!
Those 20h are equal to around 1h of rendering with a proper Nvidia GPU :'(
Maybe the noise would go away if you continued the render!
For those small areas, I'd use the Intel denoiser, and then I'd delete the parts where you don't need it in Photoshop.
Can you post a screenshot of the Emissive settings and Tone Mapping and Filtering settings you are using.?
I found a video about speeding up your rendering and one way of solving the grainy problem. It's located on YouTube at .
.
I still have problems with lighting. I worked with my emission settings, tried the distant light, and other options and I've found if I just remove the roof I get better lighting. Go figure. Also it seems if I remove the preset lighting for the scene it sometimes improve. I've tried the camera's headlamp and that's a joke. I mostly render while viewing through Perspective View.
I used to remove the ceiling too at the beginning, but sadly I'm not satisfied with that look anymore!
Then I've learned to light the scenes myself, and now I've purchased the ghost light kits to do that very fastly.
You can still keep the general lighting level you want — turn up the lights to improve the render, then do what actual photographers with real cameras do, and turn the levels back down again with the camera exposure controls in the Render Settings >Tone Mapping sub-tab. Note that you can fiddle with the tonemapping values in the middle of a render, you don't need to commit yourself to a guesstimated setting, press the button and cross your fingers.
*weeps uncontrollably*
The luminance is 500000. I have no idea if this is high or low. I just fiddled with the number until the result looked good in the IRAY preview.
The screenshot is of the ceiling lights. The lights on the floor have a differnt colour and temperature but are otherwise the same.
I haven't looked into Tone Mapping and Filtering yet, so those should be standard settings.
I'm assuming you are using cd/m^2 for your Luminance. I use cd/cm^2 which uses less zeros :) Try dropping the Luminance to 1500 at cd/cm^2 and change the Tone Mapping to Film ISO to 200; F/stop to 4.0 and Shutter Speed to 60. You aren't limited to these settings it is only a start. If the light isn't enough then raise the lumen to 2000/3000 or upwards. If you start seeing fireflies and grain appearing then drop the lumen slightly and either lower the ISO to 100, or lower the F/stop to 2, or lower the Shutter Speed to 30 or even a combination of these to get the lighting back to the level you want. I would set the Nominal Luminance below the Firefly Filter to 1500, I find that clears up fireflies quicker, although it does need adjusting if you ever use the Bloom Filter but that's for another time :)
Ok, so... I still haven't quite figured out why this particular scene is such a pain, compared to other scenes I've done in the past. But with you guys' help I managed to find settings that gave me a ok result. Not perfect, but good enough for the frivolous hobby this ultimately is for me. I set Max Path to 10, slowed down shutter speed and lowered all the lights, added a few ghost lights, and lowered "quality" from 5 to 3.
As I'm attaching the latest render I realise that it's not really that different from the one I attached to my initial post. Mostly I've just accepted that this scene is at the limit of my hardware for whatever reason and I have to be ok with that or buy me a new computer. Oh well. Thank you so much for all your input, I really appreciate it and I've learned a bunch of really useful stuff!