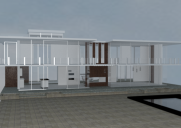
Retro Glass House Work In Progress, but what the hey.
 StratDragon
Posts: 3,251
StratDragon
Posts: 3,251
Hi,
Remember me? What's it been? Like a million years since I've posted a freebie? I had some free time but not enough to finish this.I didn't even know if ShareCG would 404 when I tried to go to it.
[edit 1] thanks Chohole
Ok, so before I go off on a tangent and launch into my conspiracy theories here's the model. Have fun, I hope to see some renders.
https://sharecg.com/v/93839/view/5/3D-Model/Retro-Glass-House-WIP
[edit 2] Forget what I wrote about brining this into studio, see what SixDs posted two down.
Don't resell this, it's free, keep it that way. If you use it for commercial work please credit me, or not. Have fun with it. If you find problems with it (and you will) post it down here. I don't know if I will have a lot of time to mess with his in the near future but it does appear to work and you might as well have something fun to mess with.
The promo image was rendered in Iray for about 1 minute totally CPU driven, I have an AMD card at the moment, It looks like crap. «
Daz 3D is part of 
Connect
DAZ Productions, Inc.
7533 S Center View Ct #4664
West Jordan, UT 84084
Licensing Agreement | Terms of Service | Privacy Policy | EULA
© 2025 Daz Productions Inc. All Rights Reserved.
Comments
You post images to the forum by attaching the file you have on your computer using the attachment button and browsing to where you have it jpg png or gif
Thanks for sharing, Stratdragon!
For the benefit of anyone trying it out, I first imported it into DAZ Studio using the Blender scaling (1 unit = 50 cm) or at 5000%, which seemed a logical choice. However, doing it that way it came in with the axes inverted, so I needed to re-import it with all the invert axis checkboxes selected. Then, it needs to be rotated 180 degrees on the Y-axis and -90 degrees on the X-axis to get the proper orientation. The materials all load with a pure white ambient channel and everything should be selected under the Surfaces tab and changed to a pure black ambient to display correctly.
I then loaded a V3 (she loads fast and is similar to V4 in height) to check the scale. It seemed a little off, so I loaded a measuring prop and checked the counter height, which should be about 3 feet or 91.5 cm. Adjusting the scale of the house to achieve this I found I needed to bring it up to 6000%, which also gave me a ceiling height of about 8 feet or so, or 2.44 metres, which is about right.
Alternatively, if the model is imported at DAZ Studio scale (1 unit = 1 cm), it comes in correctly oriented and with the correct axis settings and it can be set immediately to 6000% scale to bring it to the correct size.
Either way, it can now be re-saved using DAZ Studio scale for use in Daz Studio.
It may be a WIP, but it certainly is a solid foundation (no pun intended) for creating an interesting environment, and should be an excellent starting point for anyone interested in getting their feet wet learning surfaces and textures, amongst other possibilities. It is now on my long ToDo list, and I'm thinking maybe a John Wick safehouse with bulletproof smoked glass, gold-coated, one-way mirrored surface windows. Shouldn't be too hard, right? (I'm not sure that he'll need the appliances, as he would just order Chinese, then shoot whoever showed up to deliver it.)
Anyway, thanks again, Stratdragon.
Good to know
Your welcome. Thanks for the findngs on the settings.I'm going to update on the share CG
Thank you StratDragon for sharing this model.
I created Cycles materials for it in Blender and I did a test render (left image). I did the same for Iray in Daz Studio. These are 2 fast test renders, I need to optimize all the materials, but your Retro Glass House looks really good.
Cool! You really made my garbage look good. I'd love to see the blend file if you have with the cycles and if you don't mind I will repost it on ShareCG and credit you. My workflow was model in Blender, import into DS and render in Lux - a lot of working harder instead of smarter. I'm late in the game with Iray but that's my engine at the moment. I would like to learn cycles.
Thanks for posting these. You've inspired me to keep working on this and I'm determined to keep it as lo-polly as possible. Glass and Light are the enemies of rendering engines.
You are welcome. Your 3D model is really great and you should keep work on this one. To motivate you more I did some adjustments to the materials and did some other renders also some closeups.
I will give you the blend file soon, I need to look for the copyright of 2 image first and you can also share the blend file. I also want to explain how to setup the scene for Cycles rendering.
Yes I'd love to understand cycles.
did you put a texture on the inside walls or is that a layer of duplicate polygons I missed peeking out?
You really see all the stuff you messed up when someone else renders it!
I worked only on the outside of the building first to see how it looks, but I will also do the inside part.
Here is a description to setup the light with a HDRI. Free (CC-0) HDRI’s can be found here: https://hdrihaven.com and can also be used in Daz Studio Iray. Blendermada (http://blendermada.com/) has a lot of free Cycles materials.
Setting up the lighting in Blender Cycles. I use Blender 2.79b.
A) First we switch on the Node Wrangler addon. Activate the Node Wrangle: Menu → File → Preferences and select the Addon tab. Type wrangler in the search box, set the Node Wrangler on and click on [Save User Settings] (left bottom corner). See first attached image.
B) Select Cycles Render in the top bar and select Compositing (Point 1 in the second image). Click on the scene tab, open the Color Management and select Filmic and for look Base Contrast (Point 2).
Select the World icon on the lower bar (Point 3) and set Use Nodes active. Now you have 2 nodes the World Output and the background. Activate the Background node selecting it and type Ctrl + T (Point 4). The Node Wrangler adds the other 3 nodes. Click in the Environment Texture on the folder icon and select your HDR image. Now we have the lighting and when we want also the background. With the Strength parameter of the Background node we can adjust the strength of the light and with the Z rotation of the Mapping node we can rotate the HDR.
I did 2 renders more, one that shows the inside. To get more light inside the building I did changed the glass material. I added a transparent node with a mix shader node that is controlled from a Light path node. The "Is Camera Ray" switched between the glass shader and the transparent shader. If the camera sees glass the glass shader is used otherwise the transparent shader is used.
I need to change out those kitchen cabinets. It also looks like a few normals got themselves abnormals.'
is the Is Camera Ray part of Iray or Cycles?
No, the normals are ok, but the dark part (strip) has an angle of 45 degrees.
The Is Camera Ray is part of Cycles.
I have sent you the blend yesterday but this was not in.
Cool! I give a gift, I get back useful info!
Thank you.
Long time no see @StratDragon!
Many thanks.
Fun to be back.
The best part about others rendering your models is you see all the details you missed.
those ovens are great if you are heating a pizza sideways, other than that they look really dumb.
I need to revisit this project.