Is there a way to transfer a root node adjustment to the hip node, without everything moving?
 Those Things
Posts: 1,134
Those Things
Posts: 1,134
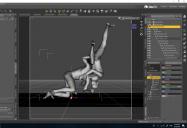
So, I just finished up this paired pose, and only then noticed I forgot to zero out a rotation on the root node of the figure on the left. Unfortunately, I have made a whole bunch of adjustments to the hip node of that figure, and now--when I zero out this adjustment--my figure reorients itself in space, and the pose is broken. Is there a way to salvage this? Some way to zero out this rotation, but still keep my figure in the same orientation in space (only rotated of course) or do I have a whole lot of finagling ahead of me to get this pose back together?
Daz 3D is part of 
Connect
DAZ Productions, Inc.
7533 S Center View Ct #4664
West Jordan, UT 84084
Licensing Agreement | Terms of Service | Privacy Policy | EULA
© 2025 Daz Productions Inc. All Rights Reserved.
Comments
Record the X, Y, Z of the root node... (Also any rotations)
Reset it to 0
Add those values to the current values of your "hip". (You may have to manually adjust the "Y", as it may still be offset by the hip-to-root offset. Some rotation values may also have to be inverted. I don't remember if the hip is actually the correct orientation or not.)
I agree, it is an odd thing, to bind the root to the hip, and not to the "feet", which messes everything up. (Especially animations.) The excuse I am often told, is that we want the root to always stay at 0,0,0... so the characters always remain in the correct position in the "scene", when moved by the "hip", instead. (That is why poses throw characters all over, they are poses, normally, for a scene, posed in specific locations where it expects something like a pre-set couch to be, or a counter, or another person.) But the moving tool moves the whole model root-node, by default... Not by the hip.
Thank you!
Don't thank me until you try it... It may not work as desired.
You may just be able to apply the values of one node, to the other. (No adding any values, just manually copy each value over.) Then restore the root node to 0's, obviously. Again, with the exception of the "Y" difference, in height.
On another note, you can add a NULL node and throw the model in there, use it as the new "root" node. (I do that, and move the root node to the hip, to remove most odd conflicts with rotations and placement.)
In a scene with more than one figure I tend to place them in seperate Groups, not just to control visibility including all parented cothes and things, but also for scene placement and rotation on the Y axis in which they are facing so I don't have to deal with that while loading pose presets.
The position and poses of the figures parented to the Groups stay local coordinates relative to the Group position, no matter where you place the figure group in the scene relative to the world center. I would use the hip node for figure placement in height and rotation but keep its position with X and Z translations near the root node. If you finaly want to save your poses to the content library in a "In Place" or "Go To" fashion you can choose to unparent the figure again (with Parent Items In Place) to use the world coordinates for figure placement.
While posing I try to keep the figure root at x0,y0,z0 but as soon as you use Move to Foor (Ctrl+D) the root node gets moved again. I can fix that by copying then resetting the root node Y translation value to zero, then selecting the hip node and click the slider to edit the Y translation value, then I press End and type + on my keyboard and paste the copied root node Y translation value from before behind the existing value to add it. With this you can enter simple calculations into the slider values.
Another method I once tried was to use the Joint Editor Tool Settings pane to copy/paste the hip node Center Point position values to the root node to have the figures pivot point in the exact same place. You can save this root node rigging adjustment to a new Property with ERC-Freeze. You may use this control property to pose your figure but again when it comes to save your poses as redistributable presets to the content library you can use "Bake to Transforms" (Shift+B) that can convert all joint transformations on the figure that may be influenced by pose control properties to real pose values so you don't need to have the extra pose controls on the figure to apply the saved pose preset.