Texture seams in low-resolution renders
 chris the stranger
Posts: 132
chris the stranger
Posts: 132
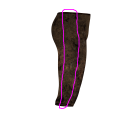
This one's had me scratching my head for awhile. I've been working on a character that uses Rogue Hunter pants and boots, and could see a texture seam in the diffuse texture when rendering images.(Shown in Attachment #1). After trying to make my own templates, I spent a considerable amount of time learning how to import objects and paint textures in Blender. As a non-3D artist, the process was thoroughly unintuitive, but I was eventually able ot make what I needed to make. Replaced the texture in my project, and...now there's a bigger seam.
I threw together an example using just the base color layer that I painted in Blender. The seam was there in my 320x320 render, but not in the 640x640 one. It has to be something in texture optimization...how would I go about fixing this in 3Delight?
There's always the tried-and-true, 'render at higher resolution, then downscale' method, but that would add a considerable amount of time to the workflow (And strangely enough, I'd been finding that rendering at the target resolution was producing better results than the aforementioned approach).
Daz 3D is part of 
Connect
DAZ Productions, Inc.
7533 S Center View Ct #4664
West Jordan, UT 84084
Licensing Agreement | Terms of Service | Privacy Policy | EULA
© 2025 Daz Productions Inc. All Rights Reserved.
Comments
How much padding is there around the texture on the uv-map?
Compression samples the surrounding pixels, and if the texture ends at the uv-island edge, the background colour will get factored in. I generally want to have 16-32 pixels of padding all round an island (Substance painter does this automatically on export if selected - not sure about Blender - you could do it in PS/GIMP by duplicating it as a background layer and scaling each island a pixel at a time (possibly adding blur)). It's not so easy to do it manually but using a background that's the same shade as your texture map could help.
It's more noticeable on things like normal maps too.
If you've already got padding, I'm stuck for solutions.
I think you hit the nail on the head, regarding the padding. Not sure if I can do it in Blender, but I was thinking of a similar approach last night. I know it painted a few pixels outside of the UVs when I painted directly on the model, so there might be a way to adjust that in settings. I'll definitely look into it once I get over this Blender Burnout. Thanks for the advice!
In case anyone's wondering, Blender's default 'bleed' value is 2 pixels - not much, and the setting is not so easy to find if you're not that familiar with the software. In 2.80 beta, in the Texture Paint workspace It's a property of the active brush; in the Properties panel (right hand side) select the Active Tool tab and it's under the Options section.
That's good to know. I wasn't using the beta, so I'd still have a hard time finding it--though my search history is now thoroughly populated by "how to _____ in blender" queries. My huge vision impairment makes it extra challenging to find some of the more tucked-away features.
With 3Delight the render settings are important, while the default settings will give you a relatively quick render, it's also more likely to throw up anomalies like seams, check the shading rate, the default is 1.0, for final renders I normally use 0.2 or 0.1 if I have a lot of displacement going on.
Since 3DL uses mipmapping, a lower resolution texture is used for lower resolutions. So the padding must be adjusted accordingly to avoid seams because the smaller is the texture the more pixels the padding takes.
That's what I thought he was saying at first too, then I reread his post and realized that those were the sizes of the renders and not the texture size.
Other than that you are quite correct, 3DL doesn't use our textures to render with, instead it creates temporary TDL files, which are mipmapped TIF's, and uses them instead. The further from the camera the surface is the further down the mips it uses, most have no idea that most of their renders actually use the 2K, 1K and even the 512 mipmaps instead of the 4K texture.
The kicker is, I was making 1024x1024 versions of the texture, because I'm making (relatively) small sprites that would see no benefit from 4k textures (and probably not even 1024's). I thought that perhaps, I could rescale the textures in [Image Editor Of Choice], and that that would alleviate the problem - but I think that would require a lot of additional painting and editing to give it extra padding. I'm not comfortable doing that in a program that doesn't realize that 'things outside the UV layer need to seamlessly transition'.
Learning some great under-the-hood details from this. It's a little more 3d work than I was expecting to do for the project, but I'm no stranger to the realm. As far as painting new textures go - I'm not sure if Amrmor Paint has a way of dramatically increasing the padding when you paint (seems you can set 'Bias' to a value between 0 and 1, but I don't know what that's been normalized FROM). I'll take a good look at the features in Blender 2.80, since it seems the developers have been working hard on a lot of the UI choices that gave me a headache.
@ andya_b341b7c5f5
I'm still trying to get better with texture panting inside of Blender. Thanks for the info about where to find the Bleed setting but I guess the extra edge around the UV islands will only be added if you actualy paint something over the seam on the texture.
If some UV seams didn't fit I've used the Blender Clone Brush to paint it over. The Clone Brush isn't perfect but does the job. The 3D Cursor is used to select the screen space projection area to clone the texture from. This is the downside of the tool, it can happen that you pain too far and capture the edge of the model to clone from. Then you get stretched textures, in this case you can undo the last brush stroke and try again.
@ harrcj101
I also did some texture editing and found that the Map Transfer utility inside of Daz Studio is capable of generating a "Bleeding edge" around the UV island seams. The purpose of the Map Transfer utility is to convert textures form one UV layout to another. I just checked this and you could also let it run over all the texture maps (including Bump, Spec, ect.) without changing the UV layout (in DS it's called UV Set). In the Map Transfer dialog ther is a setting called Beelding Factor by default set to a value of 0.010 that will generate a 10 pixel wide "bleeding" edge by repeating the color on the outer most pixel on the UV seam outwards. You may find that you've packed the UV islands too close to each other in your custom UV Set and depending on your texture resolution you want to lower the 10 pixels bleelding factor otherwise you could get overlapping.
My suggestion use the Map Transfer to generate a bleeding edge and set the output format to PNG with highest Baking Quality so you dont loose details by a second JPG compression. Then you could use these PNGs as textures, convert them to JPGs or compose the original maps with the bleeding edge with in an image editor.
I've made a Youtube tutorial about the Texture Atlas and the Map Transfer used on a Genesis 3 figure. The second part starting after 10 minutes playtime is showing the uage of the Map Transfer process.
DazStudio LowResUVs G3F - starting at 10:00
The needed mipmap size is computed in screen space. So lowering the rendering resolution will affect it as well. It's not just the distance from the camera.
The issue is that when designing the textures they didn't leave enough padding for 3DL mipmapping to work fine. Your best option here is to render at 640x640 then scale down your sprites to 320x320 with any paint program. You can also batch resize if you have many of them. Editing the textures to add more padding is just insane imho.