Creating Better UV Maps - How?
 franontheedge
Posts: 342
franontheedge
Posts: 342
Hi everybody, I've been following a lot of tutorials recently, and especially enjoying doing the Wings3D tutorials by David Brinnen. My favourite at the moment is what I call the holey cube with the loops -- sometimes referred to as the cube with Mobius loops. I was however a bit concerned that the UV mapping created by UV Mapper Classic for the loops was not very good.
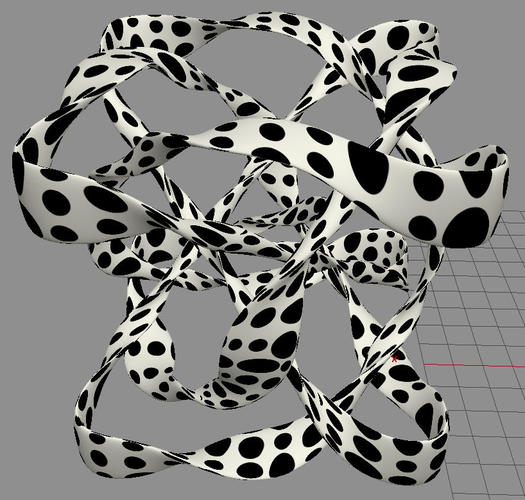
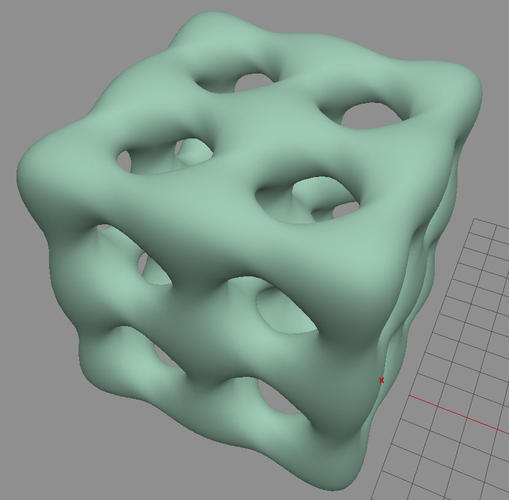
I therefore spent the last three days UV mapping the loops in Wings3D, and obtained a very good result. So now I want to UV map the cube that goes with the loops -- now I'm calling it a cube, but it's not a cube, here's a picture of it:
Pic1 BadUVMappingHoleyCube1.jpg
you can see that although vaguely cube shaped and starting from a cube it is now no longer a cube with lots of holes in it and lots of curved edges and its gonna take some UV mapping! However, three days spent UV mapping the loops is extremely bad for my neck. Today my neck hurts, my head feels like an iron helmet is gripping it, my eyes hurt and I generally feel terrible.
1) My question is: does anyone know of an easy way of UV mapping curved and somewhat difficult objects like this?
This will probably involve a program other than Wings3D. I was looking at Roadkill, and discovered that it originated from Blender's UV mapping tools, so I went to have a look at that. (and that Blender is Roadkill on steriods) My problem is I have a lot of difficulty understanding the layout of Blender, so I would have to follow a tutorial on how to use Blender before even starting with the UV mapping in there.
2) So the second question is: is Blender the way to go? Since there is no point in starting to look into it if it's not the right route.
3) I don't think Daz Studio does UV mapping does it?
4) What about Cinema 4D? (Release 10.5) no point thinking about the latest version, I don't have it. But I do have version 10. I have occasionally used Bodypaint in Cinema 4D, and I like the way you can paint directly onto a model, this would solve the problem of going around the corners and the stretching around the holes in the cube shape. I last did this about six years ago, so it will probably take quite a lot of revision to get back up to speed on that. Especially as it's painting from a texture, not painting with a pure colour. I would prefer an easier method.
5 & 6) Last two questions, a) are there other things you can do to a UV map in UV Mapper Classic other than simply choose: plannar, box, cylindrical, cylindrical cap, or spherical?
(Things that will actually make a difference to this particular object that is, not just things you can do in UV Mapper Classic anyway.)
b) is there an easier way to do it in Wings3D?
Naturally my preference would be Wings3D, since I'm most used to working in there for UV mapping.
But any information would be welcome, on anyone else's preferences.
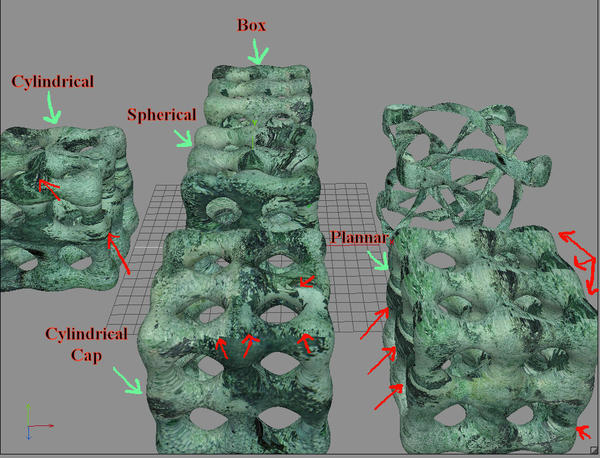
Here are two shots showing the distortions on the various types of map that UV Mapper Classic allows:
This:
Pic2 BadUVMappingHoleyCube1.jpg
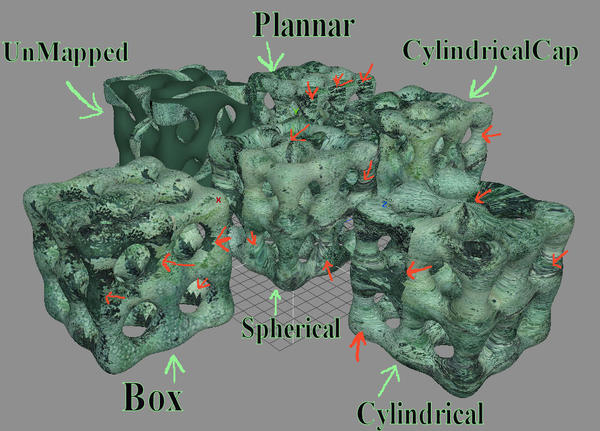
and this:
Pic3 BadUVMappingHoleyCube2.jpg
The red arrows show some of the problem areas but there are loads more on each example.
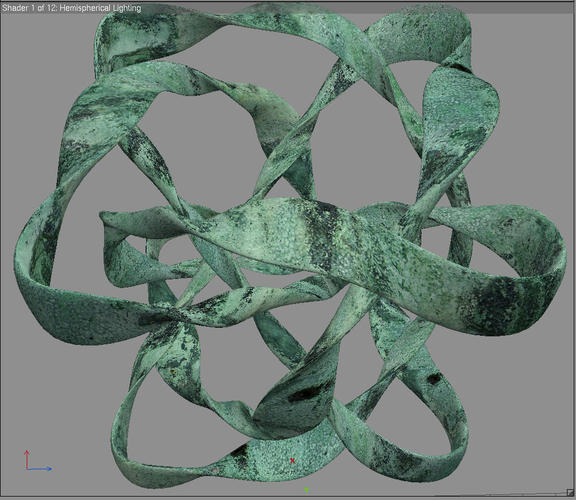
Here are two images of the perfectly mapped loops with textures on, one shows the texture I've been using on the other –warped UVMapped versions, done in Mapper classic (renders of those can be seen in the "Show us your Bryce Renders 6" thread)– but here on the perfectly mapped version done vert by vert (virtually) in Wings3D.
Pic4 PerfectUVMappedLoops.jpg
And once more but here with the spotted table cloth design I made after gazing for years at our kitchen tablecloth... the spots show just how good the mapping is:
Pic5 PerfectUVMappedLoopsSpotty.jpg
Fran
Daz 3D is part of 
Connect
DAZ Productions, Inc.
7533 S Center View Ct #4664
West Jordan, UT 84084
Licensing Agreement | Terms of Service | Privacy Policy | EULA
© 2025 Daz Productions Inc. All Rights Reserved.
Comments
You might be able to do it by breaking it up into sections and cylindrically mapping those, but a pelt-unwrap (like Roadkill, I think) on each row of units would probably be best. Something like that isn't going to have a perfect mapping - just a least bad for a given purpose.
Sections? Wouldn't that still give you the bad seams it's already suffering from in each of the examples?
PeltUnwrap? I've not heard of that before, sounds interesting. So that would be available in Blender too? Is RoadKill available as a standalone then? The webpage I went to had it as a plugin for SoftImageXSI, Maya and 3DS Max, none of which I have.
There's no way not to ave seams, I'm afraid - that's why I said there was no perfect unwrapping for a shape like that. If you want to use procedural shaders then you may need to use a project from view method to apply them, rather than UVs.
Sorry, I was thinking Roadkill was available as a standalone but apparently not. Pelt unwrapping is the sort of mapping used for the DAZ humans, and is the sort of thing Roadkill does (hence the name, which doesn't bear too much thinking about).
UVmapper Classic is excellent for basic needs but if you need more, you might want to consider a more comprehensive UV mapping app.
You might want to look at UVmapper Pro. It is reasonably priced and gives you many features you don't find in the Classic Version.
If you can afford some of the higher end UV mappers there is DeepUV by Right Hemisphere and Headus UVLayout.
UVmapper Pro has a demo version so you can get a feel for new features and some excellent tutorials on the site. DeepUV used to have a demo but I have heard little from RH in recent years. Check the Headus website to see if they have a demo as well.
It's been a while but I believe the Maya plugin for Roadkill actually functions as a stand alone version. It's been a while. Went to the website.
http://www.pullin-shapes.co.uk/page8.htm
Scroll down to where it lists Maya plugin. Download the first link under Maya (not the source code). This installer gives you the standalone and the Maya plugin.
Blacksmith3D is currently on sale over at RDNA. I've not a modeller or mapper, but I've heard good things about it. I dunno if there is a demo version you can try first. I'd think that for any choice you make, you really want to try a demo first to see if it will do what you want.
Then there is always the Ptex route where you don't UV map the object at all... Studio will render Ptex, but not show it in the viewport.
Hexagon has a UV unwrap function that allows you to set and define the seams, it could work in this situation. UVMapper Pro has alot of useful functionality over UV mapper classic, but it still primarily a projection mapper and would not help you with that particular object model.
Hexagon is currently $5 and change , and absolutely worth the money.
http://www.daz3d.com/hexagon-2-5-download-version/
Yes I do realise that all Unwrapped models will have seams. I've discovered that over the years of UVMapping in Wings3d.
It's just that this particular model - due to the method of modelling (I followed DB's Wings3D tut on it) has some slightly twisted topography, which will make for problems around each circular hole. I'd have cut inside each hole so you wouldn't see the seams on the outside surface, probably with some cut lines to relax that area - and then I'd have cut inside each column - see pic - (when I say 'inside' I mean from inside the cube not inside the columns) - because those seams would be less visible from outside the cube...
I think that's what I'd do...
But it's a big job. Which is why I'm putting it off and trying to see if there's another way... sigh.
I'm also beginning to wonder if it would be possible to make this same shape but without the twisting... I wonder if David know a way...
Okay, I was thinking about making a non twisted version of the Holey Cube, and maybe asking David to tell me how, when I thought to myself: 'hang on, take another look at the tut video and see if I can do it yourself first'
So I did... and looking at the vid, I thought, okay - make the same object, but leave out all that rotation, and maybe, just maybe, you'll get and untwisted version of the object.
So I just went off and tried it and - woopeee!
I have an untwisted version of the cube!!!
Now I just have to try UVMapperClassic on this one and see what I get - if that fails at least this one'll be easier to UV Map in Wings3D.
It would also be nice to have a look in Hexagon and see what that makes of Unwrapping this...
I switched from Wings to Blender a long time ago because the UV mapping was so much better. With complex shapes you need a lot of full seams and in some cases a few partial relief seams. Relief seams are usually needed around tight compound curved areas of the mesh so that the UV map won't bunch up when trying to flatten these areas.
Blacksmith3D was 65% off, now it's been reduced to 50% off. A nice savings, but it's still not exactly cheap.
Ptex is an alternative approach to texture mapping that Disney is promoting. Instead of using UV maps, it uses the objects actual mesh as the map. Each face of the mesh is given its own image map, effectively. And the image map of faces can vary in resolution. So if you have a flat surface (say a wall) made of giant quads to keep the poly count down, you can still have a high-resolution texture map for each face of the wall. Whereas on a figure with a very dense mesh, you would need only small image maps for the texture data for each face. Your cube object is a perfect example of where Ptex shines, since it doesn't require you to unwrap the object into some suboptimal mapping.
However, it's still a relatively new approach to texturing. There are only a handful of tools that let you paint Ptex objects, and it makes it difficult for folks used to using 2D tools like Photoshop/GIMP to create texture maps. Unfortunately, I do not believe Bryce supports Ptex.
Really? How interesting that you should say that. So Blender might yet be a good place to look at UVMapping even if I've figured out a way round this particular problem.
What are 'relief seams'? They sound like just what I need - and often have needed in the past come to that!
Are they seams that are cut but don't entirely separate parts of the mesh? Or do they not cut but do something else?
This is where I've put lines for cutting, (See Pic 1)
...unfortuately Wings always twists up the map when I want it to unfold like those animations people do of boxes when they want to show how clever they are just before a tut on UVing.
I just wish Wings3d would unfold things like that, instead of like this (see pic 2)
So would these 'relief seams' solve this kind of problem?
Blacksmith3D was 65% off, now it's been reduced to 50% off. A nice savings, but it's still not exactly cheap.
Ptex is an alternative approach to texture mapping that Disney is promoting. Instead of using UV maps, it uses the objects actual mesh as the map. Each face of the mesh is given its own image map, effectively. And the image map of faces can vary in resolution. So if you have a flat surface (say a wall) made of giant quads to keep the poly count down, you can still have a high-resolution texture map for each face of the wall. Whereas on a figure with a very dense mesh, you would need only small image maps for the texture data for each face. Your cube object is a perfect example of where Ptex shines, since it doesn't require you to unwrap the object into some suboptimal mapping.
However, it's still a relatively new approach to texturing. There are only a handful of tools that let you paint Ptex objects, and it makes it difficult for folks used to using 2D tools like Photoshop/GIMP to create texture maps. Unfortunately, I do not believe Bryce supports Ptex.
Interesting... but I'll bet it'll be expensive if it's a Disney thing.
I have done some painting of objects - that's what you do in BodyPaint, which is both a stand alone and a module of Cinema4D.
However if you have to have a separate image for each face or facet of a mesh, that too sounds quite laborious.
But it's interesting to hear about such new directions. Thanks for explaining.
Actually, Disney has made it available to anyone and everyone who wants it, free of charge, since they see it as a good thing for the industry overall. Same thing with Pixar making OpenSubDiv available to everyone.
The tools to paint Ptex, such as 3D Coat, are 3D painting tools. You load the object, and paint directly on it. For the most part, you can ignore the actual underlying geometry, and just paint as if it was a completely continuous surface. The tool takes care of managing the per-face image maps for you. If there is a particular section you want to add additional detail, you can select just the faces in question and tell the tool to increase the image resolution for those faces and then go back to painting without concern for where the face edges are.
It really is quite powerful.
Those short partial seams you have around the holes are what I call relief seams, I don't know if there is a industry standard name for them. When I was young and sort of healthy I was a bit of a jack of all traded. A lot of the things I learned from doing upholstery and metal fabricating I applied to UV mapping.
Blender has a lot of good tools to UVUnwrap and there is an additionnal plugin called Sure UVUnwrap that could also help
Plus you can directly paint in Blender.
I don't see how you could avoid multiple little island with the "cube" but for the Ribbons around, there is an option to "follow Quads" that make it easy for a unique band for that type of mesh
Example below without really harrassing myself in less than 15 min including quick paint. The job could be better done but if you paint directly you don't really have to bother
I've been calling them 'relax cuts' but yeah, I know what you mean, back when I was a lot younger I once made dresses for my kids - on something like where I have those partial cuts - you'd put a 'dart' in dressmaking, which is not a cut, it's a fold of material sewn to look like there's less material there than there actually is.
When people kept saying - 'Oh you need to do all the tuts you can find' or 'oh you need to learn a lot more of how the program works before you start that' - all (it seemed) to try and stop me doing and asking questions about UVMapping. Well it didn't work. Lol!
Well I still have some work to do on this cube it seems - the untwisted version of the HoleyCube didn't result in any better UVMaps from UVMapper Classic - so it's back to the grind stone.
These new ones look pretty much the same as the twisted cube ones to me.