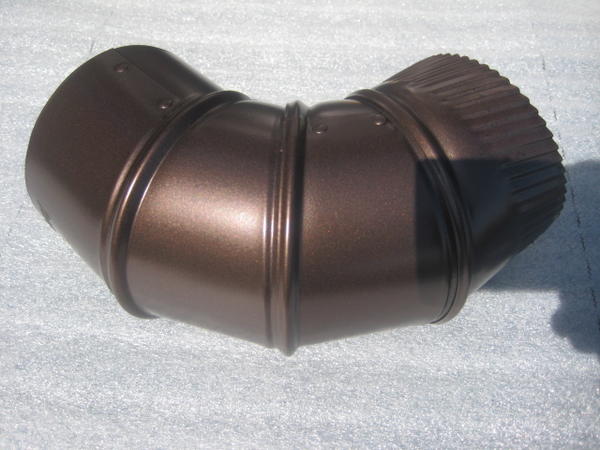
"Best" way to make this metallic material? (tiny sparkles)
 Turner
Posts: 116
Hi everyone,
Now happily into 8.5 with "all things working" (knock on wood shader)
Anyway, I'm trying to figure out how to make a texture.
Basically, it's a dark paint color, but has teeny-tiny sparkles in it, like metallic paint. (see attached photo)
Any suggestions as to how to do this so that the size and frequency (density?) of the sparkles is easily controlled?
thanks!
Andrew


sparkles.JPG
640 x 480 - 171K
Post edited by Turner on


Comments
Somewhat like I did in this ....
http://www.daz3d.com/forums/viewreply/499747/
In this, the white is dominant, and the sparkles are very faint.
Change the colours off course...
Vary the scale and contrast values in the fractal noise channels...
Thanks Varsel -
Can you be a little more specific? I can't really see the effect I'm looking for in that paint, and am not sure what you're setting up (and in which channel) to get the "sparkles".
cheers!
Andrew
Check out the second image in the post he linked to. In the very top channel he's selected to use Multi-Channel Mixer, which mixes two multi-channel shaders. In the left most window of that image, you can see the tell-tale band of a color gradient in the Highlight channel, white being the color in the color channel.
With any color gradient, you'll get a new node at the bottom of it called "Shader", which is whereyou need to put something in order to control how the colors in the band that you set up get dispersed. He is using Fractal Noise to control the color placement of the gradient. See the far right window of that image. At the bottom, you can see his settings for the Fractal Noise generator. What he means in his explanation is that, where ever you see that he's using a Fractal Noise, he's using this, same one. Above that, you'll see his second multi-channel shader, which uses the same gradient and Fractal Noise controller in both color and highlight channels.
Now, when ever you're using a mixer, you also need a controller, much like you need in a gradient. Varsel is using that same fractal noise controller in that as well. That is the final channel at the bottom of the entire list - where you see Blender on the far left, bottom of the picture.
Fractal Noise is an excellent controller for this sort of distribution. The specks in your paint is controlled by it. Take a close look at that image and just absorb how he has it set up.
Ah! I see it. For some reason the images wouldn't reload.... restarted my browser and voila...
I did try my own advise.... :red:
And it might work.... but I'm looking into simplify it.
Will return with new mistakes shortly.....
In the original post question, we don't need the multi-channel mixer - just a standard multi-channel shader. Nice, gradient with fractal noise, Highlight 33, shininess 9, Cntrl/Drag the fractal noise to the bump channel.
What I ment was that in my original suggestion, the white is dominant. The sparkles are just faint.
Here the sparkles are more dominant, or everything is sparkles... :-)
so I did some simplification....
I'm not using the Bump channel.
I'm using the Shininess channel to simulate bumps..
The greater the difference in the values, the more it will look like bumps...
The colours and highligts might still need some adjustments, but it might serve as a starting point.
The values in the shininess channel might be a tad to big, when comparing the OP's picture with mine.
and lights and placements will also influence the outcome.
You might also try changing the top shader to Anisotropic.
Nice!
Getting there...
I really need to study shader making.
A
It's very addictive!
I just got this one done.
I have uploaded the shader to the CarraraCafe freepository.
http://carraracafe.com/forum-3/?cid=25&show=759
Metalic Shaders - Free
Post edited to added the sample image.
Enjoy!
Regards
Here's a metallic I did a few years ago.
Must have a plugin...."Shoestring Shaders"
It works by putting a "glow" in the spots on the lit area of the shader.
Thanks Ringo! You rock!
That's awesome, Ringo!
See? Now you have a nice material made by a shader pro! ;)
Thanks man!
My next article for the Carrara Cafe, which is nearly complete, has some good information in it for new users in the Texture room. It's all about simple optimization of Poser shaders in Carrara, which includes some tips that will help to further understand what's going on in there.
Just playin' with more exotic combos.
beautiful work McGuiver, I have shoe string shaders but rarely use it - I should dust it off.
You should put a work in the next challenge if you get time. You always make amazing renders.
Excellent effect! Could you elaborate the Shoestring Shaders element please? I am not sure I understand how you achieve the "glow spots in the lit area" bit.
RingoMonfort, thank you for the free sample!
Antara,
I used "noise" instead of spots on the last bit of playing....this way I can better control the size of the metalflake effect.Here is a screenshot of the shader tree.
It's super easy.....pick your object color for the basic color, set your highlight, shininess, reflection etc... as you would for any other shader.
The trick with Shoestring Shaders is " Lit "
I am using a mixer in the glow channel....source 1 is black, source 2 is the color I want the metallic glow.
For the blender I use subtract, source 1 is noise...this determines the size of the metallic
I set the scale of x,y, and z at 10% and set the global scale at 10% also.
Lit determines which facets are affected by the shader...you will need to type in your light source, and set the angle limit.
I checked "invert grayscale" because I was reversed on the colors of the mixer...source 2 should have been black.
Would like to......if time allows. :-)
Thank you, McGuiver!
Time to experiment with it some more. I have an idea of using it for sparkles on a snow...
Thanks everyone!
Really helpful stuff here. Looking forward to figuring it out...
Andrew