Tricky Camera and Scale Stuff (Beware of Math)
 chris the stranger
Posts: 132
chris the stranger
Posts: 132
This is Take #2, since I might be able to explain this better having dived in headfirst yesterday.
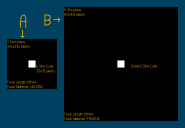
I'm rendering objects separately for use in a project. Some only have to fit within a 320x320 pixel window, but others are quite large. In the interest of keeping the scale of everything consistent, I've created several camera presets that use different Local Dimensions, Focal Distances, and Z-axis translations (though in orthogonal view, this setting isn't as important). I've included an illustration that shows how I adjust the pixel size, and then change the focal distance in order for the 'calibration cube' to retain its dimensions of 32x32 pixels when rendered.

I'm going to post some more technical information and numbers in a post to follow, but for now I'll just ask; is there a more convenient way of doing this?
Daz 3D is part of 
Connect
DAZ Productions, Inc.
7533 S Center View Ct #4664
West Jordan, UT 84084
Licensing Agreement | Terms of Service | Privacy Policy | EULA
© 2025 Daz Productions Inc. All Rights Reserved.
Comments
Okay, now for the stuff that could potentially cause headache:
I made a table of Window Resolutions, and the Ideal Focal Lengths that produce as close to pixel-perfect accuracy as Daz may allow, using the default 65 mm Focal Length: It's a big one.
Now I realize that I probably could have just done this calibration once for 4096x4096, and used that as a basis for calculating all of the others. In the interest of NOT having to do any more of these by hand, I've been looking for the relationship between Focal Distance, Focal Length, (POSSIBLY Focal Width), and Distance (For when I eventually make the sadistic leap to Perspective cameras). I've looked through the Daz documentation as well, and that added to my confusion:
'Focal Distance: Moves the focal point of the camera closer or farther away. The focal point is indicated by a red and green cross in the FOV wireframe.'
But they don't mention the fact that when you're using an orthographic camera, Focal Distance is the thing that changes when using the mousewheel.. In fact, they make it sound like I should have been using Focal Length this whole time, instead of Distance.
I find that this site providesan easy-to-follow breakdown of the math, I just need to figure out which parameters correspond to the variables given, since I have seen some discrepancy in the nomenclature during my search. For the case of orthogonal cameras, "focal distance" is the only tangible parameter I can adjust to zoom in and out of the scene, but that doesn't necessarily mean that it can be used as "distance from camera to object." Perhaps someone with a strong background in photography and optics could explain to me, for instance, if 'size' in this example refers exclusively to height like they make it appear. Would be nice if I only had to worry about one of the dimensions.
One other number I stumbled upon, was "Pixels Per cm: 37.800." Saw it in the Image Information of the test render. This could either be another big wrench in the problem, or the missing information I've needed in order to reversify a formula for Ideal Focal Distance. I can't really ponder it now, since I'm well past the burnout point, and University was years ago.
Why not just change the size of the render to 320x320 when you want that render and then render the other image you need at 4kx4k or whatever resolution you need? Why are you mucking about with all of this?
In a single word, consistency. If I were to render a background with a local resolution of 1920x1080, I couldn't simply change the resolution to 320x320 without also zooming the camera in or out. Pretend this underdeveloped, haphazardly thrown together scene is 1920x1080 (and also that it looks good). A simple change in resolution without adjusting Focal Distance makes the stand-in for the player look like a tiny pixelated blob.
Were it really 320x320, he wouldn't look THAT bad, but he'd still be tiny compared to the scene. I stuck the tiny version of him into the original scene (top-right of the gate) just for fun. I was also going to do something similar for the dog, showing that if I didn't use as stupidly precise of a number for Focal Distance, he could easily end up being a different size than how he should be in the scene...but that might be overkill.
I could render everything at the same resolution at all times (edit: without adjusting the scale of anything), but I don't like the idea of creating a sprite sheet out of 140 1920x1080 image files that are largely empty . The other option would be, render everything at 1920x1920, but scale the models then downscale the images accordinly post-render, but I think that would add a considerable amount of time to the process, as well as introducing an additional 'black box' later on in the pipeline. Finally - call me crazy, but I found during testing awhile ago that rendering at the target resolution gave me more 'accurate' results, than when I rendered at higher resolution s and downscaled.
I'm not trying to be condescending, I just want it known that there's method to my madness.
No, render the scene at 320x320 and then again at whatever resolution you need. Not resize. What you're doing seems to be completely irrelevant to what you want to achieve.
Maybe I'm not understanding what you're trying to do, but why not user spot renders for the sprites? Put the objects in the correct location in the master image and hide everything you don't want and spot render to a new image. You can then just cut them down to size in your image editor of choice. You could whip up an action in Photoshop to automate the cropping.
Because this is the first time I've ever heard of 'spot rendering.' Still pretty new to all of this.
I'll try to explain the other thing a bit better, but give me a little time. I need to hit the right beats in a way that doesn't make me sound like an out-of-touch-with-reality lunatic. Pretty sure I've already crossed that line, but eh..
Okay, so the only way I think I can convey this is via narrative. I call it, "The story of why I need to calculate Focal Distance"
Let's say this image is from my player folder, using a DUF file I set up specifically for the desired character dimensions - giving him just enough extra space that he could swing a weapon around, without said weapon going out of bounds. The camera also has the right amount of focal distance to minimize any alpha noise around the edges (I'm not actually using these settings here, but look at my cubes in the original post).
You don't see it, but there are invisible Distant Lights shining directly at him from all 6 directions. Because this setup took such a long time to make and fine-tune, I'd rather just load a new figure in place of the Cartoonized Darius 8 silhouette I'm using as a placeholder for this example. So let's load one of the big boys, the Behemoth.
I left Darius there just to show that they occupy the same scene, and the same window. Unfortunately, the Behemoth is just a little too tall for this one. kenshaw011267, you keep telling me I should just adjust the resolution and render at a higher one, so I'll do just that:
Drat, I guess that didn't solve the problem! But okay, all facetiousness aside, I'll just slide the camera up a little to fit him in the box.
Normally, I'd give him a little extra space for arm-waving and whatnot, but just for this example, I'll put him and Darius into the same scene.
But wait...he didn't appear that tall compared to Darius when I first loaded him in! This is how he *SHOULD* look:
This is absolutely why zooming (changing Focal Distance) is necessary. So, I can zoom out the camera, whose local dimensions are still 480x480, until I have a version that seems about the right size...
You'll see he has a lot more space to move his arms now.
But he's still a little tall. If only I knew a formula that would give me the exact value I needed for Focal Distance, in order to keep these two characters their appropriate size. Unless I'm missing something obvious, changing the resolution does not adapt the viewport the way 'Change Canvas Size' would in a paint program.
I'm going to look into this spot rendering, but I'm not sure it's the right solution. Does it cut down on the render time? Rendering these guys from a ridiculously far away distance is more time consuming than using the window presets I set up, and I'm not well-versed in Photoshop for making an automated process (though it's something I should really look into). I have a bunch of other trepidations as well, but I think this post is long enough. I spent the day doing this, but I think I may have an idea for how to work out the math that I can try tomorrow.
By changing the large figures resolution you effectively increased his size, he is now 480 pixels tall compared to the 320 of the original figure. Looking at it from someone who doesn't know anything about sprites and games, I would set the small figure so his feet are touching the bottom of the 320x320 square and do the same with the large figure in the same size of square. if the large figure is still too tall for the square then enlarge it but also enlarge the small figure square to the same dimensions. This way both sprites will occupy the same area of pixels but the large figure will look taller than the small one.
Changing the dimensions of the render will not change the dimensions of a figure, it is just rendered with more pixels.
So in the above example either the camera position needs adjustment or the characters base position. There is still no need to be mucking about with camera focal distance.
For instance:
These are orthogonal cameras. Changing Focal Distance is the ONLY* way to 'adjust the position'. Turn Perspective off and translate the camera along the X, Y and Z axes. You'll see what I mean for one of said axes.
* you could also adjust Focal Length.
The simple solution just hit me. Since you can't actually movean orthographic camera along the focal axis (Well you can, it just doesn't change the image), the best bet might just be scaling the models themselves. I could set the camera to the full resolution, and change the model scale to be the appropriate size. Percentages are much easier to work with than 4-decimal-place-precise parameters. That being said...look at those squares in the first post. If you adjust the corresponding focal distances I used by even a tiny bit, you start seeing blurred edges. One of the nice little side effects for calibrating the camera with this much scrutiny, is that it significantly reduces the edge noise - I'm not going to be able to completely eliminate the alpha bleeding, but this will go a long way toward reducing it without having to mess with filters.
I haven't tested it yet...and it could be that if I go this route, I'll lose that 'pixel perfect' quality. For that matter....my scaled models might have some absurd decimals in their percentages.....in fact, now that I think about it, I'd just end up with really small models rendered within a huge empty space, just like before! Darn it, I thought I was onto something! :\
Why are using orthogonal camers since they don't work for your purpose?
Well, that's the rason for the topic, isn't it? To make them work for my purpose. I thought I might be able to find some help regarding the image mathematics that go on under the hood, in the Technical Help (nuts n bolts) sub-forum.
If orthographic cameras were not meant to zoom, they wouldn't have mousewheel functionality. I don't think adjusting the focal distance in lieu of having a way to reposition the camera should be considered off-limits; it's just going to involve some trickier numbers. So far, I've seen cleaner renders from turning off perspective, but there's also a fairly important art-design reason for me wanting it to keep Perspective turned off.
Using a 3D Suite to generate 2D art assets that pretend to be 3D - now that's probably a niche that spans less than 0.0001% of the Daz userbase. I'm ready to admit the things I'm doing won't make sense to a lot of people, but that's not gonna stop me from trying to get help where I can.
My reccomendation is do not change the resolution of your render.
Set up your scene, then hide all of the people and render. (Now you have your background ready to go)
Hide the background objects, and set your render engine to not draw any kind of world or sky dome
Make one character visible and render
Hide last character and make another charcter visible then render.
Continue till complete.
Stack your layers in your image editor (this will be very simple because all of the images are the same size and all of the people are in the right location.)
I've done some testing, and here's what I've concluded: Rendering all assets at the same, maximum resolution IS a viable solution. I would say it's about a 99% acceptable compromise. The render time increase was seemingly negligible, possibly because I was rendering over a transparent background rather than a solid black plane, and the file size for a single frame
That stubborn 1% holdout is due to a few things:
With all that said, I do want to try one final thing with the math, using that 1/Xo + 1/Xi = 1/F equation. Xo - distance from lens to object, Xi - distance from lens to image, F - focal length.
Daz documentation refers to both Focal Length and Focal Distance as "distance from the lens to the focal point." despite them being two separate quantities in the classic formula. I've seen illustrations that label F as the horizontal distance between the rendered image and the lens; some people have even stated that you can assumpe that Xi = F (squiggly equals sign), because of how small the distances are. For purposes this precise, I don't think I can use that assumption. I'm going to go back into my Focal Square DUF to see if Focal Distance is xi, because that might at least allow me to do the necessary calculation without having an Xo to speak of.