Dakotaraptor colors
 xavierator
Posts: 155
xavierator
Posts: 155
Dear,
I just purchased the Dakotaraptor model.
I read the capability of "... different feather displays, and different skin colors".
I can only see one grey tone color in materials that could be changde from light or dark.
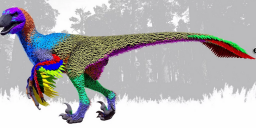
How can I change the skin color as I see in the attached image ?
Thanks a lot, Xavi
Dakotaraptor_Colors.png
1163 x 567 - 889K
Daz 3D is part of 
Connect
DAZ Productions, Inc.
7533 S Center View Ct #4664
West Jordan, UT 84084
Licensing Agreement | Terms of Service | Privacy Policy | EULA
© 2025 Daz Productions Inc. All Rights Reserved.
Comments
That image doesn't look like an additional texture, it looks like material zones. go into the surfaces tab and see if you can select those areas. If so, then add a color to the diffuse section to make the feathers different colors.
Thanks for your answer, I wil ltry it
Xavi
Dear,
I'm making tests, see the first attached image to see a names scheme.
I'm trying to create a dakotaraptor like second attached image.
With dark or medium colors it works fine, but with light colors it doesn't work, for light color I use the third attached image reference (RBG 255, 245, 220).
It seems right in the Aux ViewPort, see the fourth attached image.
But not in ViewPort, see the fifth attached image.
And of course not in final render, all results are darkness, see the sixth attached image.
Is it possible to create a white/brown dakotaraptor changing the base colors in surface tab ?
Thanks, Xavi
I don't have that product.
But you shall be aware of that all the settings in the surface tab, will influence how it is rendered. The viewport is a simplified version of the expected result.
My advice is to go through the surface tab and look at the other inputs like translucency colour if there is such.
Other colors are:
Glossy Color
Emision Color
Line Preview Color
Thanks, Xavi
The base color channel that you showed us...
...contains two components. The square box under where it says "Base" shows the image that's being used in this channel, the rectangular area to the right of it shows the creamy colour you've chosen to overlay that image with. The end result is a combination of the two - the brown image modified slightly by the creamy overlay. That's still going to end up quite brown.
If you click the image box, it'll give you the chance to browse for a better image (if there's a greyscale bump map image for that surface, that might work) or choose to have no image at all. Experiment and see what you can come up with.
Nearly perfect Chris, new attached image
I will continue in this line
Thanks, Xavi