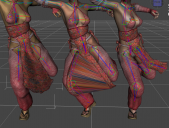
Fixing auto fit
There are a lot of costumes from prior characters that have what I call fly away parts that work well when used on the original figure they were created for. but when applied to other generation figures things get messy. On the illustrasion from right to left you will see what happens. On the right is the Genesis Flowering Dragon with the flyaway loin cloth posed. When I try to put it on the Gen 2 figure the thing loses the posing bones to the loin cloth and is attached to the figure instead. The same is true when applied to the Gen 3 figure on the far left. I'm sure this has something to do with the Auto-fit feature but isn't there some way to either perserve the bones prior to auto fit or apply new ones after?


Comments
AutoFit projects the bones of the source figure into the model and applies all weighting to them - you'd need to restoe the bones (if missing, I can't recall) and redo the weight maps to give them effect.
They are definately missing in the costume mess i'm using as an example. I suspect the same is true with any thing that pro jects below the belt such as tunic tails.etc. I know there is something that allows for tunics by Sickleyield but this is for Gen 8 and I'd like this to work with any gen figure.
As for restoring bones and redoing weight maps. I'm afraid that is beyond my smarts.
SY has templates for the various versions of Genesis, not just for G8. But they're separate products.
You could try using this tutorial to do the conversion with Transfer Utility for Genesis => G2: https://www.deviantart.com/sickleyield/journal/Tutorial-Keeping-Bones-On-TU-Conversion-Fast-Way-449218737
The solution would be to not use Auto-Fit but do the conversion in a manual way.
You can use the Transfer Utility to do that (Auto-Fit seems to be an automated Transfer-Utility process anyway). The other downside of Auto-Fit is that it will in some cases do horrible deformations on the clothes base shape while reshaping the clothes to the other figures default shape. Same ugly results while using Transfer-Utility with clone shapes. I tried the autofit with the LabCoat and was not happy with the result. To fix the deformations after the Autofit I would have to export the cloth to a sculpting app to smooth the shape and that would have smoothed the sewing seams on the sides that I wanted to maintain (I've tried that too). I prefer to use the Transfer Utility to convert clothes to other figures. It is a more time consuming process but you will get better results.
In Transfer Utility you have more options compared to Auto-Fit and the one that prevents the deletion of additional adjustment bones like for the loin in your example is found in:
General Options: Weight Maps > Extended Options: check Merge Hierarchies and optional uncheck Delete Unused Bones.
See the attached screenshot of the Transfer Utility dialog.
Here I have an example of my work on fitting the V4-LabCoat to Genesis 3 Female. Written from memory I'm sorry if some steps are not in the right order.
To get a better cloth shape fitting to the base mesh of the new figure G3F without much deformations I was first loading the original V4-LabCoat.CR2 (Poser format) without trying fit it. Then I've posed the arms of the cloth to fit the default pose of G3F, exported an OBJ and load it back as new base shape (Edit>Figure>Geometry>Update Base Geometry) added the Smoothing Modifier (Edit>Figure>Geometry>Add Smoothing Modifier) and manualy set the Collision Item to G3F also tweaking the Smoothing and Collision Iterations. Then adding a few DFormers here and there to push the cloth closer to the G3F shape. Next hiding everything else and exporting the cloth shape again with DFormers and smoothing modifier collisions to Update Base Geometry once more. In case of the old V4-LabCoat that comes with Legacy rigging I needed to go to Edit>Figure>Rigging>Convert Figure to Weight Mapping and I choosed Genaral that is the Weight Mapping that G3 and 8 figures use. I also did a step in between to delete the extra geometry at the bottom cosisting of a few cubes and spheres that where used as handles to grab the additional adjustment bones for the bottom coat. You can easily delete geometry in the Geometry Editor right-click menu Hide Selected Polygons followed by Delete Hidden Polygons. In any case the clothing item has to be converted to Weight Mapping in order to use the Transfer Utility. I've quickly loaded some of my setup scene file to make screenshots, in the third image you can see I've turned down the opacity of the cloth in the Surface settings and used Wire Txture Shaded to better see how close the cloth is to the G3F body while adjusting the DFormers. In any case you would have to use the Node Weight Map Brush tool inside Daz Studio to smooth some transfered Weight Maps so the cloth will deform smoothly while posing especialy in the hip and thighs area that even the Transfer-Utility has issues with.
I hope this is helpful - good luck with your cloth conversion.