Hair cap causing 'cracks'
 AbnerK
Posts: 718
AbnerK
Posts: 718
Hi,
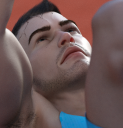
I've recently discovered this issue with hair caps when some kind of displacement is applied. It's really frustrating, it isn't something that we should be accepting. Other than removing all displacement maps or deleting the hair cap has anyone found a workable solution to this. We really should be able to use these products without this kind of issue. I haven't submitted a tiecket, I'd prefer to fix it.
Edit:
I wonder if this, that suddenly appeared in the store today, would do the job?
Daz 3D is part of 
Connect
DAZ Productions, Inc.
7533 S Center View Ct #4664
West Jordan, UT 84084
Licensing Agreement | Terms of Service | Privacy Policy | EULA
© 2025 Daz Productions Inc. All Rights Reserved.
Comments
I had a issue like that, only showed when the scene was rendered. I found if i scaled the cap from 100% to 98 or 99% then the crack went. Hope that helps.
This rendering artifact usually happens when the cap is intersecting the character geometry, either because of displacement applied to the character or a HD morph that doesn’t have a corrective projection morph to account for the HD details. Most of these caps have an ‘Adjust Expand All’ or similar morph. Dialling this up by a couple of percent will usually overcome the problem.
Oh, that sounds and easy fix. I'll give that a go, thanks. I have a friend with the same problem too.
Thanks Redz. Yeah I realised it was the Vas Morph that was causing the issue from a conversation with a friend who'd also had that problem. I didn't understand why the same morphs weren't automatically being applied to the hair too in the way you'd exppect for a character morph on clothing.
I'll try your fix too. Thanks.
Turning the cap off in the Tool settings fixed it too, not sure why I didn't think of doing that before, (that begs the question what the cap is for) there was a reason. Oh, yeah, it won't save, not the end of the world but you only see it when you render so you have to remember that beforehand. A friend brought this to my attention, I hadn't experienced it until I added the Vascularity. There was a reason why you can't just dial down cutout too.
Thanks.
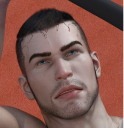
These 'artifacts' also happen if the cap appears to fit perfectly, but there is some kind of displacement map on the head or face such as veins or something else to create a textured effect on the figure's head. Displacement always happens AFTER you hit the Render button. The displacement is calculated and the actual geometry of the figure is changed once the render starts. the quality of Displacement is controlled from two different locations in Daz Studio:
1. from the Mesh Resolution part of the "Parameters" tab. A high-resolution figure has two sub-division settings - View SubD Level and Render SubD Level. For most newer figures the View SubD Level is set to 1 and Render SubD Level is set to 2. The SubD stands for 'Subdivision'. Each polygon of the figure is divided into 4 polygons for each SubD level. Therefore a SubD of 1 will divide each base polygon into 4. A SubD of 2 will divide each base polygon into 16, and so on. The View SubD Level is what you will see in the viewport. The Render SubD Level is what you will get in the actual render. So it's not surprising that what you see in the viewport is not necessarily what you will get in the final render.
2. from the Dispalcement section of the Surfaces Tab. The SubD Displacement Level option appears if there is a Displacement Map present on the surface, and this works in the same way as above, but works WITH it too. So if you already have a Render SubD Level of 2 (dividing each base polygon into 16), having a SubD Displacement Level of 1 on the surface will divide each one of those 16 polygons into another 4 (or in other words, will turn each base polygon into 64 subdivisions).
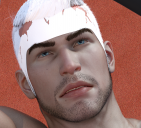
Displacement is good for producing fine details, but as I said above, it works AFTER you've hit Render. So a hair cap that fits the figure in Texture View mode will likely get artifacts during the render process if there is displacement on the figure. No amount of "mesh smoothing" will help this becaus emesh smoothing happens before the render starts, while displacement happens afterwards.
The solution of hiding the ahir cap is a good one if it's causing these artifaces, AND the hair looks fine without the cap. Otherwise, since the cap is going to cover any disaplacement on the head anyway, it could be a better solution to remove the displacement altogether, or if it's absolutely necessary, try putting the displacement map in the Bump channel and increase its slider. Bump gives the illusion of displacement without actually changing geometry, so that might work better for you.