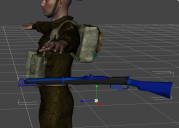
Lee Enfield rifle
 malcolmkarpeta_40f9af0b00
Posts: 257
Hi team, it's that time of year and am modelling a British soldier. I searched for the 303 rifle to go with my figure but all I could find was this one https://free3d.com/3d-models/303-rifle
Wasn't quite sure where to put it in my library, so saved all of the files in Props. However it doesn't work there, no files show up. I then imported the obj. file which worked but it shows up as attached pic. I tried changing surface texture but the object is not broken down into constituent parts so any change results in the whole thing being the same colour. Now there is a premium version but is quite expensive for a one off item, so before I buy that, anyone have advice on where I should install the files to make it workable? Or if anyone knows where I can buy a reasonably priced rifle please advise.
Many thanks


Comments
If it is UV mapped (check the details page, or look at the UV view in DS with the model and its surface selected) then you can break it down into Surface groups using the Geometry Editor tool. With the tool seelcted fro the Tools menu you drag to select the areas you want (there are also modifiers to select connected geoemtry, which in this case might be everything, and to grow the selection, which may be more useful - right-click>Geometry Selection will let you see them). Once you have a part, such as the metal areas, selected right-click>Geometry Assignment>Create New Surface from Selected.
Many thanks Richard, lots of terms there I'm not familiar with but I have to learn so I'll take the advice step by step.
I'm going in!
BTW Richard, will I be able to do all of the above having simply imported the .obj file?
Thanks again
BOOM! Genius! I put the files into runtime and all of the details you mentioned showed up in surfaces, it was just a matter of faffing around with the colours then. Only problem is they are not labelled as Stock, Barrel, etc. only numbers so a bit of trial and error there. Still need to tweek a few things but I'm feeling rather clever now :)
Thank you so much
Forgot the pic
You can rename them - if you have the Tool Settings pane open, and the Geometry Editor tool active, there will be a list fo all the diffrent kinds of group it has - you can use the eye icon next to each group to hide/show it (to see which bit of the model they are) then double-click the name in the Tool Settings pane and enter a new one that makes more sense.
Got it Richard, thanks again
Wow! I had no idea that such things were possible. Would have been plenty useful many times.