Mr. Woo character (G8M) and Oso cartoon shader?
 Roman_K2
Posts: 1,252
Roman_K2
Posts: 1,252
I tried loading "Mr. Woo" onto the Genesis 8 male base figure and... it didn't seem to morph into a little old man. Hmmm!
When I click on the character in the content pane I don't see any body or head geometry, just materials are located one step down.
I wonder if I am missing something here?
P.S. very little experience (as in zero) with G8 series characters up until now.
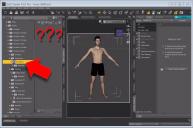
geometry-missing-perhaps.jpg
1274 x 846 - 242K
Daz 3D is part of 
Connect
DAZ Productions, Inc.
7533 S Center View Ct #4664
West Jordan, UT 84084
Licensing Agreement | Terms of Service | Privacy Policy | EULA
© 2025 Daz Productions Inc. All Rights Reserved.
Comments
If you click 'Characters' instead of 'Mr Woo', I would assume that you have a 'Mr Woo' actor.
There should also be a slider in the Shaping tab or the Parameters tab, one for the head one for the body and one for the full figure.
You must have the full figure selected and you should find the dials under actor, (in the parameter tab)
I thought so too... for instance G2F character (including the shapes) sometimes so up in the Content pane I think, and you just click to "load" them or otherwise modify the G2F base figure with the new geometry.
So that's where the control was... got it. Thanks!
Btw, I am having a similar thing going on with the M4 Base figure, on multiple devices I think. When I go to "Michael 4" under Daz People, the area seems to be blank - no choices.
M4 is a Poser character [.cr2], is found in the Poser Runtime structure under Figures.
M4 is a Daz figure, as are all the generation 4 figures, which because it is older follows the old Poser runtime structure in it's file structure. so you will find it in poser formats
Ok... I went to Poser > Figures. M4 doesn't seem to be under Daz People, and on my computer "Figures" has a lot of M4 stuff scattered about here and there.
No biggie though... I don't really need to get M4 going right now. Going back to G8M and "Mr. Woo", I am trying the Oso cartoon shader but so far without any luck - I'm not getting the flat cartoon effect like in the promos. Sometimes it comes out black, and at other times parts of the figure appear to be missing.
Note that these tests were from before I got the Mr. Woo character and texture figured out.
If it's found in the Poser runtime I call it a Poser figure ... if it's found in the "My Library > People > etc. I call it a D/S figure.
Daz, the name of a company, we all know made the figures be they in the Poser runtime or the D/S My Library field.
Okay ... found the thread ;-)
Here we go for a flat color render using Oso's Toon Shader, following the directions in the manual, fun part is locating everything in D/S ;-)
Setting something to "1"
Select 'all' the surfaces of everything in the scene {which are also selected} and apply the shader.
Select 'all' the surfaces and make the 'emission type' to be 'base color' ...
NO lights in the scene and make sure that the headlamp is also off ;-)
And then 'render' ... one flat color figure :-)
I see... so you sort of get no shadows under the chin and in the armpits say, and inside the hands there are no dark areas.
Thanks for the nice screenshots.
Yes that's just one of several possibilities to render for. It is expected then to use this layer with say possibly a layer of lines be those rendered in D/S or made in the image editor. To get nice lines in the image editor, this toon shader provides options to make 'materials' which can be easily read ... really a cool product I think.
I noticed in another thread someone mentions the Spot Render tool. Hmmm. I have yet to get into that.
Oh that's just for checking an area in the viewport, with the spot render camera tool selected, right-click drag the area you want to see rendered.
I hope I'm not "dragging this out" (hehe) but I wonder how that... method... differs, for purposes of lowering the overall render time, from doing things like removing -- at least temporarily -- certain objects or blanking them out in the scene pane, or another thing I've been doing is using the Geometry Editor tool to remove parts of a figure or object from a render.
Just as an example in the case of Mr. Woo for G8M, the beard in the "Nikan Hair and Beard" (store link; also see above where the figure sort of looks like Charlton Heston as Moses) set is a bit wispy. So if I wanted to thicken it a bit I might render an extra copy of the beard as a TIFF file on a transparent background, and I could copy and paste some bits of beard using an image editor that supports multiple transparent layers. Also the Nikan set doesn't have matching eyebrows which might be desirable if you wanted to so (say) the blind master in the TV series Kung Fu starring David Carradine.
Would Spot Render be a good way to render just the tip of the beard in this case? Apples and oranges (eg. both are fruit) or is Spot Render more like rock/paper/scizzors?
In this screenshot I have used the Geometry Editor tool to cut away a lot of the G8M figure because I am only interested in "isolating" some beard on a transparent layer so as to fashion matching eyebrows for "Mr. Woo". No biggie of course... I should have given the head a white porcelain shader, for this render in Iray.
Check the materials for the figure, the tongue should not be rendering white ;-)
Render to new window, save file if you like it.
Spot render is only good for previewing areas ... nothing to save.
Sometimes loading 2 of a hair/beard/brow file can make it appear thicker ... or the way you are thinking, one can add stuff in post work, whatever works best for you.
It's quite okay to kitbash character sets, hair from one, beard from a second and brows from a third ... consider all the products like tubes of oil paint, you paint the image with whichever colours you desire.
Yes, remove or hide items that are not in the scene {if not required for shadows or some such}, and over on the Render Settings one can optimize for speed or quality.
That's right, I definitely render a lot with "lower quality" settings, just to see what's going on.
Sometimes the arrangement of limbs and fingers has to be just so, and you have to keep on tweaking... in this test render the man has jumped on top of a pool table and he's planning his next shot... the right hand is supposed to be holding a pool cue. The man is a martial arts master, hence the bare feet and complete disregard for the management and their table!
Note the heavy shadowing in some places (the red arrows)... I think I am going to temporarily remove parts of the figure in the next render, so as to cut down on this.
I was trying to make the entire thing white so as to "thicken" the beard in the process. For some reason the white face color I was aiming for didn't take hold.
I think I am a big fan of alternative shaders like like Khory's clay shader (store link) and will you check out this wireframe shader for iray! Oh yessss...!!
On the bottom leg that is not shadow, that is clipping as in the shorts moved into that area as well. Happens when the figure mesh parts are touching each other and the solution is to adjust the pose.
Removing parts of the figure is not the usual method for tackling shadows, adjusting the lights would be. For softer shadows larger lights set much further back can help. There are some lighting tutorials in the New Users Forum, https://www.daz3d.com/forums/discussion/332431/daz-studio-beginner-tutorials-updated-every-sunday
Quite a few people are happy about that wireframe shader so not to discourage anybody from making purchases. However for myself, if I want texture and/or wireframes showing, I just apply the template to a copy of the texture and render that ;-)
Ha, very cool idea. Wonder if the shader is at all crisper, esp. with lower-resolution textures.
I did a sort of variation on that... ergo sometimes if you have a shiny object "A" say, it is hard to make a nearby object or background element "B" reflect on the surface the way you want. So in the case of these billiard balls (from the "Billiard Table" set - store link) I wanted some of the pool table to appear on the ball so I overlaid a rendering of it, onto the ball texture file. I also wrote my own numbers on the balls, and I warped that "text" to some degree as well.
Note that the "added texture elements" on the left ball need to be physically larger on the surface of the texture file. Also the "65" on the right ball is very low resolution. )-:
And as you may have noticed, the very low resolution does not result in crisper images, but rather makes for a more pixelated edge.
Ahhh... ok.... technically.... I was thinking that the lines created by the... wireframe shader might have been computed via... vector formulas instead of relying on a static (rasterized image file) texture.
If I'm not mistaken the most distortion that I've had with image-based... textures on a surface has been with "pill" or capsule shapes, eg. cylinder with half of a sphere at each end, or perhaps a V-shaped background that's gently curved where the floor changes to the far wall. I have not actually tried doubling the size of the texture (from 2048 pixels across to 4096, or to 8192 pixels from an existing texture that's 4,096 pixels across) but I'm sure that things get better when you do that.
Ergo (not sure if this makes sense) I would be generating the original texture via a vector graphics program of some sort. Like Adobe Illustrator or Corel Draw.
I looked up vector graphics just now and there does seem to be at least some validity to this. See this basic illustration on Wikipedia (which also incorporates a cylindrical object, eg. a glass bottle)... there's a lot more text that goes with this, including a reference to the PDF format - as in PDF uses vector formulas? I'm not sure how that would work! Perhaps for delineating the text.
The basic illustration also takes a little shot at the issue of misleading information and/or documentation. Heh.