Problem with Hair exported in Blender
 starkadh
Posts: 52
starkadh
Posts: 52
Hello, everybody. I recently tried to import a character of mine from DAZ studio to Blender with the addon DaztoBlender8.
I did it well, but - as expected - there are some materials to fix.
I'm not very good at nodes yet, but somehow I've managed to fix more or less everything except hair.
As you can see from the picture, it looks like the textures are somehow "eaten away". I suspect that something needs to be fixed in the transparencies, but I have no idea where to put my hands.
The hair are Heath hair for Genesis 3 Male&Female and they are composed by 3 layer. Hair 1, Hair 2 and scalp.
I think the problem is in Hair 2 and also the scalp gives me some problem.
Can someone who know both DAZ and Blender give me a hand?
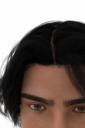
 Here is how in DAZ hair are
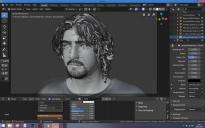
 This is the Blender rendering where you can see the hair problem
 Here the 3d model...
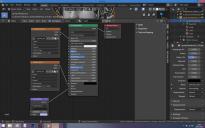
 And here the nodes into blender about hair

Daz 3D is part of 
Connect
DAZ Productions, Inc.
7533 S Center View Ct #4664
West Jordan, UT 84084
Licensing Agreement | Terms of Service | Privacy Policy | EULA
© 2025 Daz Productions Inc. All Rights Reserved.
Comments
Assuming you are using the Cycles render engine, the node setup is a bit lacking in a couple of respects.
It could do with texture coordinates and a mapping node connected to the vector inputs of the two images textures so that the UVs are correctly used to map the images to the model. See the example in the image attached, where I have used a checker texture in place of an image.
Also, it is possible that you need to invert the transparency map. It used to be I regularly had to do this with trans maps from Daz, but seems it is less often necessary lately. Still, if sorting out the texture mapping doesn't sort things out, this is worth a try. See the example in the attached image where I have inverted the gradient texture - it goes from black on the left to white on the right without the inversion. In Blender, black is transparent and white is opaque.
Lastly, the Normal Map is redundant at the moment because it has no image input, so either hook up the Normal map(s) or just delete it. Irrelevant to the transparency problem though.
Thank you veeeery much for the help. In any case, randomly changing setting I discover that he Color space of the transparence node had to set on "Non-color".
But now I have other issues. Sigh.
I don't know how to resize the whole model, nor how to set it to join it to other projects through "Append" command. Sigh.