Morph Loader Pro FUBAR’d Morph!
 Winthrod
Posts: 66
Winthrod
Posts: 66
I'm really hoping somebody here can figure out what's going wrong!
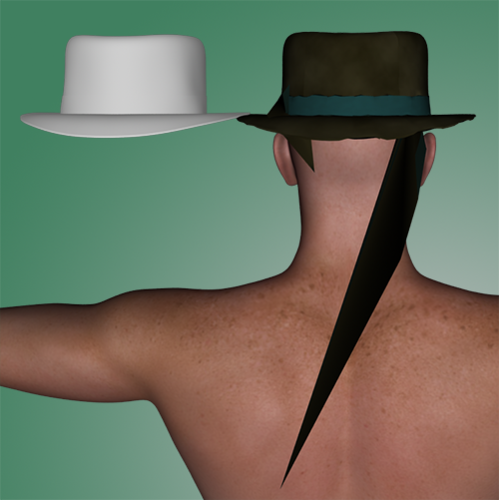
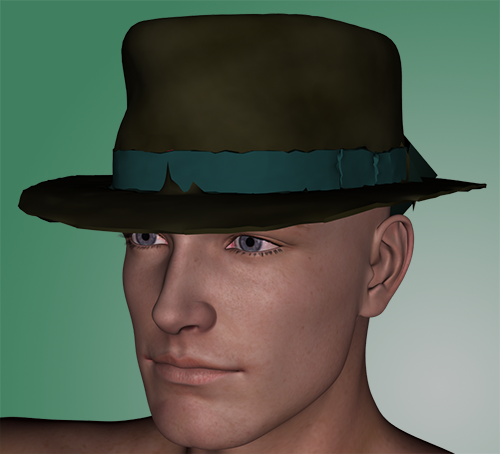
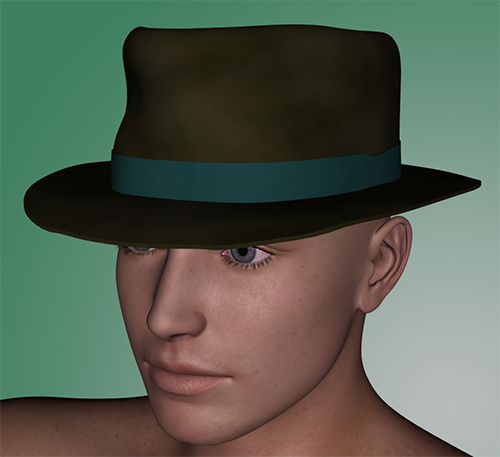
I'm working on hat for Genesis, you can see it in the first picture. The figure in the picture is the Genesis basic male figure. I'd really like the hat to fit all the Genesis characters. But when I scale the basic male figure to Michael 5 the hat goes all wonky, as you can see in the second picture.
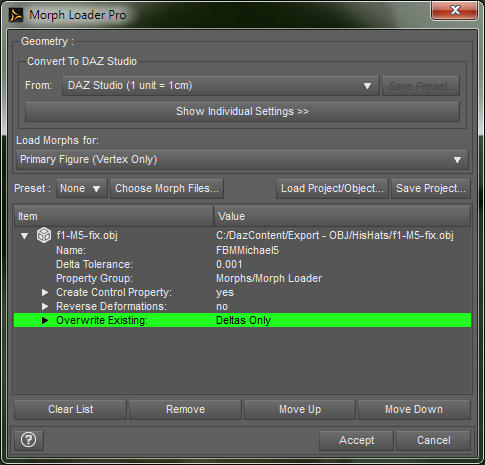
That just won't do. So, following the information I gleaned from this tutorial: DAZ Studio 4.0 CCT - Morph Clean-up Part 2, http://www.youtube.com/watch?v=O-SKYTOkVo4 I exported the original hat as an .obj file and fitted to the M5 figure and used the built in Morph Loader Pro plugin to fix the morph to M5. The Morph Loader Pro settings are picture 3 and I don't get any errors when I click Accept.
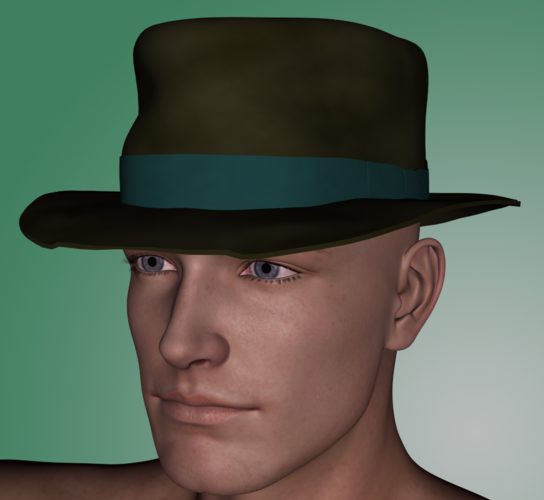
However, Power Loader Pro totally fubar's the morph .obj! As seen in picture 4. Picture 5 is a rear view of the fubar'd morph with the morphed .obj imported next to it. The one vertex that pulls down is way odd! What I really don't understand that when the .obj used for the morph is so smooth that the Morph Loader Pro turns it all jagged.
Can anybody possibly suggest a fix to this issue? Or does anyone have a better solution for setting up the dynamic FBMs for the base characters?
Daz 3D is part of 
Connect
DAZ Productions, Inc.
7533 S Center View Ct #4664
West Jordan, UT 84084
Licensing Agreement | Terms of Service | Privacy Policy | EULA
© 2025 Daz Productions Inc. All Rights Reserved.
Comments
I think if you change vertex order, when you modify the shape as morph.
if it keep vertex counts, you can load the obj as morph. but if you have changed vertex order of obj,
(eg you cut some vertexs then translate, and joint again, or you use tool of your modelor,
which change vertex order. )
it break, when you apply the morph.
And you may need to check your export and import setting of your modelor.
eg, if I use blender, I must need to check option to keep vertex order when import and export obj
to make morph.
then just to confrim,,
when you fit your hat to genesis, then apply FBMmicheal5,
M5 change root node scale to 103.8 % (Edited ^^;) by ERC of FBMmicheal5.
so that the hat change scale to 103.8% too.
If you keep the scale, when you export the Hat as obj to your modelor,
then modify and import morph , and overwrite morph which generate as FBMMicheal5.
it should double apply M5 scale size.
to avoid these scale problem , you need to export hat obj as genesis root node scale.
(turn scale to 100%) when you export the obj.
and modify it witch can fit well for M5shape 100% node scale., not actual Micheal5 scale.
(though I do not know you already adjusted the scale,
then it is not about the current problem)
kitakoredaz you are my new favoritest person!! :-)
I loaded the hat and increased the scale to the FBMMichael5 morph size and exported that to an obj. Then I brought it into my modeler program checked it against M5, it was a little off but I exported it right back and tested it inside Studio and the fubar stuff was gone.
I still need to go through and fit it to M5 but I wanted to let you know that your solution of scaling the hat up to the M5 value was the right thing to do.
Thank you again!
Not sure what happened now, but it's still fubar'ing the morph. :blank:
I'm trying to fix the dynamic morph for Genesis for a hat I have. The hat works just fine with the Basic Male character, but when I scale the character up to M5 the hat gets goofed up. I exported the hat to obj and fitted it to M5 hoping that will resolve the issue, but Morph Loader Pro messes up the hat even more. I've tried all different methods of fitting the hat to M5 and exporting to obj and nothing seems to work. Then I the idea that it's Morph Loader Pro might be causing the problems.
So as a test for Morph Loader Pro, all I did was move the hat.obj 2 cm forward, no scaling or moving of vertexes - nothing was done to the hat.obj, and that was the basis for the morph. As you can see by the picture Morph Loader Pro mucks up the hat in the middle, the white hat on the right is the obj I used for the morph, the original hat is on the left.
As a further test I used Hexagon to open the base hat's obj that was exported from DAZ. I moved the hat about 1 unit and exported a new obj. Back to DAZ Studio and opened the original hat and used the new obj from Hexagon as a morph - again the morph created from Morph Loader Pro mucks up hat, vertexes all askew.
My frustration level is beginning to reach epic levels and I really need some help with this. Any help or suggestions, such as creating a dynamic morph another way, would be greatly appreciated.
Merged duplicate threads - if you want this thread moved to DAZ Studio Discussion please ask rather than starting a new thread.
Richard, if you could please move it to DAZ discussions that would be great. Not getting a whole lot of response in Nuts & Bolts - which is quite disappointing. So, I thought I would change things up some and try a different approach in a different forum, just trying to find some help.
I'm trying to make something and become a PA but I can't seem to find any help for issues I'm having.
Hi,, winthord what version of daz studio you using now? At least about ds 4.6 current version,
I have not seen the prolblem,, so that there should be something wrong,,
then I think when you export the hat as obj from daz studio,how you set export option?
To making morph for daz studio,, always the option of import and export are very important.
I want to know, your export and morph loader setting.
And did you test with hexagon bridge ?
If hexagon bridge work for you, I think your obj export setting (from daz studio) has problem.
1. load only your hat.duf , then Mesh resolution level set to Base (no sub-D) in Parameters tab>General>mesh resolution.
2. select the hat only, then From top menu File> send to hexagon,
3, move your obj vertex in hexagon.
in daz studio , select the hat again,,
in hexagon , from menu "send to daz studio" (hexagon bridge)
4 Morph loader pro will open, set options like my pic.
5 it make morph in morph/morph loader. check the morph,,
if it work without problem,, may need to check your export option.
Then,, if the hat is your original how the mesh arranged?
if it mix tripod poligons, not quad, may cause such problem when morphed, I think.
and are not there floating vertex which not jointed to other poligons, then invisible,,
without intention?
when I export cr2 type old clothing as obj to blender,, I saw floating vertexes with obj export option.
Pic with wire shaded in daz studio, other user can check eazy, how your mesh are arranged.
and when apply morph, how vertexes move clear,, I think,,
I remember,, I had many problems and frastlated to get correct setting,, when start daz studio,,
I needed many try and test just to make simple moprh,, (daz do not offer clear documents
which guide about each option of CCT tool , I think.)
but once you get it,, it must work,,, so please test again with coffee or tea ^^;
Thank you kitakoredaz! I really appreciate your suggestions! I did learn something new. I did not know if you send a item to Hexagon via the Hexagon bridge from DAZ and adjust it and send it back DAZ using the bridge with the original still open that it would open Morph Loader Pro.
My version of DAZ Studio is 4.6.2.118, it should be the latest version - Install Manager doesn't have a newer version it wants to install. I also had DAZ check for updates and it didn't find any.
Okay, I'm going to try to start all over from scratch, and list the steps along way to see if you can spot any places where I need to change things.
--- Test One: 3D Studio Max Move Morph ---
1. Open up DAZ Studio
2. Bring in hat into the scene, the hat is the only item in the scene
3. Set Subdivision to Zero
4. Turn Interactive Update ON
5. Set Surface Angle smoothing to zero
6. Export hat as .obj file (export settings shown in first picture, since it was just for sizing/morphs I didn't export any material/surface information)
7. Import hat .obj file into 3D Studio Max (my modeler program, import settings in second picture) [Note: It turns out that the two sections are head and neck, with about 30 faces being part of the neck, I believe this if from the transfer utility and it did this when I set it to long hair. I thought that this was the reason for the morph issues but vertexes that are part of the head are also getting put out of whack. I will adjust the bones setup for the hat at a later date and see if that has any effect on things]
8. Moved the hat.obj 1 cm forward
9. Exported hat.obj as new obj for morph test (third picture. Again, just for sizing/morphs so no material information included and export done in quads)
10. Back to DAZ and open Morph Loader Pro
11. Select moved obj for morph, with not changing the name of the morph and making unique for test purpose (settings shown in fourth picture)
12. Morph created successfully
13. Test morph
Morph pooched >:-(
--- Test Two: Hexagon Move Morph via Hexagon Bridge ---
1. Open up DAZ Studio
2. Bring in hat into the scene, the hat is the only item in the scene
3. Set Subdivision to Zero
4. Turn Interactive Update ON
5. Send hat to Hexagon via bridge
6. Moved the hat.obj 1 cm forward
7. Send hat back to DAZ via Hexagon bridge
8. Morph Loader Pro does not open, an Actions dialog box opens, not sure what's up with that. (see below)
9. Test morph
Morph pooched >:-( Although not as bad as before, but still pooched.
--- Test Two, part two: Hexagon Move Morph saved as obj ---
For grins and giggles (grimacing and groaning actually) from Hexagon I exported the hat that I moved 1 unit forward as an obj file and just to test morph it. The settings are below. And once again Morph Loader Pro pooched the morph. >:-( What's really weird though is that the morph goes up and down in DAZ, instead of the forward and back that the morph was moved in Hexagon.
If anyone can explain that one I would sure love to hear it.
Also, I thought I would relate the process I used to create the original hat. It is as follows:
1. Export Genesis Basic Male to obj file
2. Import basic male obj into 3D Studio Max
3. Model hat around basic male figure. (Note: I started with an eight sided cylinder and for the most part just used smoothing iterations and pushed and pulled vertexes around to create shape - everything done in quads with no errant vertexes running around.)
4. Create UV for hat
5. Export hat as obj
6. Open basic male duf in DAZ Studio
7. Import hat to DAZ Studio
8. Send basic male and hat to Hexagon, via Hexagon bridge, for creating Surface Materials and final tweaking (Note: For some reason material groups don't carry over from 3D Studio Max to DAZ Studio and I have to recreate them in Hexagon.)
9. Send hat back to DAZ using Hexagon bridge.
10. Delete stupid def_sur_mat
11. Open new basic male .duf
12. Using Tranfer Utility fit hat.obj to basic male with Long Hair Projection Template (Note: I tried no projection template but then when I change expressions on character it moved the hat with them)
13. Set hat as a Follower\head and Default\Wardrobe\Headgear
14. Created material presets for different looks for hat.
15. Scaled basic male to M5 and hat deformed leading to current issues.
Any suggestions for refinement would be greatly appreciated.
Additionally, here is the wireframe of of the hat you requested. It is all quads.
Um, hmmm ....
well ...
let's see ... have base figure in D/S
import hat.obj
Make it a clothing piece.
Save said clothing piece.
Delete and load new clothing piece.
Fit to or plant it on the base figure.
Dial the figure to next character for sizing.
Send that character over the bridge to Hexagon.
In D/S dial the figure back to the base.
De-select the figure.
Select the hat.
In Hexagon, using the uv & map brushes to smooth or puff, and/or manually selecting and moving some face normals/vertices around "gently", make the required adjustments so the hat looks nice on the morphed figure. Helps to "freeze" the person figure so it's not accidentally selected and changed.
Do NOT do anything about the Shading Domains, materials as they appear, etc. at all. If you make changes, the morph will not happen.
The first hat.obj should have been already cleaned up ready to make clothing. If it wasn't, that has to be done first and then the clothing piece remade.
When done, in Hexagon be sure the "hat.obj" is selected and send it over the bridge to D/S.
The morph dialogue box [I'd suggest using the Advanced option - Edit > Preferences > something about the Hexagon bridge > Advanced] comes up.
Name the morph with its very own morph name. ie. Hat-Fit_M5
I have screen shots for how I make morphs in my tutorials over in my DA Gallery.
Dial up the morph and it should be working just fine.
Dial the morph back to "0" and save it.
Close Hexagon.
"Fit to" the base hat to the base figure. Select the base figure and dial up the next figure.
Send it over the bridge to Hexagon.
In D/S dial the figure back to base, de-select that figure and select the hat.
In Hexagon repeat the exercise for the next morph.
After saving a morph or two, delete the hat from the scene and load a fresh hat.
The morphs should be appearing on the Parameters right where you left them.
I haven't tried this with a hat ... but it works for other clothing pieces
Can you see the strange effect, when you use ds default hair or clothings for genesis, then make simple morph just for test?
if it is setting problem(morph loader, or import export,,smooth modifier etc,, , when use other hat or wear,
it may happen too.
if the problem happen about your hat only,, you can concentrate about your hat,,, I think,,
This might not have a thing to do with it but have you checked to see if all the normals are facing the proper direction(s) on all the mesh? It's very easy to end up with flipped normals if the obj was rotated to edit instead of the view getting rotated.
I had to step away from this for a while - then life happened and getting back to it was a challenge, but I figured out what I was doing wrong. There were two things wrong:
First off, I had WAY too may vertices in the hat. In looking at most of the hats I have, they were around 3-4K vertices. My hats were over 7K, so I had almost double the geometry.
The second problem I noticed that the hats were essentially one sided, whereas I was making my hats with a full inner lining, a fully shelled 3D object. None of the other hats did that, if the brim was thick it just went in to the head, it didn't fully go in where you couldn't see the inside.
By halving the geometry and eliminating the inner lining morphs now don't make the hat go all wonky! :-)