Problem with Rigging Orig Figures in DS4Pro Tut
 franontheedge
Posts: 342
franontheedge
Posts: 342
I have a problem with this tutorial.
On page (either 26 or 30 depending on if it’s a number actually printed on the page (26) or the page number that’s in the thumbnails list on the left - then it’s 30)
The instructions say to:
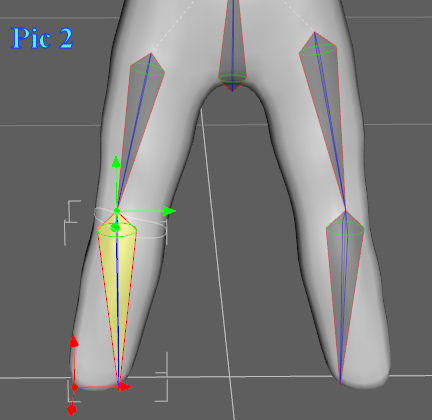
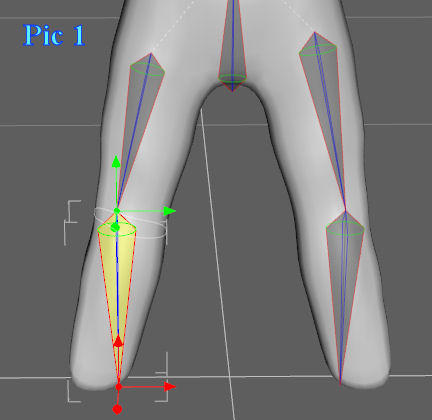
“Now, on the shin bone, move the end point so that it is centered at the bottom of the shin, and align that bone as well.”
Well I selected the shin bone, but when I tried to move the end point at the bottom of the shin, (where the foot would be if the figure had a foot) a red axis thingie moved but the bone did not.
See Pics 1 & 2.
I tried moving the top of the shin bone, it did move but that’s clearly not the bottom - I’m so confused…
How can I move the bottom of the shin bone? Help?
Daz 3D is part of 
Connect
DAZ Productions, Inc.
7533 S Center View Ct #4664
West Jordan, UT 84084
Licensing Agreement | Terms of Service | Privacy Policy | EULA
© 2025 Daz Productions Inc. All Rights Reserved.
Comments
Having moved the end point you then need to click the Align button in Tool Settings, which should already have been covered by the way the excerpt is phrased.
while I bought Blondies book I actually do not use her method but one described in a Daz video on adding bones to clothing
only I simply take an imported obj convert prop to figure under edit
then add and name childbones to the created hip using the auto align option enabled
memorize rigging
after that I weightpaint it with the brush according to where the bones are
then save as support asset
for Genesis clothing this works well in combination with transfer utility and also autofit as the original Daz tutorial was aimed at where extra bones for skirt movement etc are needed.
just sharing as this in combination with the tute that does it the traditional way legacy figures are made might be helpful
my preffered method is closer to what I do in carrara but since this is weightpainting, the polygon editor is really not needed to create zones like traditional rigging
Oh you mean the fact that moving the end controller doesn't actually move the end point itself - is SUPPOSED to happen???
Good grief!
I'd stopped at that point because I thought I'd done something seriously wrong.
I've never done any rigging in DS before you see - and in C4D where I HAVE, moving the 3 axis controller actually moves the end point of the bone - at the same time!
And to align (in C4D) is talking about rotation, not movement, so this is very confusing.
Thanks for clearing that up.
It might have, so I thank you for the thought, but as I said I don’t think it will as I'm wanting to rig a totally original figure. (or rather (in the end) seven of them.)
Now I know about weight painting since C4D uses this to assign the areas of influence that a bone will control and you can remove such areas from places that you don’t want the bone to have influence over – for instance I rigged the legs of my FrozenPea character in C4D, but FrozenPea has a selection of very long icicles hanging down rather like a skirt, but I didn't want the leg movement to also involve icicle movement, weight painting – both painting them on and painting them off – solved this beautifully.
But I don’t really understand what the Polygon Editor is – except that in DS this is where I am currently following this tutorial... is this traditional rigging? What isn't traditional rigging?
And lastly what's rigging like in Carrara? Would you say it's easier than in DS? Is that the rigging in Carrara7Pro? Or are you meaning just in Carrara8?
(I only have Carrara7Pro, and can’t afford 8)
But I'm hunting around for the best program to do this animation in, if I can do the rigging in the same program (easily) then that would be great, but if the rigging in C7Pro isn’t as good as in C8, then I'd like to know that and if animating in Carrara7pro isn’t a good idea then I'd like to know that too.
I hadn't thought about Carrara at all, I was just weighing up if DazStudio or Blender would be best.
But I need to animate limbs and expressions – talking too if I can manage it.
Yes, Blondie has a couple tutorials
carrara rigging will not work in Daz studio or Poser
but I do use it in iClone and have gotten it into Unreal, Unity and Blender via fbx or collada for the last
I meant rigging an original figure and indeed was the sash video I refered to
that video gave me the idea to try my carrara style workflow and it worked
will add a link
here we go
https://www.youtube.com/watch?v=N56wo8iHM-Q
I used triax weight in that one, an early go, but general weight works better and is easier
was video response to a Blender user
Oh you mean the fact that moving the end controller doesn't actually move the end point itself - is SUPPOSED to happen???
Good grief!
I'd stopped at that point because I thought I'd done something seriously wrong.
I've never done any rigging in DS before you see - and in C4D where I HAVE, moving the 3 axis controller actually moves the end point of the bone - at the same time!
And to align (in C4D) is talking about rotation, not movement, so this is very confusing.
Thanks for clearing that up.
The end point (the red circle with axes) should be moving, and is in your screenshot, but the bone doesn't automatically snap to it (unless you turn AutoAlign on). Moving the centre point (green circle with axes) does move the whole bone.
Yes I know, including the one I am talking about at the top of this thread.
And one I have no interest in because although it is called 'Advanced Rigging' it is only for people who wish to work with Genesis or morphs etc to do with Genesis or derived from that mesh. Not for rigging original figures. (Or so I understand.)
Or did you mean more rigging tutorials other than these 2?
Does Blender rigging work in DazStudio?
Oh the roebuck, yes I've seen that one too - shame about the ears. Was that fixable?
Would using 'general weight' whatever that is, mean that you could have rigged that buck and the ears wouldn't have been a problem?
The end point (the red circle with axes) should be moving, and is in your screenshot, but the bone doesn't automatically snap to it (unless you turn AutoAlign on). Moving the centre point (green circle with axes) does move the whole bone.
Yes, I got that from your last post - but that's not obvious if you don't know that. And that's why I was so puzzled. Really thought I'd broken something somehow.
no Blender rigging does not work in Daz studio.
only Daz studio and Poser rigging does.
you might be able to get a collada export to work in carrara if you are lucky.
not FBX
C7pro exports FBX ok to other nonDaz/Poser apps but is not so great importing tends to mangle most.
C8.5pro much better ar that.
the roebuck worked after saving as an asset
unsaved it tended to have the vertex pull effect morand yes general would have been much easier.
the rigging tutorial is very kind and easy to follow for most of new users.
She clearly mentioned many times , we need "Align node"
she adjust shldr node, ,
Click on the rShldr part (A). Use the translation arrow to move the starting point of the bone up a little (B). You will notice that the end point is no longer aligned; right-click on the bone and select “Align” and “Align Node.” The bone will now be properly aligned (C).
then adjust hip, she mentioned again
Align the bone (right-click> Align> Align Node.) then
after that, she adjust shin bone, as you moved.
move the end point so that it is centered at the bottom of the shin, and align that bone as well.
If you follow what her mentioned one by one, you must find,, you need "Align">"Align node"
after you move node end points.
I usually just follow the step which written in document, when learn from it.
Sorry all, but I seem to be having a problem again.
Thanks to Richard's clear information I've now finished the bone and joint manipulation and have saved the file after doing the 'memorise figure rigging' as instructed.
The tut then went into a bit of a ramble with Genesis, explaining weight mapping and changing the view if you don't have an Nvidia card. (I do, so I don't need to do that.)
However although the tut says things are similar in weight mapping to the polygon group editor... at no point does it actually tell you how to find the weight mapping editor, or how to move to that section.
It just goes on and tell you what to do once you are in it...
The next instruction just says:
5.2.2 The “Fill Selected Faces” Tool
The Fill Selected Faces tool is used to “fill” a selected area with weight mapping. To access it, right-click on the figure in the viewport and select “Fill Selected Faces.”
Of course because I'm still in the polygon group editor there IS no 'fill selected faces' when I right click on the mesh.
I've had a look around but I can't see a 'weight map editor' anywhere nor can I see a 'fill selected faces' tool either, so I'm a bit stuck.
Help?
The tool's name has changed, now that we can can edit the weight maps for DForms as well as for bones. You want Tools>Node Weight Paint Brush.
Okay thanks Richard.
(sorry for late reply, I've been trying to investigate rigging in Carrara.)